Установка macos на virtualbox
Содержание:
- What You’ll Need
- How to Run Windows 10 on Mac with VirtualBox for Mac OS X
- 1. Mouse and Keyboard not working in macOS VirtualBox
- Настройка эмулятора и запуск установки
- Давайте кратко: как установить Mac OS X на iPad и есть ли смысл
- Николай Грицаенко
- Summary
- Создание виртуальной машины VirtualBox
- Чем полезна виртуальная машина для Windows на Mac
- Загрузка, установка и настройка дистрибутива
- Для начала придётся установить альтернативный магазин приложений AltStore
- Download and Install VirtualBox
- Установка и запуск OS X Yosemite
- Настройка оборудования
- Установка виртуальной машины UTM на мобильное устройство Apple
- Edit the Virtual Machine
- Installation Steps
- Экспериментальная поддержка
- Everything You Need to Get Started with Installing macOS on VirtualBox
- How to Create Your macOS Virtual Machine
What You’ll Need
First, you’ll need to download a copy of Oracle VM VirtualBox. You’ll also need an ISO image of the macOS version you want to install.
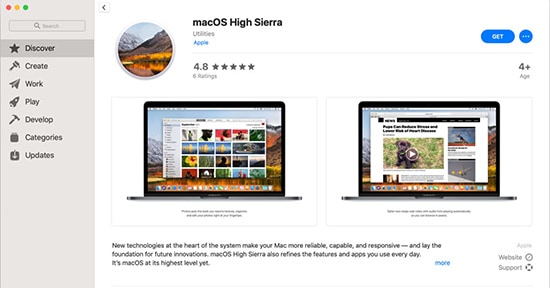
Getting hold of an ISO is actually more difficult than you might expect. If you have access to a Mac, you won’t be able to download a copy of the OS you already have installed. If the Mac is running macOS Mojave, open the macOS High Sierra page in the App Store and download the installer from there.
You will need to convert this APP file to a DMG and then convert from a DMG to an ISO in order to be able to install it in VirtualBox. A less complicated, but also less secure, option is to search for an ISO of your desired version of macOS online. There are plenty of sites that have them, but downloading an ISO from an unofficial site does come with a level of risk.
How to Run Windows 10 on Mac with VirtualBox for Mac OS X
Now that you’ve got the software components necessary to run Windows 10 in a virtual machine, let’s run through the installation process:
- Open VirtualBox and click on the “New” button to build a new virtual machine
Name the new virtual machine “Windows 10 VM” (or something equally obvious), select “Microsoft Windows” as the type and choose “Windows 10” as the version, then choose Continue
Select to create a new virtual hard drive, then choose Continue again
Back at the primary VirtualBox screen, choose “Start” to boot the new Windows 10 volume
Since there is no drive or OS installed yet, you will be asked to choose a virtual optical disk, click on the Folder icon and choose the Windows 10 ISO you downloaded earlier, then click “Start”
In a moment or two you’ll be in the Windows 10 installer, select your language and click “Next”
Go through the standard Windows 10 installation experience, this can take a little while but eventually you’ll create a user account, select a user name, and do some basic Windows configuration
When setup is finished, Windows 10 will be running in VirtualBox, right on your Mac – yes this is a full featured version of Windows
When you’re finished, quit VirtualBox like any other application and Windows 10 will shut down. When you want to run Windows again in Mac OS X, just launch VirtualBox again, select your Windows 10 virtual machine, and click the “Start” button to boot Windows in the app. Easy, right?
Yes, this is a complete version of Windows 10. These preview builds expire eventually when the final version comes out from Microsoft, but there is some speculation that they may make Windows 10 free. Regardless, when the final version comes out you’ll be able to install it and run within VirtualBox the same way as outlined above.
Keep in mind this is a virtual machine, which basically means the VirtualBox app is functioning as a virtual computer on top of your existing Mac. This undoubtedly impacts performance, which is part of why the more resources the computer has the better the experience, so you’re not going to want to be using this for trying to play some wild Windows games in Mac OS X. Nonetheless, this is more than sufficient for basic Windows tasks, using Windows apps like Internet Explorer, or just to get a feel for Windows 10. For a true native Windows experience on a Mac, you’d want to install Windows with Boot Camp as a side-by-side bootable operating system, we’ll cover that separately here if that interests you.
If you’re enjoying this VirtualBox experience, you may be pleased to discover that you can run many other operating systems in the virtual machine environment as well. If you want to try Linux, you can run Ubuntu on your Mac with VirtualBox, or many versions of Internet Explorer in different Windows VMs, Windows 8, even Android 4, older versions of Mac OS X like Snow Leopard, and much more, you can explore our VirtualBox section for more.
If you get tired of Windows 10, you can either delete the virtual machine from within VirtualBox, or remove the Windows .vdi file (the virtual disk image) from your hard disk manually. Keep in mind that if you delete the VM, any files that you created in Windows will be removed as well.
1. Mouse and Keyboard not working in macOS VirtualBox
When you will install the macOS for the first time in VirtualBox. You will find that the Mouse and Keyboard will not work and it will stuck on one place. Therefore, for make the mouse and keyboard to work follow these steps below.
Step 1: Download the Extension Pack
Download the VirtualBox extension and you can find that on VirtualBox download web page. Therefore, you have to visit the page and click on the latest version of the VirtualBox Extension Pack.
Step 2: Start Installation
When you have downloaded the Extension. Then you have to double click on it. Further. there will be a pop-up message showing the features of the extension pack. If you want read everything and at last click on Install.
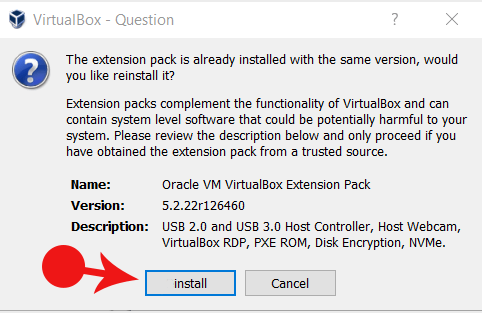
Extension Installation
Step 3: License Agreement
In this step, it will ask about the agreement. Just scroll down and Click on Agree.
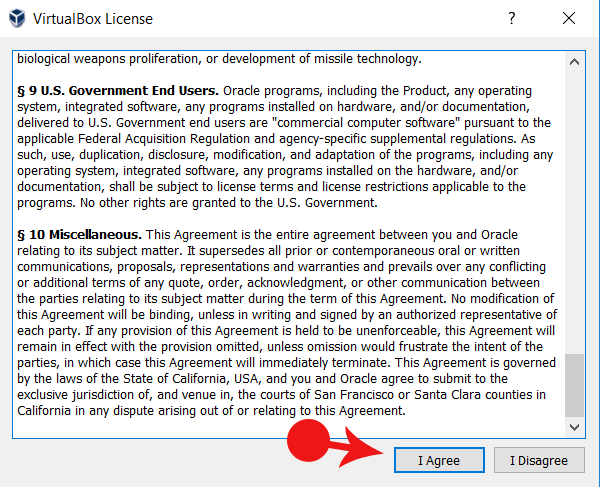
Extension Agreement
Finally, the installation will start. In few minute the installation will complete and a message will come with successfully installed. You have to press on OK.
Step 4: Configure VirtaulBox for mouse and key to work
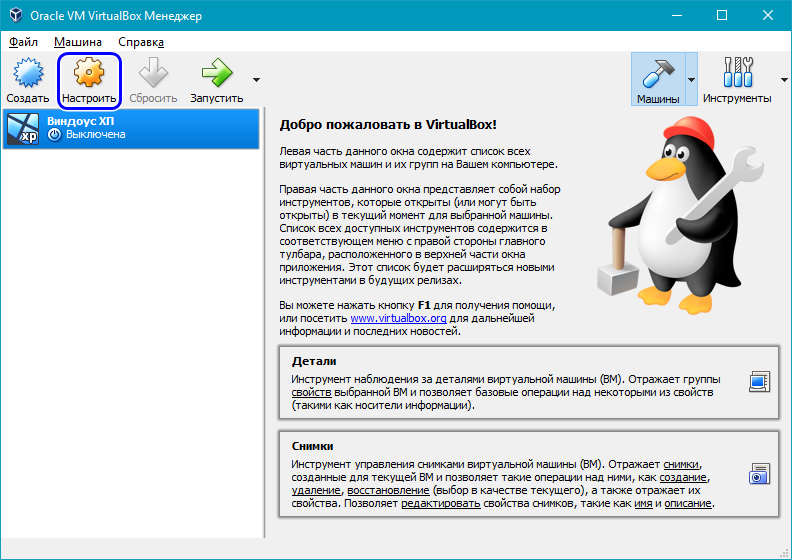
1. In this step you have to come to Setting in main VirtualBox. And click on it.
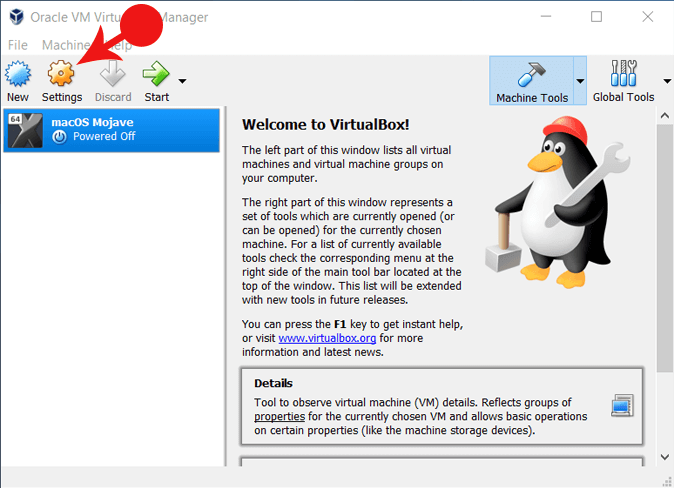
VirtualBox Setting For mouse
2. Next you have to click on USB on left hand side. And on the right you have to click on USB 3.0 (xHCI) Controller. Finally, Click on OK

USB Setting Mouse & Keyboard
Now your both keyboard and mouse will work fine on macOS 10.14 Mojave.
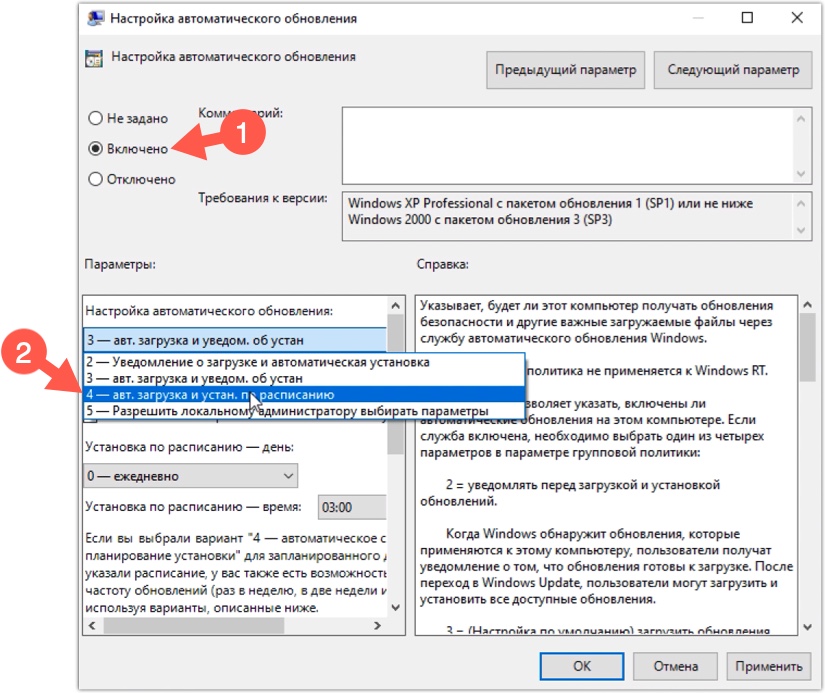
Настройка эмулятора и запуск установки
Запустите Virtualbox и выполните следующие настройки:
в главном окне нажимаем на кнопку «Создать»;
указываем название виртуальной машины, выбираем тип Mac OS X, версию 64-bit;
создаем новый виртуальный жесткий диск — VHD;
формат хранения указываем динамический (т.е. объем будем меняться в зависимости от количества информации на нем);
вводим название для нашего диска и его начальный размер (обычно 20-30 гигабайт);
- новая виртуальная машина создана, переходим в её настройки;
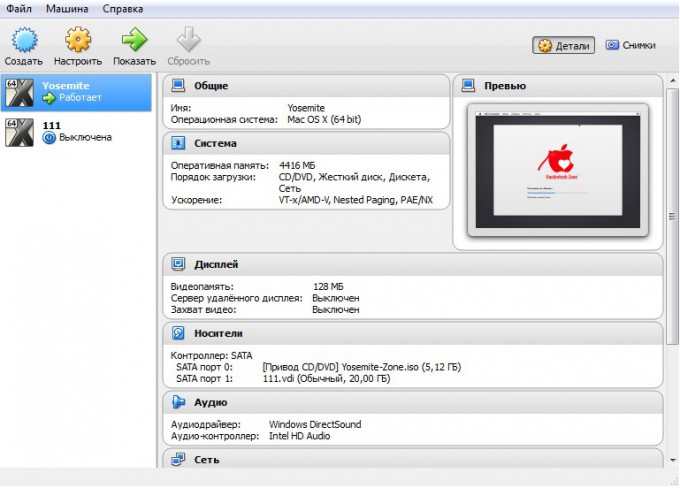
- во вкладке система приводим все к такому виду;
в меню настроек дисплея указываем объем видеопамяти в 128 мб;
в пункте «носители» убираем выбираем виртуальный оптический привод и указываем образ системы для него;
далее запускаем командную строку Windows (Win+R / cmd);
вбиваем поочередно команды из файлика, не забывая указать свое имя виртуальной машины;
в меню virtualbox нажимаем на кнопку «запустить», после этого последует процедура запуска виртуальной машины и установки системы из образа, по времени занимает около 5 минут;
Если процесс будет выдавать ошибку или все время повторяться, проверьте правильно ли вы вбили команды или попробуйте вбить их при закрытой программе VirtualBox.
делаем русский язык основным для системы и переходим на следующую вкладку;
здесь перед тем как продолжить нужно подготовить наш диск, для этого нажимаем на вкладку утилиты в верхней части экрана;
выбираем дисковую утилиту;
отмечаем наш виртуальный жесткий диск и нажимаем стереть;
вводим произвольное имя диска, формат OS X Extended журнальный, схему не трогаем и нажимаем на кнопку стереть;
закрываем дисковую утилиту и продолжаем установку, выбрав наш виртуальный hdd.
Далее следует обычная установка системы, ничего сложного, просто указываете данные которые попросит установщик и нажимаем «дальше».
В итоге получаем готовую систему Mac Os X на VirtualBox!
Теперь вы знаете, как установить мак ос на виртуальную машину.
Иногда возникают некоторые неисправности, которые связаны с несовместимостью. Дело в том, что при установке на эмулятор Мак ОС некорректно воспроизводит звук и графику. Исправить эту проблему можно с помощью MultiBeast. Установите ее через Мак ОС на Virtualbox.
https://youtube.com/watch?v=Y2Lie2alEwI
Давайте кратко: как установить Mac OS X на iPad и есть ли смысл
Во-первых, нужно скачать образ Mac OS X 10.5 Leopard или старее в формате ISO, который будет устанавливаться на мобильное устройство. Для работы системы потребуется от 23 ГБ свободного места в хранилище (15 ГБ на виртуальную машину и 8 ГБ на образ).
Во-вторых, нужно установить альтернативный «магазин приложений» AltStore и платформу виртуальных машин UTM, которая будет запускать и хранить данные Mac OS X.
В-третьих, нужно создать виртуальную машину с заданными параметрами, отформатировать хранилище для системы и файлов, произвести установку операционной системы. На все про все потребуется от двух часов (на iPad 2019 года у меня это заняло около 3–4 часов).
В итоге Mac OS X на iPad (или iPhone) можно использовать, но не очень полезно или удобно. Система работает медленно и не поддерживает современный софт.
Тем не менее, в качестве ностальгического триггера — ничего так затея на выходные.
iPhones.ru
Нашел способ обмануть систему: на все нужно от двух часов.
Николай Грицаенко
Кандидат наук в рваных джинсах. Пишу докторскую на Mac, не выпускаю из рук iPhone, рассказываю про технологии и жизнь.
Summary
Basically, in this article, I’ve shown you the step by step pictorial guide on how to install macOS Big Sur on VirtualBox on Windows computer. After reading and following this guide, you should have done the following;
- Downloaded VirtualBox with its Extension
- Installed VirtualBox on your system
- Installed & upgraded VirtualBox extension
- Created a new virtual machine for macOS Big Sur
- Customized macOS Big Sur VM
- Executed the VirtualBox code to the CMD
- And finally performed a clean installation of macOS Big Sur.
Related: How to install macOS Big Sur on VMware on Windows.
We are ready to keep receiving your feedback about this article, and other posts on wikigain. Your suggestion and feedback are highly appreciated.
Warning: All the content of this site is copyright protected, and no-one has the right to copy-paste our materials.
Создание виртуальной машины VirtualBox
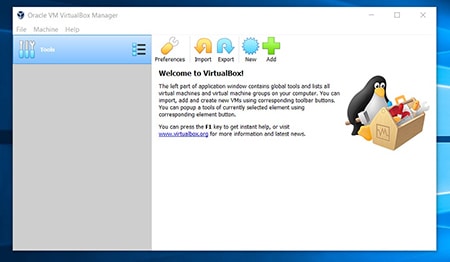
- Запускаем VirtualBox и нажимаем по кнопочке New. чтобы создать новую виртуальную машину.
- Даем название, выбираем тип и версию системы. Название может быть любым, но разумно указать что-то близкое к реальности.
- Указываем, каким размером оперативной памяти вы готовы поделиться с гостевой системой. macOS Sierra требует минимум 2 Гб, но я поставил больше.
- Создаем новый диск для системы.
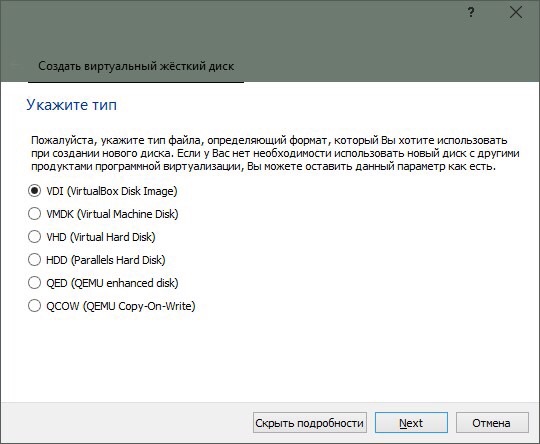
- Выбор типа диска.
- Выбираем фиксированный размер диска. Надеюсь, что так действительно будет быстрее работать, как и обещается в объяснении на скриншоте. Динамический размер хорош тем, что изначально занимает меньше места и будет увеличиваться по мере надобности, но вот сам уменьшаться он уже не будет.
- Указываем название и размер диска. Собственно для системы требуется 8.8 Гб, плюс для установки программ и на всякий случай.
- Ждем, пока закончится процесс создания виртуальной машины.
Чем полезна виртуальная машина для Windows на Mac

«Виртуалкой» называют виртуальную машину. Это особенное программное обеспечение, которое нужно для запуска дополнительной операционной системы внутри базовой. Она подходит, чтобы использовать Windows в пределах macOS.
Такой софт дает возможность создать новый компьютер на базе старого. Даже технические характеристики выбрать получится. Но не нужно думать, что для работы с виртуалкой нужна сильно производительная машина. Даже мой MacBook Air 2019 справляется.
Есть несколько виртуальных машин, которые подойдут для установки дополнительной ОС на Mac. Про альтернативы расскажу в конце, а сам использую VirtualBox. Это бесплатное решение от Oracle, которое работает на macOS и поддерживает Windows. Этого достаточно.

С помощью VirtualBox Windows на Mac можно запустить в отдельном окне. Настройка виртуальной машины и установка дополнительной системы при этом не займет больше 30 минут. Почему бы не попробовать? Не вижу причин.
Кстати, с помощью VirtualBox приложения для Windows можно использовать и на Linux. Проходить требовательные AAA-игры так получится вряд ли. Но с обычным софтом данный прием сработает. Главное, не «промазать» с настройками.
➤ Скачать VirtualBox (бесплатно)
Загрузка, установка и настройка дистрибутива
1. Загружаем дистрибутив с официального сайта. Нам нужна VirtualBox 4.3.26 for Windows hosts.
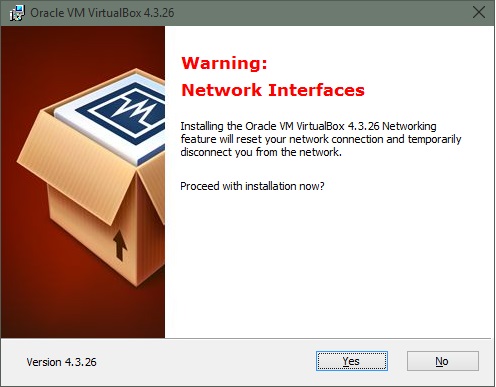
2. Во время установки программа вас оповестит о том, что ей требуется установить некоторые патчи для сети, чтобы интернет мог работать на виртуальной машине. Нажимаем “Yes” и ждём окончания установки утилиты.

3. После установки открываем программу и мы видим окно приветствия. Нажимаем кнопку «Создать». Перед нами появляется окошко первоначальной настройки будущей операционной системы.
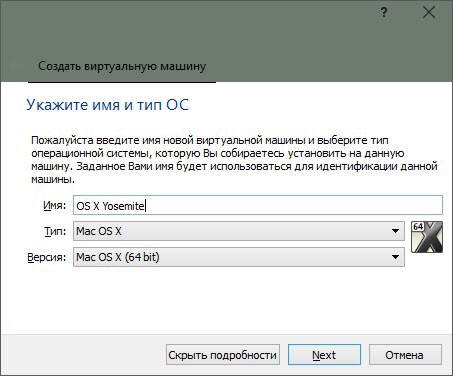
4. Называем нашу виртуальную машину и указываем тип OS X (32 bit/64 bit на выбор).
Памятка: если вам нужна будет «ось» для дальнейшего пользования и у вас 64-битный процессор, то не выставляйте настройки под 32-битную систему для 64-битных приложений. 64-битная ось медленнее запускает 32-битные приложения (OS X Yosemite работает исключительно на х64 процессорах).
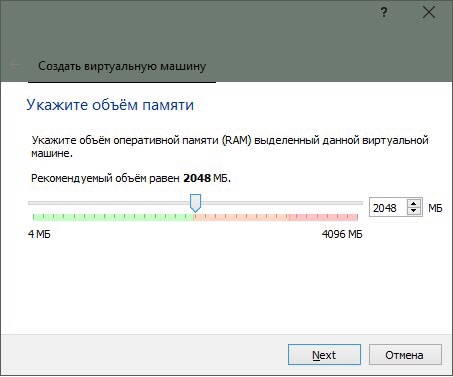
5. Указываем, сколько требуется оперативной памяти для системы. По-хорошему, ей нужно не более 4ГБ ОЗУ, но можно и больше, в зависимости от ресурсов вашего ПК. Я задал 4 ГБ.
6. Нам также потребуется создать виртуальный жёсткий диск для нашей будущей машины. Именно на нём будут храниться все файлы ОС и всё то, что вы на ней будете создавать. Он берёт от физического «харда» лишь часть, размер которой вы задаёте сами. Выбираем первый пункт и идём дальше.
7. После этого заходим в раздел «Настройки->Система» и отключаем там EFI.
8. Теперь остается лишь запустить на ней OS X Yosemite. Нажимаем «Запустить» и в открывшемся диалоговом окне выбираем необходимый образ.
Памятка: для пущей верности можно задать для программы эмуляцию ноутбука от Apple. Открываем командную строку Windows (cmd.exe) и вставить:
1. cd C:\Program Files(x86)\Oracle\Virtualbox\ (стандартный путь установки)
2. VBoxManage setextradata *название_вашей_виртуальной_машины* VBoxInternal2/SmcDeviceKey “ourhardworkbythesewordsguardedpleasedontsteal(c)AppleComputerInc”
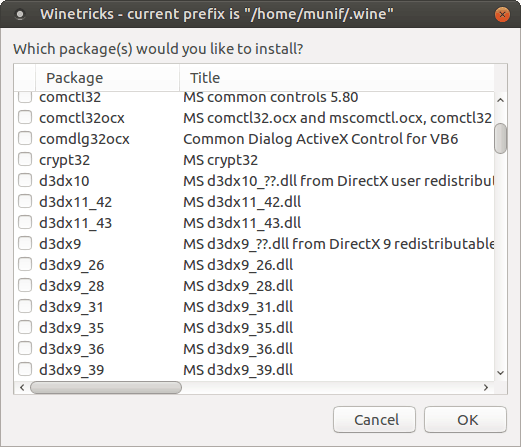
Для начала придётся установить альтернативный магазин приложений AltStore
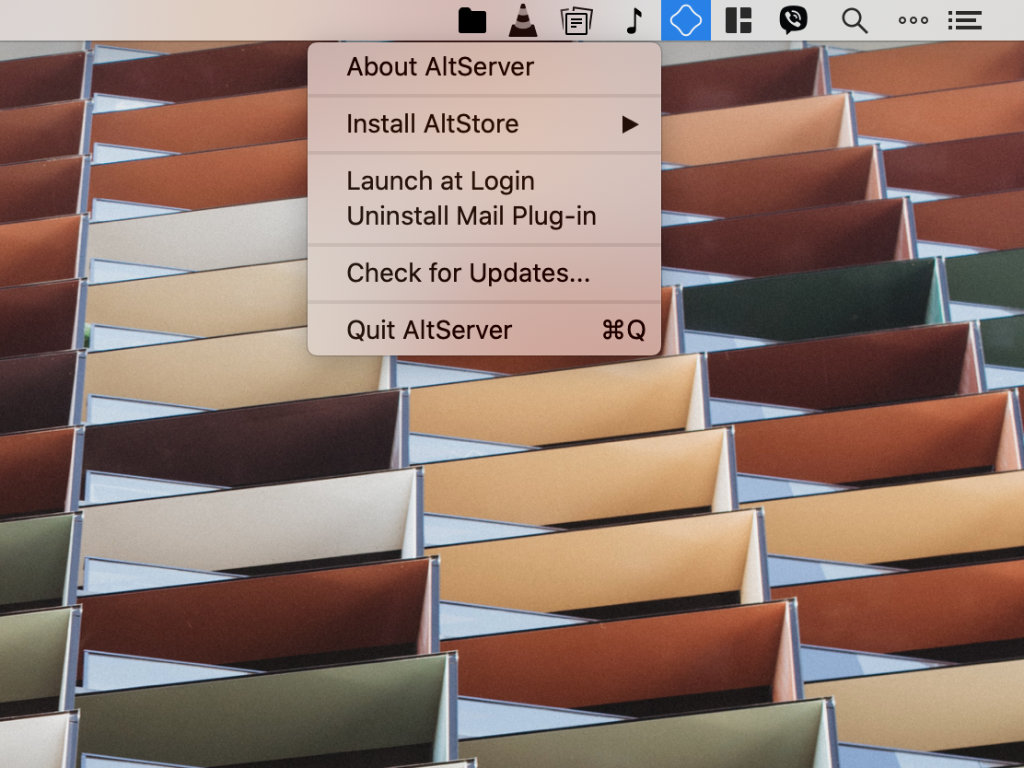 Во время манипуляций с AltStore на компьютере должен быть запущен AltStore Server: на Mac он «живет» в строке меню
В конце 2019 года разработчик Райл Тестут запустил AltStore, новый способ установки софта на iPhone и iPad, который тут же прозвали альтернативным магазином приложений. Но его полки не ломятся от программ и игр, поэтому я бы скорее назвал его платформой для установки софта без взлома через Jailbreak.
Утилита использует важную особенность iOS и iPadOS – установку приложений через систему сертификатов Xcode, среды разработки приложений.
️Повторюсь, метод абсолютно не официальный, приложение не проверено, и действия далее — под ответственность интересующихся.
Шаг 1. Скачайте AltStore Server для Mac или PC² (это бесплатно).
Шаг 2. Установите AltStore Server на компьютер стандартными средствами.
Шаг 3. Подключите iPhone или iPad к компьютеру с помощью кабеля: если нужно, введите код-пароль, чтобы авторизовать Mac или PC.
Шаг 4. Запустите AltStore Server и выберите возможность Install AltStore.
Шаг 5. Следуйте инструкциям на экране³ и дождитесь установки AltStore на мобильное устройство.
² — если вы используете PC, на него должны быть установлены iTunes и iCloud с официального сайта Apple, и в iTunes должна быть активна возможность синхронизации данных через Wi-Fi
³ — если для установки AltStore вы используете Mac, в процессе AltStore Server предложит установить плагин для «Почты», который пригодится в работе платформы
Download and Install VirtualBox
To run Windows on a Mac, you need to use virtualization software such as VirtualBox. While there are other options available (such as Parallels and VMware Fusion), VirtualBox is free. And while Bootcamp is also a free option, it doesn’t let you run macOS and Windows simultaneously (you have to reboot the machine every time you want to switch to the other operating system). So with VirtualBox you get the best of both worlds — it’s free, and it allows you to run both Windows and macOS simultaneously so you can switch between them as required without having to reboot.
-
Go to the VirtualBox download page and click OS X Hosts.
-
Install VirtualBox
Double-click the VirtualBox.pkg icon to install VirtualBox. This will enable you to run VirtualBox from your Applications folder.
Установка и запуск OS X Yosemite
Итак, наша система загружается.
1. Выбираем русский язык и переходим к следующему шагу – настройке жёсткого диска для «операционки». Так как он создается изначально в файловой системе NTFS (которая не работает с OS X), нам придется немного «пошаманить».
2. В верхней панели заходим в «Утилиты->Дисковая утилита». В левом крае экрана выбираем наш новоиспечённый жёсткий диск, на который будет производиться установка, затем в правой части окна открываем вкладку «Стереть» и стираем диск. После этого в нём будет создан чистый раздел под ОС.
3. Переходим в верхнем «тулбаре» обратно в установщик (нажимаем на «Дисковая утилита» и выбираем «OS X Installer») указываем только что отформатированный под наши нужды «хард», жмём «Продолжить» и ожидаем окончания установки.
4. И вот, момент истины – OS X Yosemite готова к работе! Пропускаем этап авторизации через iCloud, задаём логин/пароль для пользователя и, пожалуй, на этом всё.
4.005
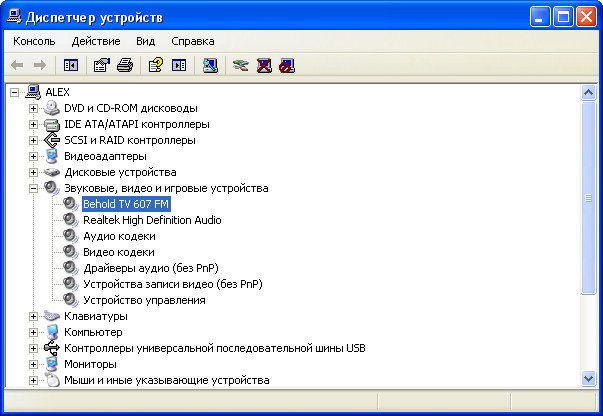
Настройка оборудования
Проще всего произвести первоначальную настройку с помощью MultiBeast. Утилита позволит вам без лишних трудностей установить все необходимые драйверы для оборудования. Впрочем, даже MultiBeast не под силу загрузить абсолютно все драйвера, поэтому некоторые вам придется устанавливать вручную. Итак, для настройки оборудования сделайте следующее:
- Запустите MultiBeast.
- Выберите UEFI Boot Mode или Legacy Boot Mode. Об их различиях мы писали на этапе «Подготовка образа Mac OS Mojave».
- На вкладке «Audio» лучше всего отметить опцию AppleALC.
- Во вкладке «Disc» представлены настройки для сторонних SATA-контроллеров жестких дисков.
- В следующей вкладке «Misc» присутствует крайне важный для работы Mac OS драйвер FakeSMC, который призван эмулировать работу фирменной микросхемы SMC. Нужный вам драйвер будет отмечен галочкой по умолчанию. Также в этом пункте есть еще две настройки: VoodooTSCSync и FakeSMC HWMonitor. Первая предназначена только для процессоров с разъемом LGA2011, в то время как FakeSMC HWMonitor необходима для получения данных о температурах систем охлаждения.
- Перейдя во вкладку «Network», отметьте вашу сетевую карту.
- Вкладка «USB» предназначена для настройки и корректной работы USB-портов. Отметьте те пункты, которыми вы будете пользоваться.
- В верхней панели окна кликните на «Bootloaders». Нужный пункт уже должен быть отмечен по умолчанию.
- Теперь перейдите в «Customize». Тут вы увидите 3 раздела, первый из которых — «Graphics Configuration». Если у вас установлена видеокарта NVIDIA 9xx серии и выше, отметьте галочкой опцию «NVIDIA Web Drivers Boot Flag».
- В разделе «SSDT» отметьте ваш процессор.
- В «System Definitions» не придется менять ничего, так как весь раздел уже настроен.
- Перейдите во вкладку «Build» и нажмите «Install».
Компьютер почти готов к полноценному использованию, осталось только установить драйвера для видеокарты:
- Установите последнюю версию утилиты Alternate NVIDIA Graphics Drivers, подходящую для вашей Mac OS.
- Теперь извлеките загрузочную флешку и перезагрузите ПК.
Если все действия были выполнены правильно, у вас получился стабильно работающий «хакинтош».
Установка виртуальной машины UTM на мобильное устройство Apple
 Да, приложение AltStore не адаптировано для большого экрана iPad
Apple не разрешает продвигать через App Store любые приложения, которые интерпретируют или генерируют программный код. Поэтому на данной площадке виртуальная машина UTM вряд ли когда-либо появится.
Именно этой цитатой известного математика, который помог союзным войскам одержать победу во Второй мировой войне, разработчик UTM с ником osy86 объясняет работу его виртуальной машины. Вот как ее установить.
Шаг 2. Откройте приложение AltStore на мобильном устройстве, которое должно быть подключено к компьютеру кабелем (во время процедур с AltStore приложение AltStore Server на компьютере должно быть активно).
Шаг 3. Перейдите в раздел My Apps, нажмите на кнопку ⊕, дождитесь установки програмы: если потребуется, введите логин и пароль своего Apple ID.
К слову, UTM можно использовать не только для установки Mac OS X: она работает с Windows, Android и не только. Она поддерживает больше 30 различных процессоров, включая архитектуры x86_64, ARM64 и RISC-V. Кстати, UTM не работает с iOS 13.3.1: нужна версия выше или ниже.
Edit the Virtual Machine
Right now the wizard part has been completed and next you are going to configure the virtual machine. For doing so you have to follow the setting below.
Step 1: Configure System
You will see on the right hand side of VirtualBox the macOS Mojave. Select it and on the top you will see the option for settings. Click on setting.
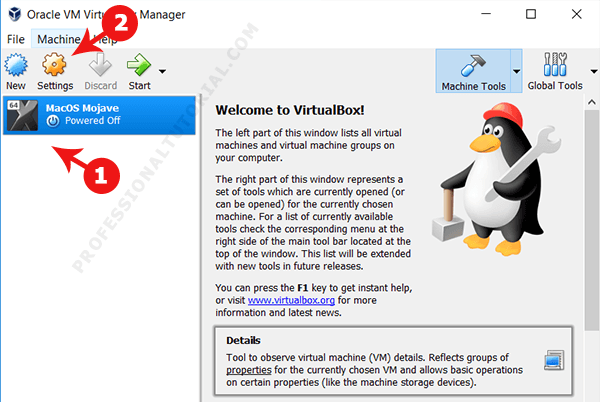
Setting
Step 2: System Setting
Here you will see various options on left side. However, you have to click on System. Further, you will see there more options on the tab.
1. You have to click on Motherboard.
Moreover, you will see different other option. I will guide you here which one you have to select.
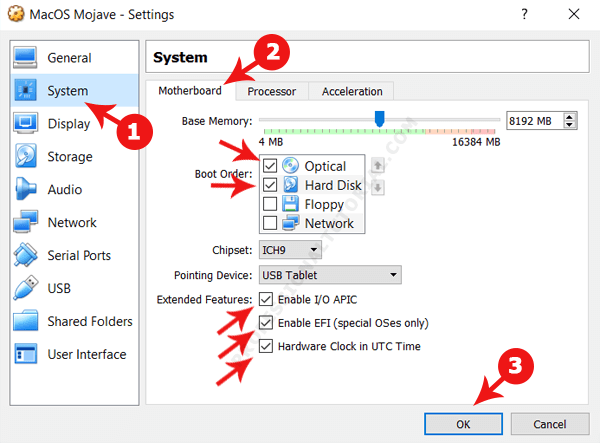
Motherboard
- Check the box of Optical
- Check the box of Hard Disk
- Chipset: ICH9
- Pointing Device: USB Tablet
- Extended Features: Check all the box of
- Enable I/O APIC
- Enble EFI ( Special OSes only)
- Hardware Clock in UTC Time
2. Next you have to click on Processor Tab. Check the box Next to the PAE/NX and increase cores to 50% for the best optimal performance.
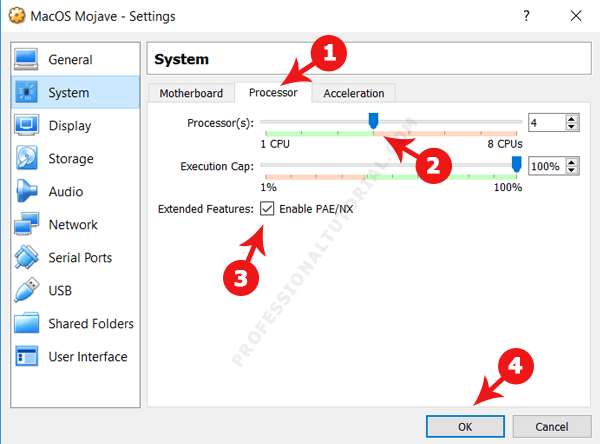
System Processor
3. Further, you have to Click on Display category. Here you should change the Video Memory to 128MB. There are different other option as well. See if you want to change those. However, it is not essentially required.

Display
4. Moreover, click on Storage category. Here on the right side you will find Use Host I/O Cache Enable it by click on the box.
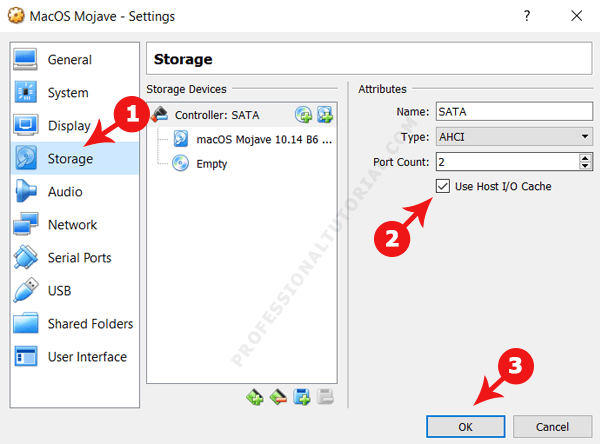
Storage
Installation Steps
1) Download the Mac OS X VMware image here. ( it’s a torrent download & size is approx 1.9 GB)
2) Extract the downloaded image by WinRar.
3) Now, Open VirtualBox. Create a new virtual machine with the following configuration.
Operating System – BSD
Version – FreeBSD
MotherBoard Extended Features – Select Enable IO APIC,
Processor Extended Features –Select Enable PAE/NX
Acceleration Hardware Virtualization – Select Enable VT-x/AMD-V

If you can’t see Acceleration tab under system settings, it means hardware virtualization is not enabled on motherboard BIOS. This Mac OS X VMware image works only with hardware virtualization enabled computers.
Allocate memory – Minimum 1GB
Hard disk – Select Existing hard disk and add extracted Mac OS X VMDK file. You can see the hard disk size as 30GB. When adding the Mac VMDK file, attach as ICH6 or PIIX4 only. If you select PIIX3, Mac will hang with booting screen.
4) Here we go; we are ready to start Mac 10.5 VM. Don’t start the virtual machine, because it will not work now. After configured following settings, close VirtualBox application completely and change the XML file. Add the string mentioned in the below step.
5) VirtualBox creates and saves virtual machine’s configurations in an XML file. Normally location is user profile ->.Virtualbox -> machines -> machine name.
Edit the XML file and add
<ExtraDataItem name=”VBoxInternal2/SupportExtHwProfile” value=”on” />
My Mac OS X XML file looks like below,
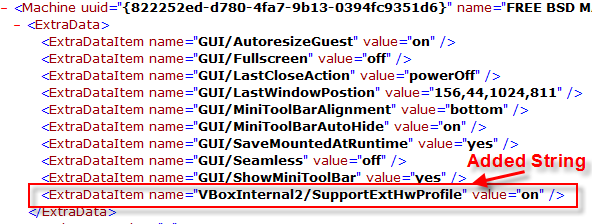
If you are facing difficulty to start Mac OS X after above changes, open the XML file and make sure the added line exists. Because sometimes when the VirtualBox services are running, the XML change will not be saved properly.
6) If the Mac OS virtual machine booting screen stuck as below, I’m sure something wrong with hardware virtualization.
7) Mac admin password with for Mac OS X Vmware image is Xelabo, as hinted below.
8) Now start the virtual machine, I’m sure you can see a working Mac OS X 10.5.5 leopard on VirtualBox.

9) As you could see in the above screen, the network is working fine within the image. I can ping to my host Windows computer from Mac OS X. I set up ‘Host-only’ network.
To use this method, the hardware virtualization in BIOS and Acceleration Hardware Virtualization – Enable VT-x/AMD-V in VirtualBox should be enabled.
You can verify the enabled hardware virtualization in motherboard BIOS here.
That’s it. Installation is done. Unfortunately, we can’t install the VirtualBox guest additions or change the screen resolutions.
Problems and Solutions
I demonstrated these installation steps on my PC which was with the following configuration (Remember: it was done in 2010).
- Intel Core2duo 2.66GHz
- 3GB RAM
- P35 Intel Chipset.
If the VM stuck with Mac logo (without loading arrows), then check the following settings.
- Enable IO APIC and VT-x
- Enable PAE/NX, make processors numbers 1
- You can Try Enabling Nested Paging. (it worked for me without enabling it, but one user said it worked for him after enabled)
- IDE Controller ICH6
- Close VirtualBox completely and open the XML file to make sure extra string is there.
- Still, it hangs? Shutdown the virtual machine and restart several times. It will work (Don’t ask me why).
If stuck with Mac logo (with loading arrows), then check the following settings
- Enable VT-x
- Check BIOS whether hardware virtualization is enabled.
- Run virtualization detecting tools to make sure that host OS is detecting hardware virtualization. Because in some PCs, even when VT is enabled in BIOS the OS will not detect.
- Close VirtualBox completely and check the XML.
As this guide was done with the older versions, you can use the same VMware preinstalled image of Mac OS 10.5.5 without modifying ting the XML file on latest Oracle VirtualBox. It is better to virtualize and use the latest version of macOS rather than trying 10-year-old product except you have some specific reason for that.
Экспериментальная поддержка
Все началось с того, что я решил попробовать написать приложение для iPhone/iPad и тут же встрял из-за досадного ограничения. Оказалось, SDK разработчика и все сопутствующие инструменты доступны только для платформы Mac OS Х. По правде говоря, Mac я собираюсь купить уже довольно давно, особенно после мучительных танцев с Хакинтошом, но, увы, заветный Macbook Pro 15″ как был, так и остается лишь пунктом в списке «Хочу купить».
Колдовать снова с установкой Mac OS на свой PC, не имея гарантии, что смогу хотя бы запустить нужный софт, не было никакого желания. Опыт подсказывал, что ничего хорошего не выйдет и с виртуальными машинами. Ни одно решение для виртуализации, будь оно от Microsoft, Parallels, VMware или Sun, без шаманства (важный момент!) не позволяет запустить Mac OS в качестве гостевой ОС! Вернее говоря, не позволяло. Изучая changelog программы VirtualBox’а (теперь уже распространяемое под эгидой компании) Oracle, которую в последнее время использую в качестве основного средства виртуализации, наткнулся на очень интересную строчку: «Experimental support for Mac OS X Server guests». Опция впервые появилась в версии 3.2.0 и далее часто упоминается. Получается, в качестве гостевой OS теперь можно установить макось? Слово «server» сначала сбило с толку, но быстро выяснилось, что это есть не что иное, как лицензионное ограничение Mac OS X. Дело в том, что лицензия допускает установку ОС только на компьютеры и ноутбуки Mac. Все остальное, включая Хакинтоши и прочие извращения, по большому счету запрещены — вполне логичный шаг со стороны компании Apple. А вот ограничение внутри самой VirtualBox, как оказалось, искусственное. Быстро нашлось немало отзывов о том, что под VirtualBox’ом отлично устанавливается последняя версия Mac OS X, то есть Snow Leopard (такое вот кодовое имя релиза). Тут надо иметь в виду, что подобный опыт напрямую нарушает лицензию системы, поэтому может рассматриваться исключительно в образовательных целях.
Everything You Need to Get Started with Installing macOS on VirtualBox
Before we go through the steps on how to install macOS on Virtual Box, let’s get everything together that you’ll need to get started.
- Open up your Mac
- Go to the App Store
- Type in “High Sierra”
You’ll want to search for your desired operating system (we’ll be using High Sierra), and Download it.
Note: You’ll need a decent computer to be able to run Virtual Box. Your computer will need to meet these minimum requirements:
- Dual core processor
- 4GB Ram or higher
- 64-bit
If your computer doesn’t meet these requirements, you won’t be able to run macOS properly. You’ll be able to download VirtualBox from the official website. I’m not going to go through the installation process, as the website will have all of the information you need to be able to install VirtualBox.
I do recommend that you read all of the documentation and ask any questions that you have in the community section of the website.
VirtualBox 6.0 was just released, so it’s definitely a great time to get started with your own macOS.
Extract macOS Sierra
Make sure you’ve downloaded High Sierra, and then you’ll want to run a few commands from your terminal . You’ll be able to open the terminal at: Applications > Utilities > Terminal. Once inside of the terminal, you’ll want to run the following commands:
-
hdiutil create -o /tmp/HighSierra.cdr -size 5200m -layout SPUD -fs HFS+J
-
hdiutil attach /tmp/HighSierra.cdr.dmg -noverify -mountpoint /Volumes/install_build
-
sudo /Applications/Install\ macOS\ High\ Sierra.app/Contents/Resources/createinstallmedia --volume /Volumes/install_build
-
mv /tmp/HighSierra.cdr.dmg ~/Desktop/InstallSystem.dmg
-
hdiutil detach /Volumes/Install\ macOS\ High\ Sierra
-
hdiutil convert ~/Desktop/InstallSystem.dmg -format UDTO -o ~/Desktop/HighSierra.iso
Go to your desktop and rename the file, removing the “.cdr” extension. You need this extension to read “.iso” for it to work properly.
You’ve successfully created your own ISO file so that you can bootup your macOS.
The next step is to copy the file over to your Windows machine (using a large USB drive seems to work best). This file will be mounted in your virtual machine later on in the article, so it’s very important that this step is completed successfully.
How to Create Your macOS Virtual Machine
1. Install VirtualBox on your Windows PC by following the instructions. Click “New” to create your new virtual machine.
2. Use the name of your macOS version to name your virtual machine. For example, High Sierra or Mojave. The type and version should autofill with the correct settings.
3. Select the amount of RAM to be allocated to your virtual machine. Allocating more RAM will help to speed up your virtual machine, but make sure you leave enough for your host OS (whether that’s Windows or Linux).
4. Choose “Create a virtual hard disk now,” and click on the “Create” button. Leave the default setting of “VDI” checked, and click “Next.”
5. Decide whether you want a dynamically allocated or fixed size virtual hard drive. A dynamically allocated drive will start small and grow in size as more space is needed. A fixed-size drive will immediately take up the set amount of space on your physical hard drive.
7. Choose the size of your virtual hard disk. Click on “Create” to finish creating your virtual machine.