Css3 animations
Содержание:
- Setting a Delay
- Используйте “липкие” фильтры
- Property Values
- transition-delay
- Добавляйте псевдо-хвостики
- Более подробная работа с @keyframes:
- CSS Properties
- Creating CSS3 Animations
- Используйте комбинации из animation-timing-function
- Stagger on
- First, What Is CSS Animation?
- CSS Reference
- CSS Properties
- Specify the fill-mode For an Animation
- The @keyframes rule
- Что такое CSS анимация?
- Property Values
- Рассинхронизируйте все движения
- Dynamic animations
Setting a Delay
As with transitions, animations can be delayed before they execute. Use the animation-delay property to wait some time before pulsing the icon:
(In this version, the icon pulses three times.)
Whenever two time measurements are specified in a shorthand property value, the second is interpreted as the delay:
This more elaborate example shows a delayed animation within a mobile interface. After an initial pause, content shifts down to make room for a series of banner advertisements, which then continuously cycle horizontally and rewind to display the first:
(View live sample)
To achieve this effect, the animation-delay property makes content shift down after 4 seconds. Here is the relevant CSS:
The animation-iteration-count property makes the animation execute only once. (The next section explains the animation-fill-mode property.)
The banner’s first animation (insertBanner) closely mirrors that of the content (displaceContent) shown above. After 4 seconds, it slides into view from off the screen:
The banner’s second animation (scrollBanner) takes over at the 5-second mark, after the first has completed. Over the course of 25 seconds, it shifts the banner sideways to view each advertisement for nearly 5 seconds. After rewinding to its initial position 97% of the way through the keyframes, setting animation-iteration-count to infinite makes the animation replay indefinitely:
Используйте “липкие” фильтры
Были времена, когда SVG-фильтры для обычных HTML-элементов были решением так себе – IE/Edge их совсем не поддерживали, а у остальных браузеров поведение могло сильно отличаться, да и производительность, особенно в Firefox, оставляла желать лучшего. Но постепенно дела налаживаются, Edge переходит на новый движок, да и другие браузеры вроде бы начинают вести себя схожим образом. Так что может для продакшена технология еще не готова, но попробовать и поиграться с ней, для того, чтобы расшевелить мозги, очень даже можно.
Применить фильтр несложно:
Главное не забыть про саму SVG картинку с ним:
Вообще SVG-фильтры – это очень широкая тема, достойная отдельной статьи, так что сейчас мы просто воспользуемся одним из них, не вдаваясь в подробности его работы.
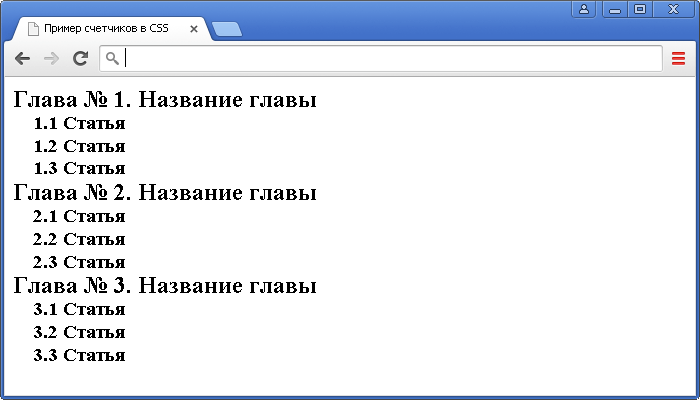
Довольно неплохо эффект с этим фильтром смотрится на разных выезжающих кнопках:
Для создания «вау-эффектов» такие фильтры подходят как нельзя лучше. Осталось дождаться нормальной поддержки всеми основными браузерами.
Property Values
| Value | Description |
|---|---|
| animation-name | Specifies the name of the keyframe you want to bind to the selector |
| animation-duration | Specifies how many seconds or milliseconds an animation takes to complete |
animation-timing-function |
Specifies the speed curve of the animation |
| animation-delay | Specifies a delay before the animation will start |
animation-iteration-count |
Specifies how many times an animation should be played |
| animation-direction | Specifies whether or not the animation should play in reverse on alternate cycles |
| animation-fill-mode | Specifies what values are applied by the animation outside the time it is executing |
| animation-play-state | Specifies whether the animation is running or paused |
| initial | Sets this property to its default value. Read about initial |
| inherit | Inherits this property from its parent element. Read about inherit |
transition-delay
В можно определить задержку перед началом анимации. Например, если , тогда анимация начнётся через 1 секунду после изменения свойства.
Отрицательные значения также допустимы. В таком случае анимация начнётся с середины. Например, если равно , а – , тогда анимация займёт одну секунду и начнётся с середины.
Здесь приведён пример анимации, сдвигающей цифры от до с использованием CSS-свойства со значением :
Результат
script.js
style.css
index.html
Свойство анимируется следующим образом:
В примере выше JavaScript-код добавляет класс к элементу, после чего начинается анимация:
Можно начать анимацию «с середины», с определённого числа, например, используя отрицательное значение , соответствующие необходимому числу.
Если вы нажмёте на цифру ниже, то анимация начнётся с последней секунды:
Результат
script.js
style.css
index.html
JavaScript делает это с помощью нескольких строк кода:
Добавляйте псевдо-хвостики
Возможно вы еще помните детские мультики. Там персонажи во время быстрых движений растягиваются в направлении движения или даже оставляют за собой фантомный след. Персонаж как бы раздваивается или размазывается и это выглядит довольно мило. Подчеркивает движения. Очень советую загуглить “12 принципов анимации” и посмотреть разные примеры, но мы сейчас остановимся на технической реализации такого следа. Как его можно сделать?
На первый взгляд может показаться, что сделать подобное в рамках CSS практически невозможно, особенно если элемент наполнен контентом, имеет фиксированную форму и его нельзя просто так растянуть. Но это лишь отчасти правда. Мы можем использовать псевдоэлементы размером с основной элемент (или немного меньше него) и перемещать их с задержкой относительно основной анимации.
Это может выглядеть как-то так:
Как видите, никакой магии здесь нет. Просто небольшая задержка. Она даст такой эффект, что часть элемента как бы не успевает за основным его объемом и постоянно его догоняет. Это может разбавить и оживить даже простое движение.
Пример с несколькими движущимися кружками:
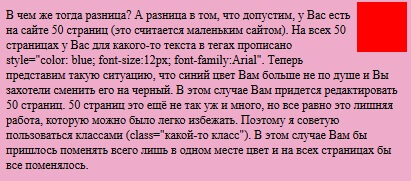
Более подробная работа с @keyframes:
В этой части статьи будут только новые свойства «animation-…» и всё, новых способов работы с @keyframes не будет.
Ещё больше свойств «animation-…» для @keyframes:
- animation-direction — определяет, как должна воспроизводится анимация, вперёд, назад или переменно вперед и назад;
- animation-timing-function — это грубо говоря меняет задаёт как происходит анимация, про неё надо писать отдельно;
Теперь я показал на мой взгляд самые важные свойства, но ниже будут ещё, которые могут пригодится.
Пример более продвинутой работы с @keyframes:
Почти точно такой же блок div мы создаём и работаем с ним.
Тут только поменялся CSS.
CSS
|
1 2 3 4 5 6 7 8 9 10 11 12 13 14 15 16 17 18 19 20 21 22 |
.square { width100px; height100px; background-colorred; animation-duration10s; animation-iteration-countinfinite; animation-directionalternate; animation-timing-functionlinear; animation-namesquare2; } @keyframes square2 { 90% { background-colorblue; } to { width500px; height200px; background-colorgreen; } } |
Разбор кода:
Про код тут нечего говорить, разве что мы не используем from и добавилось два новых свойств, для настройки анимации.
Для animation-direction используется параметр alternate, который говорит, что анимация, после того как проиграется до конца, сразу же начнёт проигрываться в обратном порядке.
Для animation-timing-function используется параметр linear, который делает так, чтобы скорость анимации была равномерной, то есть не как по умолчания, сначала быстро, а потом медленно.
Больше тут не чего сказать.
CSS Properties
align-contentalign-itemsalign-selfallanimationanimation-delayanimation-directionanimation-durationanimation-fill-modeanimation-iteration-countanimation-nameanimation-play-stateanimation-timing-functionbackface-visibilitybackgroundbackground-attachmentbackground-blend-modebackground-clipbackground-colorbackground-imagebackground-originbackground-positionbackground-repeatbackground-sizeborderborder-bottomborder-bottom-colorborder-bottom-left-radiusborder-bottom-right-radiusborder-bottom-styleborder-bottom-widthborder-collapseborder-colorborder-imageborder-image-outsetborder-image-repeatborder-image-sliceborder-image-sourceborder-image-widthborder-leftborder-left-colorborder-left-styleborder-left-widthborder-radiusborder-rightborder-right-colorborder-right-styleborder-right-widthborder-spacingborder-styleborder-topborder-top-colorborder-top-left-radiusborder-top-right-radiusborder-top-styleborder-top-widthborder-widthbottombox-decoration-breakbox-shadowbox-sizingbreak-afterbreak-beforebreak-insidecaption-sidecaret-color@charsetclearclipclip-pathcolorcolumn-countcolumn-fillcolumn-gapcolumn-rulecolumn-rule-colorcolumn-rule-stylecolumn-rule-widthcolumn-spancolumn-widthcolumnscontentcounter-incrementcounter-resetcursordirectiondisplayempty-cellsfilterflexflex-basisflex-directionflex-flowflex-growflex-shrinkflex-wrapfloatfont@font-facefont-familyfont-feature-settingsfont-kerningfont-sizefont-size-adjustfont-stretchfont-stylefont-variantfont-variant-capsfont-weightgapgridgrid-areagrid-auto-columnsgrid-auto-flowgrid-auto-rowsgrid-columngrid-column-endgrid-column-gapgrid-column-startgrid-gapgrid-rowgrid-row-endgrid-row-gapgrid-row-startgrid-templategrid-template-areasgrid-template-columnsgrid-template-rowshanging-punctuationheighthyphens@importisolationjustify-content@keyframesleftletter-spacingline-heightlist-stylelist-style-imagelist-style-positionlist-style-typemarginmargin-bottommargin-leftmargin-rightmargin-topmax-heightmax-width@mediamin-heightmin-widthmix-blend-modeobject-fitobject-positionopacityorderoutlineoutline-coloroutline-offsetoutline-styleoutline-widthoverflowoverflow-xoverflow-ypaddingpadding-bottompadding-leftpadding-rightpadding-toppage-break-afterpage-break-beforepage-break-insideperspectiveperspective-originpointer-eventspositionquotesresizerightrow-gapscroll-behaviortab-sizetable-layouttext-aligntext-align-lasttext-decorationtext-decoration-colortext-decoration-linetext-decoration-styletext-indenttext-justifytext-overflowtext-shadowtext-transformtoptransformtransform-origintransform-styletransitiontransition-delaytransition-durationtransition-propertytransition-timing-functionunicode-bidiuser-selectvertical-alignvisibilitywhite-spacewidthword-breakword-spacingword-wrapwriting-modez-index
Creating CSS3 Animations
In the previous chapter you’ve seen how to do simple animations like animating a property from one value to another via CSS3 transitions feature. However, the CSS3 transitions provide little control on how the animation progresses over time.
The CSS3 animations take it a step further with keyframe-based animations that allow you to specify the changes in CSS properties over time as a set of keyframes, like flash animations. Creating CSS animations is a two step process, as shown in the example below:
- The first step of building a CSS animation is to defining individual keyframes and naming an animation with a keyframes declaration.
- The second step is referencing the keyframes by name using the property as well as adding and other optional to control the animation’s behavior.
However, it is not necessary to define the keyframes rules before referencing or applying it. The following example will show you how to animate a box horizontally from one position to another using the CSS3 animation feature.
Example
Try this code
You must specify at least two properties and the (greater than 0), to make the animation occur. However, all the other are optional, as their default values don’t prevent an animation from happening.
Note: Not all CSS properties are animatable. In general, any CSS property that accepts values that are numbers, lengths, percentages, or colors is animatable.
Используйте комбинации из animation-timing-function
Одна из очень частых стенок в головах у начинающих верстальщиков – это мысль о том, что animation-timing-function существует в единственном экземпляре на всю анимацию. Так вот, это не так.
Мы можем задавать в каждом фрейме в keyframes свою функцию и она будет работать до следующего фрейма, а в следующем – никто не мешает задать еще одну и.т.д. В последнем фрейме, разумеется, уже ничего не указываем – анимация там заканчивается.
Пример:
Зачем это может быть нужно? В первую очередь для создания всевозможных подпрыгиваний, отпрыгиваний, смены скорости движения в соответствии с физикой, но без прибегания к скриптам. На самом деле пользователь и не заметит, если где-то движения будут не совсем соответствовать физическим законам, особенно если они будут намеренно преувеличенными, мультяшными. Это определенно стоит взять на вооружение.
Чтобы лучше понять, о чем идет речь, посмотрим красивый пример от David Lewis (концепт не адаптивный, лучше открыть на большом экране в новой вкладке):
Stagger on
Once you’ve begun to accumulate a decent library of various easing snippets, it’s time to look into other ways to enhance the depth of your animations, and one of the best ways is to offset your animated elements.
It’s all too common that a JavaScript trigger is set to initiate a bunch of animations based on scroll position, only to find all items moving effectively in tandem. Fortunately CSS itself provides a simple property that can make (or break) your animated experience: animation-delay.
Let’s say, for instance, we have a grid of images we want to animate into frame when the user scrolls. There’s a number of ways we could trigger this, most likely adding classes to the elements as they enter the viewport. This can be quite a heavy lift on the browser, however, and can be avoided by simply adding a single class to a container element and defining animation delays on child elements.
This is a particularly good use case for preprocessors like SCSS or LESS, which allow us to use a @for loop to iterate through each element.
Here you’ll see with SCSS we are able to loop through each :nth-of-type selector, then apply an animation delay based on each child element’s numerical value. In this case you’ll note we divide up our timing to reduce each increment to a fraction of a second. While offsetting your animated elements can lend emotion to your animation, too much delay can make it feel disjointed. Check out this CodePen below.
First, What Is CSS Animation?
CSS animation is a proposed module for Cascading Style Sheets that allows designers and developers to add animations by editing the CSS code of their websites, instead of uploading GIF or flash images directly.
In this way, they can not only reuse the similar CSS animations on different websites easily by copying and pasting the CSS code but also make lighter websites with better compatibility. With animation tool will make websites/apps as realistic as possible.
Pick the right prototyping tools before making the best animation websites
To build the most engaging and creative animation websites, good prototyping tools also matter a lot. It helps you prototype, test, iterate, and share your animation website designs with ease.
CSS Reference
CSS ReferenceCSS Browser SupportCSS SelectorsCSS FunctionsCSS Reference AuralCSS Web Safe FontsCSS Font FallbacksCSS AnimatableCSS UnitsCSS PX-EM ConverterCSS ColorsCSS Color ValuesCSS Default ValuesCSS Entities
CSS Properties
align-content
align-items
align-self
all
animation
animation-delay
animation-direction
animation-duration
animation-fill-mode
animation-iteration-count
animation-name
animation-play-state
animation-timing-function
backface-visibility
background
background-attachment
background-blend-mode
background-clip
background-color
background-image
background-origin
background-position
background-repeat
background-size
border
border-bottom
border-bottom-color
border-bottom-left-radius
border-bottom-right-radius
border-bottom-style
border-bottom-width
border-collapse
border-color
border-image
border-image-outset
border-image-repeat
border-image-slice
border-image-source
border-image-width
border-left
border-left-color
border-left-style
border-left-width
border-radius
border-right
border-right-color
border-right-style
border-right-width
border-spacing
border-style
border-top
border-top-color
border-top-left-radius
border-top-right-radius
border-top-style
border-top-width
border-width
bottom
box-decoration-break
box-shadow
box-sizing
break-after
break-before
break-inside
caption-side
caret-color
@charset
clear
clip
clip-path
color
column-count
column-fill
column-gap
column-rule
column-rule-color
column-rule-style
column-rule-width
column-span
column-width
columns
content
counter-increment
counter-reset
cursor
direction
display
empty-cells
filter
flex
flex-basis
flex-direction
flex-flow
flex-grow
flex-shrink
flex-wrap
float
font
@font-face
font-family
font-feature-settings
font-kerning
font-size
font-size-adjust
font-stretch
font-style
font-variant
font-variant-caps
font-weight
gap
grid
grid-area
grid-auto-columns
grid-auto-flow
grid-auto-rows
grid-column
grid-column-end
grid-column-gap
grid-column-start
grid-gap
grid-row
grid-row-end
grid-row-gap
grid-row-start
grid-template
grid-template-areas
grid-template-columns
grid-template-rows
hanging-punctuation
height
hyphens
@import
isolation
justify-content
@keyframes
left
letter-spacing
line-height
list-style
list-style-image
list-style-position
list-style-type
margin
margin-bottom
margin-left
margin-right
margin-top
max-height
max-width
@media
min-height
min-width
mix-blend-mode
object-fit
object-position
opacity
order
outline
outline-color
outline-offset
outline-style
outline-width
overflow
overflow-x
overflow-y
padding
padding-bottom
padding-left
padding-right
padding-top
page-break-after
page-break-before
page-break-inside
perspective
perspective-origin
pointer-events
position
quotes
resize
right
row-gap
scroll-behavior
tab-size
table-layout
text-align
text-align-last
text-decoration
text-decoration-color
text-decoration-line
text-decoration-style
text-indent
text-justify
text-overflow
text-shadow
text-transform
top
transform
transform-origin
transform-style
transition
transition-delay
transition-duration
transition-property
transition-timing-function
unicode-bidi
user-select
vertical-align
visibility
white-space
width
word-break
word-spacing
word-wrap
writing-mode
z-index
Specify the fill-mode For an Animation
CSS animations do not affect an element before the first keyframe is played
or after the last keyframe is played. The animation-fill-mode property can
override this behavior.
The property specifies a
style for the target element when the animation is not playing (before it
starts, after it ends, or both).
The animation-fill-mode property can have the following values:
-
— Default value. Animation will not
apply any styles to the element before or after it is executing -
— The element will retain the
style values that is set by the last keyframe (depends on animation-direction
and animation-iteration-count) -
— The element will get the style
values that is set by the first keyframe (depends on animation-direction), and
retain this during the animation-delay period -
— The animation will follow the rules
for both forwards and backwards, extending the animation properties in both
directions
The following example lets the <div> element retain the style values from the
last keyframe when the animation ends:
Example
div { width: 100px; height: 100px; background: red; position: relative; animation-name: example; animation-duration: 3s;
animation-fill-mode: forwards;
}
The following example lets the <div> element get the style values set by the
first keyframe before the animation starts (during the animation-delay period):
Example
div { width: 100px; height: 100px;
background: red; position: relative;
animation-name: example;
animation-duration: 3s;
animation-delay: 2s; animation-fill-mode: backwards;
}
The following example lets the <div> element get the style values set
by the first keyframe before the animation starts, and retain the style values
from the last keyframe when the animation ends:
Example
div { width: 100px; height: 100px; background: red;
position: relative;
animation-name: example;
animation-duration: 3s;
animation-delay: 2s; animation-fill-mode: both;
}
The @keyframes rule
The animation-name property specifies an animation named pulse. Use a @keyframes rule within the CSS to define each named animation sequence:
The entire sequence between from and to executes over the span of time defined by the animation-duration property. Each keyframe within the sequence behaves like a CSS selector, manipulating the values of individual properties. Shifts from one keyframe to another work the same as transitions, and the same set of properties that can be transitioned can also be manipulated in keyframes. In this case, opacity dims the icon and transform shrinks it. (See the tutorial on transforms for details on the transform property’s scale() function.)
As with animation properties, each @keyframes rule also needs to be prefixed redundantly to run on WebKit-based browsers such as Chrome and Safari. The transform properties below are also prefixed:
This example also substitutes 0% and 100% for their synonymous keywords from and to. (If you don’t specify either, values transition from the next available keyframe in the series.)
Что такое CSS анимация?
Как и CSS свойство плавных переходов transition, о котором мы говорили в предыдущем уроке, свойство animation призвано сделать нашу верстку более динамичной, оживить её для лучшего взаимодействия с пользователем и создания WOW эффекта.
Но в отличие от CSS переходов, создание анимации базируется на ключевых кадрах @keyframes, которые позволяют автоматически воспроизводить и повторять эффекты на протяжении заданного времени, а также приостанавливать анимацию по определенному событию.
Другими словами, использование конструкции animation и @keyframes позволяет нам создавать более сложные сценарии анимаций.
Шпаргалка CSS свойств, которые можно анимировать
- -moz-outline-radius
- -moz-outline-radius-bottomleft
- -moz-outline-radius-bottomright
- -moz-outline-radius-topleft
- -moz-outline-radius-topright
- -webkit-line-clamp
- -webkit-text-fill-color
- -webkit-text-stroke
- -webkit-text-stroke-color
- all
- backdrop-filter
- background
- background-color
- background-position
- background-size
- border
- border-bottom
- border-bottom-color
- border-bottom-left-radius
- border-bottom-right-radius
- border-bottom-width
- border-color
- border-end-end-radius
- border-end-start-radius
- border-image-outset
- border-image-slice
- border-image-width
- border-left
- border-left-color
- border-left-width
- border-radius
- border-right
- border-right-color
- border-right-width
- border-start-end-radius
- border-start-start-radius
- border-top
- border-top-color
- border-top-left-radius
- border-top-right-radius
- border-top-width
- border-width
- bottom
- box-shadow
- caret-color
- clip
- clip-path
- color
- column-count
- column-gap
- column-rule
- column-rule-color
- column-rule-width
- column-width
- columns
- filter
- flex
- flex-basis
- flex-grow
- flex-shrink
- font
- font-size
- font-size-adjust
- font-stretch
- font-variation-settings
- font-weight
- gap
- grid-column-gap
- grid-gap
- grid-row-gap
- grid-template-columns
- grid-template-rows
- height
- inset
- inset-block
- inset-block-end
- inset-block-start
- inset-inline
- inset-inline-end
- inset-inline-start
- left
- letter-spacing
- line-clamp
- line-height
- margin
- margin-bottom
- margin-left
- margin-right
- margin-top
- mask
- mask-border
- mask-position
- mask-size
- max-height
- max-lines
- max-width
- min-height
- min-width
- object-position
- offset
- offset-anchor
- offset-distance
- offset-path
- offset-position
- offset-rotate
- opacity
- order
- outline
- outline-color
- outline-offset
- outline-width
- padding
- padding-bottom
- padding-left
- padding-right
- padding-top
- perspective
- perspective-origin
- right
- rotate
- row-gap
- scale
- scroll-margin
- scroll-margin-block
- scroll-margin-block-end
- scroll-margin-block-start
- scroll-margin-bottom
- scroll-margin-inline
- scroll-margin-inline-end
- scroll-margin-inline-start
- scroll-margin-left
- scroll-margin-right
- scroll-margin-top
- scroll-padding
- scroll-padding-block
- scroll-padding-block-end
- scroll-padding-block-start
- scroll-padding-bottom
- scroll-padding-inline
- scroll-padding-inline-end
- scroll-padding-inline-start
- scroll-padding-left
- scroll-padding-right
- scroll-padding-top
- scroll-snap-coordinate
- scroll-snap-destination
- scrollbar-color
- shape-image-threshold
- shape-margin
- shape-outside
- tab-size
- text-decoration
- text-decoration-color
- text-decoration-thickness
- text-emphasis
- text-emphasis-color
- text-indent
- text-shadow
- text-underline-offset
- top
- transform
- transform-origin
- translate
- vertical-align
- visibility
- width
- word-spacing
- z-index
- zoom
Property Values
| Value | Description | Play it |
|---|---|---|
| linear | The animation has the same speed from start to end | Play it » |
| ease | Default value. The animation has a slow start, then fast, before it ends slowly | Play it » |
| ease-in | The animation has a slow start | Play it » |
| ease-out | The animation has a slow end | Play it » |
| ease-in-out | The animation has both a slow start and a slow end | Play it » |
| step-start | Equivalent to steps(1, start) | |
| step-end | Equivalent to steps(1, end) | |
| steps(int,start|end) | Specifies a stepping function, with two parameters. The first parameter specifies the number of intervals in the function. It must be a positive integer (greater than 0). The second parameter, which is optional, is either the value «start» or «end», and specifies the point at which the change of values occur within the interval. If the second parameter is omitted, it is given the value «end» | |
| cubic-bezier(n,n,n,n) | Define your own values in the cubic-bezier function Possible values are numeric values from 0 to 1 |
|
| initial | Sets this property to its default value. Read about initial | |
| inherit | Inherits this property from its parent element. Read about inherit |
Tip: Try the different values in the «More Examples» section below.
Рассинхронизируйте все движения
Очень часто, особенно если речь идет про бесконечные анимации с несколькими элементами, возникает необходимость их оживить, добавить неравномерность в общее движение. Если у вас такая задача возникла, то будет хорошей идеей немного изменить все длительности в анимации. Да, прям вот так, слегка их поменяйте, чтобы они все были разными. Больше ничего делать не нужно. Здесь стоило бы сказать, что длительности всех движений должны быть взаимно простыми числами, но по отношению к числам с плавающей запятой это высказывание будет немного некорректным.
Что это нам даст? Все очень просто – у нас рассинхронизируется вся анимация.
Этот совет, несмотря на свою простоту и очевидность, почему-то постоянно забывается и приводит к тому, что люди начинают сочинять очень сложные keyframes там, где можно просто рассинхронизировать длительности. Наверное это буквальное следования совету об использовании разных animation-timing-function. Они ведь такие, один раз попробуешь – и все. Вызывают зависимость. Не злоупотребляйте.
Dynamic animations
The example above uses JavaScript to assign random delays to stagger each animation’s execution. Any animation property can be set directly on an element’s style object, but as of this writing you also need to add alternative Webkit-prefixed property names:
Once an animation starts to execute, setting the animation-play-state property to pause stops it, and a value of running resumes it.
As in the following example, you would typically want to pause an animation if it becomes part of an interface element that is no longer in an active state:
(View live sample)
To dynamically initiate an animation, specify a different name. In this example, applying an animate class overrides the animation-name property’s default value, which is an empty string. The sequence animation executes each time the class is applied after having been absent:
Once the animate class is applied, simply reapplying it has no effect, because the animation’s name has to actually change its value. The same is true when applying the property directly to the element. The first button below only works once, but the second can be repeated because it responds to asynchronous mouse or touch input:
As a workaround, you can inject CSS into a local style region. Re-interpreting the CSS causes the animation to re-execute:
Applying a @keyframes rule is a bit more complex than it is to set properties. Perhaps the easiest way is to inject the CSS into a style region in the same way as described above:
A more formal API is available, especially to modify existing rules. Briefly, suppose this is your first declared style:
Here is how you might change the initial color to a shade of gray:
See CSSKeyframesRule, CSSKeyframeRule and CSSRule for details.