Класс local() модуля threading в python
Содержание:
- Condition Objects
- Стоимость диспетчеризации уровня ядра
- Проблема GIL на Python
- Атомарные операции
- Using QThread vs Python’s threading
- Использование Event.wait() в многопоточности Python
- Синхронизация потоков в Python
- The Threading Module
- Запуск
- Объект Event
- Приключение начинается. У древнего шлюза
- Реентерабельные замки (RLock)
- 17.1.5. Condition Objects
- Threading a Method
- Barrier Objects
- Getting Started
- Метод after() — Погружение в сон для Tkinter
- Subclassing Thread
- Python thread creating using class
- Freezing a GUI With Long-Running Tasks
- Заключение
Condition Objects
A condition variable is always associated with some kind of lock; this can be
passed in or one will be created by default. Passing one in is useful when
several condition variables must share the same lock. The lock is part of
the condition object: you don’t have to track it separately.
A condition variable obeys the :
using the statement acquires the associated lock for the duration of
the enclosed block. The and
methods also call the corresponding methods of
the associated lock.
Other methods must be called with the associated lock held. The
method releases the lock, and then blocks until
another thread awakens it by calling or
. Once awakened,
re-acquires the lock and returns. It is also possible to specify a timeout.
The method wakes up one of the threads waiting for
the condition variable, if any are waiting. The
method wakes up all threads waiting for the condition variable.
Note: the and methods
don’t release the lock; this means that the thread or threads awakened will
not return from their call immediately, but only when
the thread that called or
finally relinquishes ownership of the lock.
The typical programming style using condition variables uses the lock to
synchronize access to some shared state; threads that are interested in a
particular change of state call repeatedly until they
see the desired state, while threads that modify the state call
or when they change
the state in such a way that it could possibly be a desired state for one
of the waiters. For example, the following code is a generic
producer-consumer situation with unlimited buffer capacity:
# Consume one item
with cv
    while not an_item_is_available():
        cv.wait()
    get_an_available_item()

# Produce one item
with cv
    make_an_item_available()
    cv.notify()
The loop checking for the application’s condition is necessary
because can return after an arbitrary long time,
and the condition which prompted the call may
no longer hold true. This is inherent to multi-threaded programming. The
method can be used to automate the condition
checking, and eases the computation of timeouts:
# Consume an item
with cv
    cv.wait_for(an_item_is_available)
    get_an_available_item()
To choose between and ,
consider whether one state change can be interesting for only one or several
waiting threads. E.g. in a typical producer-consumer situation, adding one
item to the buffer only needs to wake up one consumer thread.
Стоимость диспетчеризации уровня ядра
Сами объекты-диспетчеры, а это события, мьютексы, таймеры и семафоры — это объекты ядра. Они разделимы между процессами, и по этой причине считаются дорогими объектами.
Посмотрите на график, посмотрите на стоимость инкрементирования или доступа к кэшу L1, а затем — на стоимость присваивания объекта диспетчера ядра. Две наносекунды и 295 наносекунд — огромная разница! А создание объекта диспетчера вообще занимает 2093 наносекунды.
При разработке важно писать код, который не будут создавать объекты диспетчера лишний раз, иначе можно ожидать большую потерю производительности. На уровне .NET у нас есть , который использует внутренний таймер
возвращает выполняющийся поток обратно в очередь ожидания потоков. блокирует вызывающий поток. Но сейчас я хочу более подробно рассказать про .
Проблема GIL на Python
Обычно на Python используется только один поток для выполнения нескольких записанных инструкций, то есть одновременно выполняется только один поток. Производительность однопоточного и многопоточного процессов здесь одинакова, и происходит это из-за GIL (Global Interpreter Lock — глобальной блокировки интерпретатора). Эта глобальная блокировка интерпретатора сама действует как поток и ограничивает другие потоки, делая невозможной многопоточность на Python.
Процессы ускоряют операции на Python, которые создают интенсивную вычислительную нагрузку на центральный процессор, используя сразу несколько ядер и избегая GIL, в то время как потоки лучше подходят для задач ввода-вывода или задач, связанных со внешними системами, потому что потоки могут более эффективно работать вместе. Для объединения процессов им нужно сериализовывать свои результаты, на что требуется время.
Потоки на Python не дают никаких преимуществ для задач, создающих интенсивную вычислительную нагрузку на процессор, именно из-за GIL.
Атомарные операции
Возникает вопрос: что же делать со всем этим беспорядком и неопределенностью? Как синхронизировать ядра? На помощь приходит , и это единственный механизм в .NET, предоставляющий доступ к атомарным операциям и на аппаратном уровне.
содержит такие операции, как инкрементирование (), обмен () и обмен через сравнение ().
Я собираюсь разобрать не очень часто используемую операцию — , также известную как CAS. Она изменяет значение поля на новое только в том случае, если текущее поле равно какому-либо определенному значению. Эта операция необходима для всех параллельных структур.
Эти операции происходят на уровне кэша L3: есть строки кэша, размер которых составляет 64 байта. Для каждой строки определена структура данных, обеспечивающая блокировку на этом уровне. Если вы работаете с одним процессором, то все эти инструкции будут реализованы с помощью кэша L3, а если у вас многопроцессорная система, то будет происходить обмен сообщениями между различными процессорами.
Не стоит забывать про стоимость выполнения Interlocked-операций. Стоимость инкрементирования в кэше L1 примерно равна удвоенной задержке кэша L1. Вполне быстро! Но стоимость использования Interlocked-инкремента составляет уже целых 5,5 наносекунд, даже если это происходит в единственном потоке. Этот показатель близок к показателю задержки кэша L3. А если у вас два потока обращаются к одной кэш-линии, то стоимость удваивается: ядрам приходится ждать друг друга.
Проанализируем случай, когда двум ядрам приходится ждать друг друга. Для этого используем Intel Vtune Amplifier — профайлер со счетчиками производительности процессора. Он подсчитывает частоту цикла процессора и частоту процессора, нужную для выполнения одной инструкции. На картинке ниже показатель подсвечен красным. Профайлер выдает дополнительную информацию, почему соответствующее значение — это плохо. Если несколько ядер обращаются к одной кэш-линии, то возникнут проблемы с производительностью. Это особенно критично для приложений, которые обрабатывают большое количество транзакций в секунду.
Using QThread vs Python’s threading
When it comes to working with threads in Python, you’ll find that the Python standard library offers a consistent and robust solution with the module. This module provides a high-level API for doing multithreaded programming in Python.
Normally, you’ll use in your Python applications. However, if you’re using PyQt to build GUI applications with Python, then you have another option. PyQt provides a complete, fully integrated, high-level API for doing multithreading.
You might be wondering, What should I use in my PyQt applications, Python’s thread support or PyQt’s thread support? The answer is that it depends.
For example, if you’re building a GUI application that will also have a web version, then Python’s threads might make more sense because your back end won’t depend on PyQt at all. However, if you’re building bare PyQt applications, then PyQt’s threads are for you.
Using PyQt’s thread support provides the following benefits:
- Thread-related classes are fully integrated with the rest of PyQt infrastructure.
- Worker threads can have their own event loop, which enables event handling.
- Interthread communication is possible using signals and slots.
A rule of thumb might be to use PyQt’s thread support if you’re going to interact with the rest of the library, and use Python’s thread support otherwise.
Использование Event.wait() в многопоточности Python
Модуль предоставляет , которого можно использовать как . Однако преимущество в том, что он более отзывчив. Причина в том, что когда событие установлено, программа сразу выходит из цикла. В Python с коду надо будет подождать завершения вызова до выхода из потока.
Причина, по которой здесь лучше использовать в том, что он не блокируется, в то время, как блокируется. Это значит, что при использовании вы заблокируете выполнение основного потока, пока тот будет ждать завершения вызова . решает данную проблему. Более подробнее прочитать о принципах работы потоков можно в .
Далее показан пример добавления в Python вызова с :
Python
import logging
import threading
def worker(event):
while not event.isSet():
logging.debug(«рабочий поток вносится»)
event.wait(1)
def main():
logging.basicConfig(
level=logging.DEBUG,
format=»%(relativeCreated)6d %(threadName)s %(message)s»
)
event = threading.Event()
thread = threading.Thread(target=worker, args=(event,))
thread_two = threading.Thread(target=worker, args=(event,))
thread.start()
thread_two.start()
while not event.isSet():
try:
logging.debug(«Добавление из главного потока»)
event.wait(0.75)
except KeyboardInterrupt:
event.set()
break
if __name__ == «__main__»:
main()
|
1 8 15 25 |
importlogging importthreading defworker(event) whilenotevent.isSet() logging.debug(«рабочий поток вносится»)
defmain() logging.basicConfig( level=logging.DEBUG, format=»%(relativeCreated)6d %(threadName)s %(message)s» )
thread=threading.Thread(target=worker,args=(event,)) thread_two=threading.Thread(target=worker,args=(event,)) thread.start() thread_two.start() whilenotevent.isSet() try logging.debug(«Добавление из главного потока») exceptKeyboardInterrupt event.set() break if__name__==»__main__» main() |
В данном примере создается и передается к . Вспомните, что в предыдущем примере вместо этого передавался словарь.
Затем устанавливаются циклы для проверки, настроено ли событие . Если это не так, тогда код выведет сообщение и немного подождет перед повторной проверкой. Для установки события можно воспользоваться комбинацией . Как только событие установлено, вернется, и цикл оборвется, завершив программу.
Рассмотрите подробнее код выше. Как бы вы передали разное время сна каждому работающему потоку? Справитесь с задачей? Не бойтесь экспериментировать!
Синхронизация потоков в Python
Синхронизация потоков определяется как механизм, гарантирующий, что никакие два потока не выполнят определенный сегмент программы, который обращается к общим ресурсам. Такие разделы программы называются критическими.
Состояние гонки определяется как сценарий, когда два или более потока обращаются к общим ресурсам с разрешением на запись и пытаются изменить данные. Таким образом, значение таких переменных становится непредсказуемым.
Следовательно, мы используем блокировки в программе, которые временно останавливают выполнение программы до тех пор, пока блокировка не будет снята. Это делается для того, чтобы два потока не обращались к одной и той же переменной и не вызывали конфликтов.
The Threading Module
The newer threading module included with Python 2.4 provides much more powerful, high-level support for threads than the thread module discussed in the previous section.
The threading module exposes all the methods of the thread module and provides some additional methods −
-
threading.activeCount() − Returns the number of thread objects that are active.
-
threading.currentThread() − Returns the number of thread objects in the caller’s thread control.
-
threading.enumerate() − Returns a list of all thread objects that are currently active.
In addition to the methods, the threading module has the Thread class that implements threading. The methods provided by the Thread class are as follows −
-
run() − The run() method is the entry point for a thread.
-
start() − The start() method starts a thread by calling the run method.
-
join() − The join() waits for threads to terminate.
-
isAlive() − The isAlive() method checks whether a thread is still executing.
-
getName() − The getName() method returns the name of a thread.
-
setName() − The setName() method sets the name of a thread.
Запуск
Поток запускается путем вызова метода модуля передачи объекта Thread.
t1.start()
Он должен вызываться не более одного раза для каждого объекта потока. Он организует вызов метода объекта в отдельном потоке управления.
Этот метод вызовет если будет вызван более одного раза для одного и того же объекта потока.
Поток вызывается в программе, которая сама по себе является процессом. Таким образом, во время выполнения потока основная программа также продолжает свое выполнение.
Следовательно, мы можем приостановить деятельность основной программы (выполняемой основным потоком) до завершения созданного потока.
Объект Event
Объект event – это простой объект синхронизации. Он представляет собой внутренний флаг, так что все потоки могут ожидать, пока флаг будет установлен, задавать, или убирать его.
Python
import threading
event = threading.Event()
# поток-клиент ожидает установки флага
event.wait()
# поток-сервер может установить флаг или снять его.
event.set()
event.clear()
|
1 2 3 4 5 6 7 8 9 10 |
importthreading event=threading.Event() event.wait() event.set() event.clear() |
Если флаг был задан, метод wait не будет делать ничего. Если флаг был убран, wait будет блокировать, пока его снова не установят. Любое количество потоков может дожидаться одного и того же объекта event.
Приключение начинается. У древнего шлюза
Питон слывёт дружелюбным и простым в общении, но есть у него причуды. Нельзя просто взять и воспользоваться всеми преимуществами многопоточности в Python! Дорогу вам преградит огромный шлюз… Даже так — глобальный шлюз (Global Interpreter Lock, он же GIL), который ограничивает многопоточность на уровне интерпретатора. Технически, это один на всех mutex, созданный по умолчанию. Такого нет ни в C, ни в Java.
Задача шлюза — пропускать потоки строго по одному, чтоб не летали наперегонки, как печально известные стритрейсеры, и не создавали угрозу работе интерпретатора.
Без шлюза потоки подрезали бы друг друга, чтобы первыми добраться до памяти, но это еще не всё. Они имеют обыкновение внезапно засыпать за рулём! Операционная система не спрашивает, вовремя или невовремя — просто усыпляет их в ей одной известный момент. Из-за этого неупорядоченные потоки могут неожиданно перехватывать друг у друга инициативу в работе с общими ресурсами.
Дезориентированный спросонок поток, который видит перед собой совсем не ту ситуацию, при которой засыпал, рискует разбиться и повалить интерпретатор, либо попасть в тупиковую ситуацию (deadlock). Например, перед сном Поток 1 начал работу со списком, а после пробуждения не нашёл в этом списке элементов, т.к. их удалил или перезаписал Поток 2.
Чтобы такого не было, GIL в предсказуемый момент (по умолчанию раз в 5 миллисекунд для Python 3.2+) командует отработавшему потоку: «СПАААТЬ!» — тот отключается и не мешает проезжать следующему желающему. Даже если желающего нет, блокировщик всё равно подождёт, прежде чем вернуться к предыдущему активному потоку.
Благодаря шлюзу однопоточные приложения работают быстро, а потоки не конфликтуют. Но, к сожалению, многопоточные программы при таком подходе выполняются медленнее — слишком много времени уходит на регулировку «дорожного движения». А значит обработка графики, расчет математических моделей и поиск по большим массивам данных c GIL идут неприемлемо долго.
В статье «Understanding Python GIL»технический директор компании Gaglers Inc. и разработчик со стажем Chetan Giridhar приводит такой пример:
from datetime import datetime
import threading
def factorial(number):
    fact = 1
    for n in range(1, number+1):
        fact *= n
    return fact
number = 100000
thread = threading.Thread(target=factorial, args=(number,))
startTime = datetime.now()
thread.start()
thread.join()

endTime = datetime.now()
print "Время выполнения: ", endTime - startTime
Код вычисляет факториал числа 100 000 и показывает, сколько времени ушло у машины на эту задачу. При тестировании на одном ядре и с одним потоком вычисления заняли 3,4 секунды. Тогда Четан создал и запустил второй поток. Расчет факториала на двух ядрах длился 6,2 секунды. А ведь по логике скорость вычислений не должна была существенно измениться! Повторите этот эксперимент на своей машине и посмотрите, насколько медленнее будет решена задача, если вы добавите thread2. Я получила замедление ровно вдвое.
Глобальный шлюз — наследие времён, когда программисты боролись за достойную реализацию многозадачности и у них не очень получалось. Но зачем он сегодня, когда есть много- и очень многоядерные процессоры? Как объяснил Гвидо ван Россум, без GIL не будут нормально работать C-расширения для Python. Ещё упадёт производительность однопоточных приложений: Python 3 станет медленнее, чем Python 2, а это никому не нужно.
Что делать?
Реентерабельные замки (RLock)
Класс RLock – это версия замка, который выполняет функцию блокировки только в том случае, если замок удерживает другой поток. В то время как обычные замки блокируют тогда, когда тот же поток пытается получить к одному и тому же замку дважды, реентерабельный замок блокирует только в том случае, если другой поток уже держит замок. Если нынешний поток пытается получить доступ к замку, который и так удерживается, осуществление данной операции проходит в привычном порядке.
Python
lock = threading.Lock()
lock.acquire()
lock.acquire() # заблокирует
lock = threading.RLock()
lock.acquire()
lock.acquire() # не будет блокировать
|
1 2 3 4 5 6 7 |
lock=threading.Lock() lock.acquire() lock.acquire()# заблокирует lock=threading.RLock() lock.acquire() lock.acquire()# не будет блокировать |
В основном это используется для вложенного доступа к общим ресурсам, как показано в предыдущем примере. Для того, чтобы наладить методы доступа в нашем примере, просто замените обычный Lock на RLock и вложенные вызовы заработают так, как надо.
Python
import threading
lock = threading.RLock()
def get_first_part():
lock.acquire()
try:
# берем данные для первой части из общих ресурсах.
finally:
lock.release()
return data
def get_second_part():
lock.acquire()
try:
# берем данные для второй части из общих ресурсах.
finally:
lock.release()
return data
|
1 2 3 4 5 6 7 8 9 10 11 12 13 14 15 16 17 18 19 |
importthreading lock=threading.RLock() defget_first_part() lock.acquire() try # берем данные для первой части из общих ресурсах. finally lock.release() returndata defget_second_part() lock.acquire() try # берем данные для второй части из общих ресурсах. finally lock.release() returndata |
При этом вы можете выбрать отдельные части, или обе за раз, не застревая и не получая взаимоисключающих данных
Обратите внимание на то, что этот замок отслеживает уровень рекурсии, так что вам все раз нужно вызвать release по одному разу для каждого вызова для получения доступа
17.1.5. Condition Objects
A condition variable is always associated with some kind of lock; this can be
passed in or one will be created by default. Passing one in is useful when
several condition variables must share the same lock. The lock is part of
the condition object: you don’t have to track it separately.
A condition variable obeys the :
using the statement acquires the associated lock for the duration of
the enclosed block. The and
methods also call the corresponding methods of
the associated lock.
Other methods must be called with the associated lock held. The
method releases the lock, and then blocks until
another thread awakens it by calling or
. Once awakened,
re-acquires the lock and returns. It is also possible to specify a timeout.
The method wakes up one of the threads waiting for
the condition variable, if any are waiting. The
method wakes up all threads waiting for the condition variable.
Note: the and methods
don’t release the lock; this means that the thread or threads awakened will
not return from their call immediately, but only when
the thread that called or
finally relinquishes ownership of the lock.
The typical programming style using condition variables uses the lock to
synchronize access to some shared state; threads that are interested in a
particular change of state call repeatedly until they
see the desired state, while threads that modify the state call
or when they change
the state in such a way that it could possibly be a desired state for one
of the waiters. For example, the following code is a generic
producer-consumer situation with unlimited buffer capacity:
# Consume one item
with cv
    while not an_item_is_available():
        cv.wait()
    get_an_available_item()

# Produce one item
with cv
    make_an_item_available()
    cv.notify()
The loop checking for the application’s condition is necessary
because can return after an arbitrary long time,
and the condition which prompted the call may
no longer hold true. This is inherent to multi-threaded programming. The
method can be used to automate the condition
checking, and eases the computation of timeouts:
# Consume an item
with cv
    cv.wait_for(an_item_is_available)
    get_an_available_item()
To choose between and ,
consider whether one state change can be interesting for only one or several
waiting threads. E.g. in a typical producer-consumer situation, adding one
item to the buffer only needs to wake up one consumer thread.
Threading a Method
A basic example of threading can be seen below:
In this example, we create a place to store the threads and then loop 4 times as we create the threads. To create the threads, we first initialise a threading.Thread instance passing the method as the target. We then add this thread to our previously create list and start it. This will provide the following output:
Note that there are no brackets after worker when defining the target. This is because we need to pass the method, not what the method returns (even if it returns nothing).
Passing Arguments
To pass arguments to a method when creating the thread, we can pass a tuple to args. For example:
In this expanded example I have added a number parameter to which will then be used in the output. When creating the instance of threading.Thread, I pass the variable to in a tuple. This will provide the output:
The reason args is set to and not is because if we left out the comma, the type would no longer be a tuple and would cause an error.
Barrier Objects
New in version 3.2.
This class provides a simple synchronization primitive for use by a fixed number
of threads that need to wait for each other. Each of the threads tries to pass
the barrier by calling the method and will block until
all of the threads have made their calls. At this point,
the threads are released simultaneously.
The barrier can be reused any number of times for the same number of threads.
As an example, here is a simple way to synchronize a client and server thread:
b = Barrier(2, timeout=5)

def server():
    start_server()
    b.wait()
    while True
        connection = accept_connection()
        process_server_connection(connection)

def client():
    b.wait()
    while True
        connection = make_connection()
        process_client_connection(connection)
- class (parties, action=None, timeout=None)
-
Create a barrier object for parties number of threads. An action, when
provided, is a callable to be called by one of the threads when they are
released. timeout is the default timeout value if none is specified for
the method.- (timeout=None)
-
Pass the barrier. When all the threads party to the barrier have called
this function, they are all released simultaneously. If a timeout is
provided, it is used in preference to any that was supplied to the class
constructor.The return value is an integer in the range 0 to parties – 1, different
for each thread. This can be used to select a thread to do some special
housekeeping, e.g.:i = barrier.wait() if i == # Only one thread needs to print this print("passed the barrier")If an action was provided to the constructor, one of the threads will
have called it prior to being released. Should this call raise an error,
the barrier is put into the broken state.If the call times out, the barrier is put into the broken state.
This method may raise a exception if the
barrier is broken or reset while a thread is waiting.
- ()
-
Return the barrier to the default, empty state. Any threads waiting on it
will receive the exception.Note that using this function may require some external
synchronization if there are other threads whose state is unknown. If a
barrier is broken it may be better to just leave it and create a new one.
- ()
-
Put the barrier into a broken state. This causes any active or future
calls to to fail with the . Use
this for example if one of the threads needs to abort, to avoid deadlocking the
application.It may be preferable to simply create the barrier with a sensible
timeout value to automatically guard against one of the threads going
awry.
-
The number of threads required to pass the barrier.
-
The number of threads currently waiting in the barrier.
-
A boolean that is if the barrier is in the broken state.
Getting Started
Here is an example for getting started, which illustrates the basic concepts. A thread is an object of the class threading.Thread.
It requires a function for execution when it starts. (It is also possible to subclass threading.Thread to provide an action to run. See below.)
When created, a thread starts in a not-yet-started state, and should be started using the method start(). When the task function is done, the thread exits and can be waited for using the method join().
To illustrate the passing of arguments to the task function, we pass the number of seconds to sleep as an argument.
import threading
import random, time

def runner(secs):
    print threading.current_thread(), 'begin sleep(', secs, ')'
    time.sleep(secs)
    print threading.current_thread(), 'end sleep(', secs, ')'

threads = []
for x in xrange(0, 5):
    t = threading.Thread(target = runner, args = (random.randint(1, 10),))
    threads.append(t)
    t.start()

print 'joining ..'
while threading.active_count() > 1:
    for t in threads:
        t.join()
        print t, 'is done.'
print 'all done.'
Метод after() — Погружение в сон для Tkinter
tkinter является частью стандартной библиотеки Python. В случае, если вы используете заранее установленную версию Python на Linux или Mac, он может быть вам недоступен. При получении ошибки стоит самостоятельно добавить его в систему. В том случае, если вы ранее установили Python сами, должен быть доступен.
Начнем с разбора примера, где используется . Запустите следующий код и посмотрите, что произойдет при неправильном добавлении вызова в Python:
Python
import tkinter
import time
class MyApp:
def __init__(self, parent):
self.root = parent
self.root.geometry(«400×400″)
self.frame = tkinter.Frame(parent)
self.frame.pack()
b = tkinter.Button(text=»click me», command=self.delayed)
b.pack()
def delayed(self):
time.sleep(3)
if __name__ == «__main__»:
root = tkinter.Tk()
app = MyApp(root)
root.mainloop()
|
1 15 |
importtkinter importtime classMyApp def__init__(self,parent) self.root=parent self.root.geometry(«400×400») self.frame=tkinter.Frame(parent) self.frame.pack() b=tkinter.Button(text=»click me»,command=self.delayed) b.pack() defdelayed(self) if__name__==»__main__» root=tkinter.Tk() app=MyApp(root) root.mainloop() |
После запуска кода нажмите кнопку в GUI. Кнопка не будет реагировать три секунды, ожидая завершения . Если в приложении есть другие кнопки, на них тоже нельзя будет нажать. Закрыть приложение во время сна нельзя, так как оно не будет откликаться на событие закрытия.
Для должного погружения в сон потребуется использовать :
Python
import tkinter
class MyApp:
def __init__(self, parent):
self.root = parent
self.root.geometry(«400×400»)
self.frame = tkinter.Frame(parent)
self.frame.pack()
self.root.after(3000, self.delayed)
def delayed(self):
print(‘Я задержался’)
if __name__ == «__main__»:
root = tkinter.Tk()
app = MyApp(root)
root.mainloop()
|
1 10 |
importtkinter classMyApp def__init__(self,parent) self.root=parent self.root.geometry(«400×400») self.frame=tkinter.Frame(parent) self.frame.pack() defdelayed(self) print(‘Я задержался’) if__name__==»__main__» root=tkinter.Tk() app=MyApp(root) root.mainloop() |
Здесь создается приложение, высота которого 400 пикселей, и ширина также 400 пикселей. На нем нет виджетов. Оно только показывает фрейм. Затем вызывается , где является отсылкой к объекту . принимает два аргумента:
- Количество миллисекунд для сна;
- Метод который вызовется после завершения сна.
В данном случае приложение выведет строку в стандартный поток вывода (stdout) через 3 секунды. Можно рассматривать как Tkinter-версию того же , только он добавляет способность вызова функции после завершения сна.
Данную функциональность можно использовать для улучшения работы пользователя. Добавив в Python вызов , можно ускорить процесс загрузки приложения, после чего начать какой-то длительный процесс. В таком случае пользователю не придется ждать открытия приложения.
Subclassing Thread
It is also possible to start a thread by subclassing threading.Thread. Depending on the design of your application, you may prefer this approach. Here, you extend threading.Thread and provide the implementation of your task in the run() method.
import threading
import random, time

class MyTask(threading.Thread):
    def __init__(self, sleepFor):
        self.secs = sleepFor
        threading.Thread.__init__(self)

    def run(self):
        print self, 'begin sleep(', self.secs, ')'
        time.sleep(self.secs)
        print self, 'end sleep(', self.secs, ')'
And here is the usage of the class defined above.
tasks = []
for x in xrange(0, 5):
    t = MyTask(random.randint(1, 10))
    tasks.append(t)
    t.start()

print 'joining ..'
while threading.active_count() > 1:
    for t in tasks:
        t.join()
        print t, 'is done.'
print 'all done.'
Python thread creating using class
Here, we can see how to create thread using class in python.
Syntax to create thread class:
To create a thread using class in python there are some class methods:
- run() – This method calls the target function that is passed to the object constructor.
- start() – Thread activity is started by calling the start()method, when we call start() It internally invokes the run method and executes the target object.
- join() – This method blocks calling thread until the thread whose join() is called terminates normally or through handle exception.
- getName() – This method returns a name for the thread.
- setName(name) – This method is used to set the thread name, the name in the form of a string, and is used for identification.
- isAlive() – This method returns that the thread is alive or not. The thread is alive at the time when the start() is invoked and lasts until the run() terminates.
- setDaemon(Daemonic) – This method is used to set the daemon flag to Boolean value daemonic. this should be called before the start().
- isDaemon() – This method returns the value of the thread’s daemon flag.
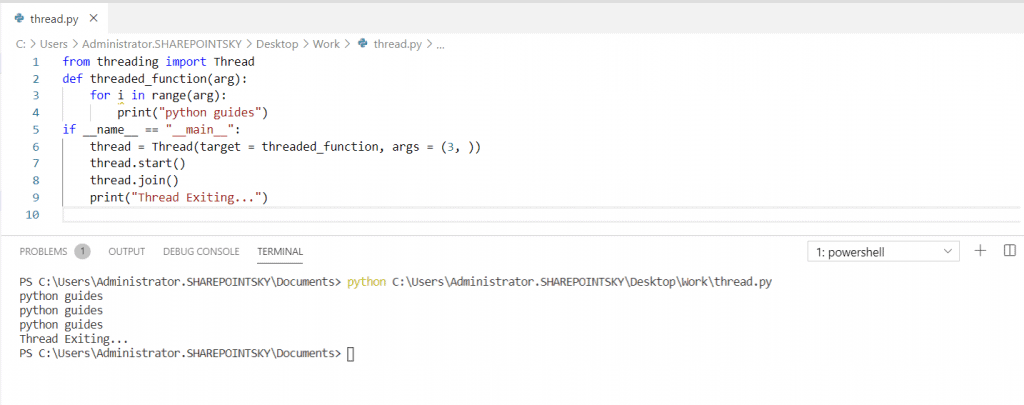
- In this example, I have imported a module called thread from threading and defined a function as a threaded function and an argument is passed.
- The value of __name__ attribute is set to “__main__”. When the module is run as a program. __name__ is the inbuilt variable that determines the name for a current module.
- If the module is running directly from the command line then “__name__” is set to “__main__”.
Example:
You can see in the below screenshot that python guides printed three times as mentioned in the range().
Python thread creating using class
Freezing a GUI With Long-Running Tasks
Long-running tasks occupying the main thread of a GUI application and causing the application to freeze is a common issue in GUI programming that almost always results in a bad user experience. For example, consider the following GUI application:
Say you need the Counting label to reflect the total number of clicks on the Click me! button. Clicking the Long-Running Task! button will launch a task that takes a lot of time to finish. Your long-running task could be a file download, a query to a large database, or any other resource-intensive operation.
Here’s a first approach to coding this application using PyQt and a single thread of execution:
In this Freezing GUI application, creates all the required graphical components for the GUI. A click on the Click me! button calls , which makes the text of the Counting label reflect the number of button clicks.
Note: PyQt was first developed to target Python 2, which has an keyword. To avoid a name conflict on those earlier versions of PyQt, an underscore was added to the end of .
Even though PyQt5 targets only Python 3, which doesn’t have an keyword, the library provides two methods to start an application’s event loop:
Both variations of the method work the same, so you can use either one in your applications.
Clicking the Long-Running Task! button calls , which performs a task that takes seconds to complete. This is a hypothetical task that you coded using , which suspends the execution of the calling thread for the given number of seconds, .
In , you also call to make the Long-Running Step label reflect the progress of the operation.
Does this application work as you intend? Run the application and check out its behavior:
When you click the Click me! button, the label shows the number of clicks. However, if you click the Long-Running Task! button, then the application becomes frozen and unresponsive. The buttons no longer respond to clicks and the labels don’t reflect the application’s state.
After five seconds, the application’s GUI gets updated again. The Counting label shows ten clicks, reflecting five clicks that occurred while the GUI was frozen. The Long-Running Step label doesn’t reflect the progress of your long-running operation. It jumps from zero to five without showing the intermediate steps.
Note: Even though your application’s GUI freezes during the long-running task, the application still registers events such as clicks and keystrokes. It’s just unable to process them until the main thread gets released.
The application’s GUI freezes as a result of a blocked main thread. The main thread is busy processing a long-running task and doesn’t immediately respond to the user’s actions. This is an annoying behavior because the user doesn’t know for sure if the application is working correctly or if it’s crashed.
Fortunately, there are some techniques you can use to work around this issue. A commonly used solution is to run your long-running task outside of the application’s main thread using a worker thread.
Заключение
В Python 3.10 появилось много интересных новых возможностей, но этот релиз — alpha (вскоре появится beta) всё ещё далек от полноценного тестирования и готовности к производственной среде. Поэтому определенно не стоит начинать использовать его.
Наверное, лучше подождать полноценного релиза в октябре и, возможно, время от времени проверять страницу Что нового в Python 3.10, чтобы увидеть изменения, которые могут появиться на последних минутах.
С учётом сказанного выше — если вы хотите обновиться — неплохой идеей может быть взять на тест первый релиз beta (который будет в июне), чтобы посмотреть, совместима ли ваша кодовая база со всеми изменениями в новой версии, включая устаревание и удаление модулей и функций.А если хотите прокачать себя в Python — приходите учиться, например на направление Fullstack-разработчик, где мы делаем универсальных специалистов, которые высоко ценятся на рынке.
Узнайте, как прокачаться в других специальностях или освоить их с нуля: