Устранение неполадок буферизации plex
Содержание:
- Secure Connections
- Step by Step
- Шаг третий. Создание сертификата.
- Plex Media Server — Установка
- 3. Управление транскодированием Plex
- Есть ли у Plex Live TV какие-либо ограничения?
- Plex Subscription
- Your Media
- 4. Оптимизируйте свои видео Plex.
- Why Use TIDAL With Plex?
- Preparation
- Main
- Features
- 2. Using Plex for the First Time
- Player Apps and Platforms
- Installing the Plex Kodi addon
Secure Connections
By default, the Plex Media Server will prefer to use secure connections for apps that support them. Not all apps support connecting securely, though. You should make sure you aren’t unintentionally blocking unsupported apps.
- Check if your app
- If the app is not supported, make sure that you have the Secure connections server setting set to (not Required)
Tip!: Most Plex apps that support secure connections will be set by default to not connect to servers that are not available securely. So, you should make sure that you do not set the server’s Secure connections setting to , in that case, or else the app will not be allowed to connect.
Related Page: Related Page:
DNS Rebinding
Some routers or modems won’t allow DNS Rebinding by default, which can affect or even prevent an app from being able to connect with a Plex Media Server on the local network. For most users, this won’t be an issue, but some users of more advanced routers (or those provided by some ISPs) may run into issues.
Similarly, some DNS providers (such as your ISP) may prevent DNS Rebinding.
See the in our How to Use Secure Server Connections article.
Related Page:
Step by Step
Overview
Getting started with Plex isn’t really any different than installing other software, except that you first install the server software. Then, you install apps on your devices so that each device can connect to the server.
Preparing and Organizing Your Media Collection
Getting your media set up can be an important step. As you set up your Plex Media Server, you’ll be creating libraries for your media—movies, TV shows, music, photos, and home videos. When you do so, Plex will identify and match content like movies and TV shows and then gather things like movie poster artwork, movie casts, TV episode descriptions, and more to make your collections beautiful.
Plex will do its best to automatically identify and match your content. You can help that process out and give yourself the very best results by ensuring that your content follows our media preparation guidelines.
Related Page: Your Media
The “Plex Media Server: Start here!” Video
For those that would prefer a video overview, please check out our “Plex Media Server: Start here!” video.
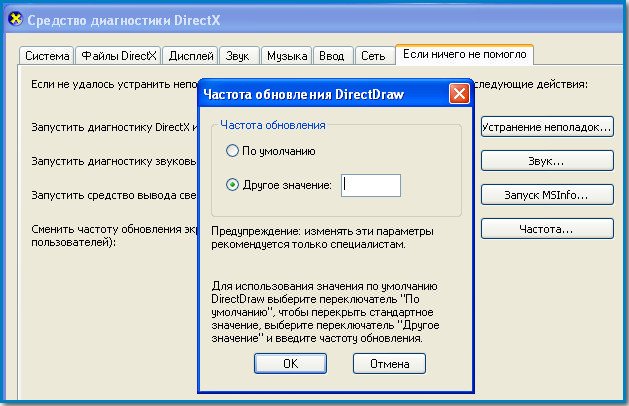
Шаг третий. Создание сертификата.
Для Windows. Пользователям необходимо предварительно скачать и установить OpenSSL Win 32 light и Visual C++ 2008 Redistributable Package (x86).
Далее запускаете командную строку (cmd.exe) с правами администратора и выполняете следующую команду:
C:\OpenSSL-Win32\bin\openssl.exe req -new -nodes -newkey rsa:2048 -out C:\trailers.pem -keyout C:\trailers.key -x509 -days 7300 -subj “/C=US/CN=trailers.apple.com” -config C:\OpenSSL-Win32\bin\openssl.cfg
Затем:
C:\OpenSSL-Win32\bin\openssl.exe x509 -in C:\trailers.pem -outform der -out C:\trailers.cer
И напоследок:
type C:\trailers.key >> C:\trailers.pem
Для OS X и Linux. Юзеры запускают Terminal и выполняют команды:
openssl req -new -nodes -newkey rsa:2048 -out ~/Desktop/trailers.pem -keyout ~/Desktop/trailers.key -x509 -days 7300 -subj “/C=US/CN=trailers.apple.com”
Далее:
openssl x509 -in ~/Desktop/trailers.pem -outform der -out ~/Desktop/trailers.cer && cat ~/Desktop/trailers.key >> ~/Desktop/trailers.pem
Затем перемещаем 3 файла (trailers.pem, trailers.key, и trailers.cer) из корня диска C (для Windows) или с рабочего стола (для MacOS/Linux) в папку \assets\certificates\ каталога PlexConnect.
Наконец можно запустить PlexConnect.
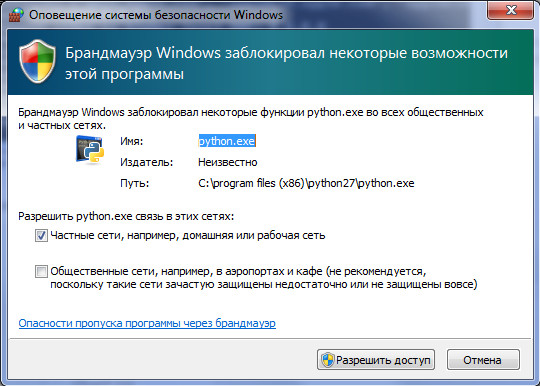
Пользователи Windows запускают файл PlexConnect.py и разрешают доступ Python.exe в сеть.
Пользователи MacOS выполняют в терминале команду:
sudo “/Applications/PlexConnect-master/PlexConnect.py”
Пользователи Linux в терминале переходят к каталогу с PlexConnect и выполняют команду:
sudo ./PlexConnect.py
Теперь можно переходить к следующему шагу.
Plex Media Server — Установка
Установить Plex можно или же из файла который находится по данной ссылке, или же посетив сайт разработчиков:
После установки Plex Media Server’a на ПК, в левой нижней части экрана появится иконка Plex сервера:
1
А так же в интернет браузере произойдет автоматический запуск страницы Plex. В случае если запуск страницы не произошел, сделайте двойной щелчок правой клавишей мышки на иконке Plex сервера в нижней левой чати экрана (рис. 1)
2
Для продолжения настройки Plex нажмите кнопку «Согласен»,
3
4
5
6
После нажатия кнопки готово, откроется основная страница медиатеки Plex.
7
На данном этапе основная установка Plex Media Server окончена
Для оптимальной работы Plex оставьте все настройки по умолчанию.
3. Управление транскодированием Plex
Plex может перекодировать ваши видео, чтобы их можно было воспроизводить на других устройствах. Например, настольные ПК и ноутбуки обычно имеют мощные процессоры, которые могут обрабатывать большинство форматов файлов, кодеков, разрешений и субтитров. Однако могут возникнуть проблемы с мобильными устройствами и приставками для потоковой передачи. Таким образом, Plex может редактировать ваши видео на лету, чтобы гарантировать их совместимость с другими гаджетами.
Обратной стороной транскодирования является то, что для этого требуется много ресурсов процессора. Если ваш сервер Plex работает на невыделенном компьютере, вы, вероятно, не хотите, чтобы потреблялась вся мощность вашего процессора. Даже если у вас есть выделенный сервер, вы в конечном итоге достигнете его пределов, если многие элементы перекодируются одновременно.
Решение — изменить настройки транскодера ( Настройки> Настройки> Транскодер ). Вам необходимо знать три значения (нажмите « Показать дополнительные», чтобы увидеть их все):
- Качество транскодирования: вы можете определить качество транскодирования с помощью раскрывающегося меню. Чем выше качество, тем медленнее будет перекодирование.
- Фоновое перекодирование x264 Preset: этот параметр определяет скорость фонового перекодирования, например, при использовании Mobile Sync, Cloud Sync или Media Optimizer. Чем медленнее перекодировка, тем меньше размер файла и выше качество, но тем медленнее время.
- Максимальное количество одновременных сеансов перекодирования — это самый важный параметр для большинства пользователей. Логика подсказывает, что чем больше разрешено одновременных перекодировок, тем больше нагрузка на ЦП. Учитывайте мощность вашего ЦП, независимо от того, является ли он выделенным сервером, и сколько людей будут одновременно вести потоковую передачу, и установите соответствующее число. С вашей стороны может потребоваться метод проб и ошибок.
Есть ли у Plex Live TV какие-либо ограничения?
К сожалению, поскольку эта услуга бесплатна и основана на партнерстве с крупными телевизионными сетями в данной стране, у нее есть некоторые ограничения, о которых вам необходимо знать.
Во-первых, нельзя приостанавливать или перематывать прямые телеканалы. Если вы пропустите начало фильма или спортивного мероприятия, вам просто нужно принять это.
Во-вторых, нет функции видеорегистратора. Это отличается от поддержки Plex каналов OTA, которая позволяет вам делать записи через приложение Plex.
Являются ли эти ограничения справедливым компромиссом с учетом количества бесплатного контента? Мы так думаем, но вам нужно будет принять решение самостоятельно.
Plex Subscription
Most Plex users find the Plex Free Service is adequate for their media and streaming needs.
The Free Version of Plex will provide you with the following features:
- Unlimited use of Media Server
- Movie and TV Streaming App
- News Podcasts, and Web Shows Support
- All non-mobile Client apps (and mobile apps with some restrictions)
- TIDAL 30-second song previews
However, Plex also offers a premium subscription called Plex Pass with some advanced benefits.
Plex Pass
For those who want a more in-depth experience, you may want to consider purchasing a Plex Pass subscription.
The Plex Pass is available in 3 packages including monthly, yearly, and lifetime:
Plex Pass subscribers get everything included in the free Plex package but with some additional features.
This includes:
- Full mobile app use
- Stream trailers and extras
- Set up Plex Home with the ability to switch between accounts and restrict access
- Early Preview access to new apps and features
The biggest component provided with the Plex Pass is the ability to use the full functionality of the mobile app.
Free users are not able to transmit content within their Plex Server to the mobile app. That means if you want to view content on your mobile phone from your home server, you must have the Plex Pass.
This is perfect for those who travel frequently or want to view their home media on the go.
Plex Live TV & DVR
For those who want to get more out of Plex, the Live TV & DVR feature works great to record shows OTA (Over the Air).
This will require a Plex Pass as well as a DVR Tuner and an OTA Antenna.
You can check out a complete list of Plex supported Tuners using the link below:
Most OTA Antennas are compatible with Plex and work well with any of the tuners listed above. Both Indoor and Outdoor antennas will work with the Plex DVR system.
While the Plex Pass adds some beneficial extras to your streaming experience, most will find the free version of Plex is adequate for their needs.
Your Media
-
- Naming and organizing your Movie files
- Multi-Version Movies
- Local Media Assets – Movies
- Local Files for Movie Trailers and Extras
- Special Keyword File/Folder Exclusion
- ISO, IMG, and Video_TS Movie files
-
- Naming and Organizing Your TV Show Files
- Local Media Assets – TV Shows
- Special Keyword File/Folder Exclusion
- Local Files for TV Show Trailers and Extras
-
- Adding Music Media From Folders
- Adding Local Artist and Music Videos
- Adding Local Lyrics
- Identifying Music Media Using Embedded Metadata
- Special Keyword File/Folder Exclusion
-
- Personal Media Movies
- Naming Home Series Media
- Special Keyword File/Folder Exclusion
-
- Description
- Fetching Internet Sourced & Using Your Own Subtitle Files
- Configuring Subtitle Support
- Adding Local Subtitles to Your Media
- Troubleshooting Subtitles
- On-Demand Subtitle Search
- Import or Delete a Subtitle File
- Subtitle Offsets
-
Working with Your Media
- Overview
- Edit Details
- Mark as Watched or Unwatched
- Fix Match / Match
- Collections
- Investigate Media Information and Formats
- Merge or Split Items
- Changing Artist, Album, or Track Information
- How do I find duplicate or merged content?
- Unmatch an Item
- Sync Content
- Download Media
- Rename a badly named file
- Converting ISO, Video_TS, and Other Disk Image Formats
- Remuxing Files to MKV
- Scanning Disk Image Format Media
- TV Theme Music & Submissions
- Generating Sample Files from Media
4. Оптимизируйте свои видео Plex.
Функцию оптимизации лучше всего рассматривать как «предварительный транскодер». Это позволяет вам выбирать определенные видео и конвертировать их в другой формат.
Например, если вы знаете, что хотите посмотреть «Историю игрушек», «Красавица и чудовище» и «Бэтмена» на своем iPad во время путешествия на следующей неделе, вы можете заранее оптимизировать видеофайлы. Это означает, что они будут немедленно готовы к игре на выбранном вами устройстве. Дальнейшего перекодирования не потребуется.
Оптимизация мультимедиа полезна, даже если вы знаете, что многие люди будут одновременно смотреть видео удаленно, поскольку это снизит нагрузку на ваш процессор.
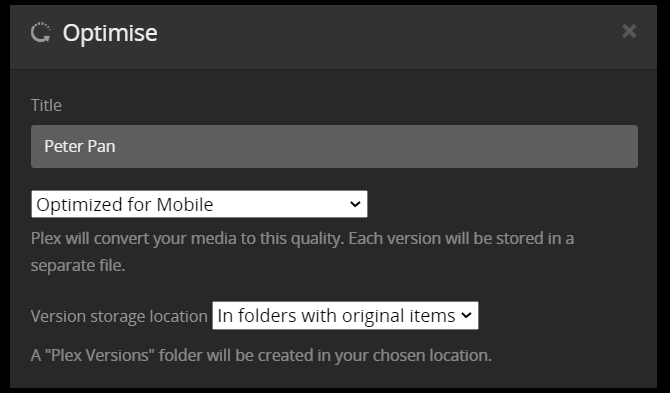
Вы можете оптимизировать отдельное шоу, серию или даже всю библиотеку. Для начала перейдите к контенту, который хотите отредактировать, нажмите на три горизонтальные точки и выберите « Оптимизировать» .
В новом окне вы можете выбрать, хотите ли вы оптимизировать определенное количество видео или только непросмотренные видео
Что еще более важно, вы можете установить качество оптимизации. Вы можете выбрать Оптимизировать для мобильных устройств , Оптимизировать для ТВ , Исходное качество или Пользовательское
Параметр Custom позволяет указать конкретное устройство, разрешение и битрейт.
Если вы настроили длинный список элементов для оптимизации, вы можете управлять очередью, выбрав « Настройки»> «Статус»> «Конверсия» . Вы можете управлять уже оптимизированными файлами в разделе «Настройки»> «Управление»> «Оптимизированные версии» .
Why Use TIDAL With Plex?
Digital music users largely fall into two camps these days: those with their own, personal, curated music collection and others who use a music streaming service. The former group often runs into a dilemma: How do we keep discovering quality new music? How do we avoid losing ourselves, and our curated albums, in an infinite sea of (streaming) music?
To help provide a bridge between those two worlds, we’ve partnered with TIDAL, who has a vast universe of music, most of it available in high quality FLAC. In addition, we’ve worked out some really great ways to combine it with your own library.
Related Page:
With a TIDAL subscription (whether you already have one or want to start one through us) linked to your Plex account, you’ll be able to access TIDAL’s tens of millions of songs and videos through your Plex apps whenever you want.
Related Page:
For those who already have a music library on their Plex Media Server, you’ll see awesome integrations such as albums for an artist that are available on TIDAL, but missing from your library. Furthermore, you can even add content from TIDAL (artists, albums, or individual tracks) so that it appears alongside your own content in your personal library.
Related Page: Related Page:
Preparation
Before You Begin
Before you begin installing Plex Media Server, it’s strongly recommended that you check that your media collection has been named and organized in a way that Plex will understand. If not, you may notice content isn’t recognized, is mis-matched, or not found at all.
You may already be naming and organizing your media files in a way suitable for Plex. Here are the important things:
- Movies are gathered together in a “Movies” type folder, TV Shows in a “TV Shows” type folder, etc.
-
Movies are named as follows:
-
TV Show episodes are named with the season and episode:
-
TV Show episodes are stored in their own folder as follows:
- For TV shows, the folder structure can be very important. Make sure you have show folders that contain season folders that contain the episodes
Related Page: Your Media
Tip!: It’s important to understand that Plex Media Server does not have its own graphical user interface. When you run the server on your computer, NAS, or other device, you won’t see a window open with a “server UI” or similar. Instead, you use the Plex Web App to manage your server.
Download the Installer
The Plex Media Server can be downloaded for free from the Plex Downloads page. There are many platforms available:
- Windows
- macOS
- Linux
- Compatible NAS devices
From the Downloads page, choose the platform or device you need, and download the installer.
Related Page: Plex DownloadsRelated Page: NAS Devices
Get a Plex (Player) App
While you’re on the Downloads page, you may wish to download a player app as well. The server includes the browser-based Plex Web App, but you’ll probably want to download an app for other devices. There are many available:
- Windows/macOS Desktop PCs: Plex for Windows, Plex for macOS, or Plex Media Player (primarily intended for HTPC usage)
- Mobile Devices: Android, iOS
- Connected Devices: Amazon Fire TV, Apple TV, Android TV, Roku, Smart TVs, game consoles, and more
Related Page: Player Apps and Platforms
Main
Automatically Sign In
If you’re a member of a Plex Home, you can use this option to have the app automatically sign in to the last used user and bypass any PIN for that user.
Related Page: Plex Home
Cinema Trailers
The cinema trailers setting controls how many cinema trailers will play before a movie. Source settings can be controlled through Plex Media Server.
Related Page:
Screen Saver
The screen saver setting controls the timeout before the screen saver begins. Note that this is independent from the system.
Auto Play
When the Post Play screen is presented after playback, choose whether an “up next” video should be played automatically after a short countdown.
Allow Fallback to Insecure Connections
When enabled, it means that this device is allowed to make insecure connections to a Plex Media Server if secure connections fail. Available choices:
- Never – (Default) Never fall back to insecure connections without specific action from the user
- On same network as server – Allow fallback, but only when Plex Media Player and the Plex Media Server are on the same network
- Always – Always allow fallback
Layout
- Auto– Allows the app to switch between desktop and TV layout.
- TV – Locks the TV layout and does not automatically switch to desktop mode.
Full Screen
The Full Screen toggle controls whether the app is rendered in full screen or windowed. On OS X, this may result in better results than the full screen window control.
Update Channel
The Update Channel setting lets the user control which update channel the app is subscribed to. Most users will want to leave this set to Stable, but other channels can receive early preview releases depending on the user’s permission level.
Features
-
- Getting Started with Plex Arcade
- Plex Arcade Subscriptions
- Plex Arcade Frequently Asked Questions
- Naming and organizing Game files and Cores
-
- Overview
- Supported Plex Companion Apps
- Choose a Player
- Fling Media
- Controlling Flung Media
- Plex Companion Remote Control Issues
-
- Camera Upload Overview
- Set Up Camera Upload (Android)
- Set Up Camera Upload (iOS)
- Default Camera Upload Settings
-
- Frequently Asked Questions – DVR & Live TV
- Supported DVR Tuners and Antennas
- Live TV & DVR (Set Up and Manage)
- Program Guide
- Watching Live TV
- Setting Up Recordings
- Manage Your Recordings
- Removing Commercials
- Using XMLTV for guide data
- Community Supported Tuners
-
- Media Optimizer Overview
- Example Media Optimizer Usage
- Creating Optimized Versions
- Conversion Queue
-
- Mobile Sync Overview
- Sync Media to a Device
- Sync Multiple Items Dynamically
- Sync Prepared Items to the Device
- Monitoring Sync Status
- Settings for Sync Jobs
- Mobile Sync for Shared Users
- Mobile Sync FAQ
- Which Plex Apps support Mobile Sync?
- Where are sync transcodes stored on my computer?
-
- Upgrading Music Libraries to the New Metadata System
- Correcting Your Music Content Matches
- Changing Artist, Album, or Track Information
-
- What is Plex Home?
- Creating a Plex Home
- Example Plex Home Setup
- Managed Users
- Fast User Switching
- Parental Controls
- How do I leave a Plex Home?
- Plex Home Security Changes
- Consequences of Being in a Plex Home
- I forgot my Plex Account PIN; how can I reset it? How can I change my PIN?
-
- Remote Access
- Troubleshooting Remote Access
- Creating and Managing Server Shares
- Restricting the Shares
- Single Item Shares
-
- Watch Together
- Frequently Asked Questions – Watch Together
-
Other Features
- Skip TV Show Intros
- Cinema Trailers, Extras, & Related Albums
- Video Preview Thumbnails
- HDR to SDR Tone Mapping
- Automatic Lyrics from LyricFind
- Auto Tagging of Photos
- Webhooks
- Play Queues
- Play Queue Post-Play Screen
- Watchlist for Free Movies & Shows on Plex
- Push Notifications
- Places (Location-Based Photos)
- Why won’t trailers or extras play?
2. Using Plex for the First Time
Again, the very first time the server runs, it should launch a browser to sign you in or create a new account, accept terms of service, and run the Setup Wizard.
Just in case the browser and wizard don’t launch or you need to close your browser and computer to come back to it later, we will explain how to 1) launch the Plex Media Server and 2) launch the Plex Web App below.
It is important to note that the server needs to be running before you can access the Plex Web App in a browser. If the Plex Web App and Setup Wizard have already launched for you, you can also skip down to section “.”
Launching the Plex Media Server
Launching Plex on Windows
- If you chose Launch Plex Media Server at the end of the installation process, it will already be running
- If you didn’t, find it in the Start menu and launch it
Launching Plex on Linux
For most flavors of Linux:
- Open a Command prompt
- Type
Accessing Plex Media Server via the Plex Web App
The Plex Media Server comes with the Plex Web App, which allows you to control Plex and access your media through any browser. Again, this should launch automatically and start the Setup Wizard when the server is run for the first time.
Launching the Plex Web App on Mac or Windows
On a Mac or Windows PC, you can launch the Plex Web App as follows:
- Windows: Find the Plex icon in the Windows System Tray at the lower right of the screen. Right click the icon and choose Open Plex…
- OS X: Locate the Plex icon (>) in your Mac’s top Menu bar or right-click the Server icon in the dock and choose Open Plex…
- The default browser will open and load Plex Web App
Launching the Plex Web App on Linux
If the Server was installed on a Linux based PC, and you’re using that PC to access Plex Web App:
- Open a web browser
- Type into the address bar
- The browser will connect to the Server and load Plex Web App
Launching the Plex Web App on Network Attached Storage (NAS)
If you installed the Server on a device like a NAS, or the Server PC is somewhere else in the house, you’ll need to know the Server’s internal IP Address. Once you know that IP address, on a PC in your home:
- Open a browser window
- Type into the address bar (e.g “http://192.168.1.5:32400/web”)
- The browser will connect to the Server and load Plex Web App
Signing in to Plex Accounts
The best way to use Plex is to always sign in to your Plex account, regardless of what device or app you are using. As well, you should sign your server into your Plex account through Settings > Server > General. Signing into your accounts ensures that all functionality is working appropriately.
Related Page:
Player Apps and Platforms
-
- Getting Started with Alexa Voice Control
- Alexa Voice Commands
-
- Navigating the Mobile Apps
- Customizing the Mobile Apps
- Settings: Plex for Android (mobile)
- Unlocking or Activating Plex for Android
- What are the features and limitations without unlocking the app?
- Android, Android TV, Fire TV, Portal Logs
- Purchasing a Plex Pass Subscription Through Google Play
- Android Auto
- I have Plex Pass, so how do I use Plex for Android for free?
- Purchasing a Plex Pass Subscription Through Amazon
- Opening a Local Video File (mobile)
-
- Navigating the Big Screen Apps
- Customizing the Big Screen Apps
- Settings: Android TV
- Android, Android TV, Fire TV, Portal Logs
- Purchasing a Plex Pass Subscription Through Google Play
- Purchasing a Plex Pass Subscription Through Amazon
- How do I use the old TV Layout with pre-4.4 Android devices?
-
- Navigating the Big Screen Apps
- Customizing the Big Screen Apps
- Settings: Plex for Apple TV
- How do I get Plex content to show up in the Top Shelf?
- How do I delete content using the Apple TV app?
- Do I need a Plex account to use the Apple TV app?
- Apple TV Logs
-
- Casting Support
- Cast from Browser or Desktop
- Cast from Android
- Cast from iOS
- Does content stream directly to the Chromecast or through the casting device?
- Why does the Chromecast show my BT router page?
- Why can’t I see Chromecast on my Amazon-based Android device?
- Why can’t I see Chromecast on my iOS 5 device?
-
- Navigating the Mobile Apps
- Customizing the Mobile Apps
- Settings: Plex for iOS
- Unlocking or Activating Plex for iOS
- Purchasing a Plex Pass Subscription Through iTunes
- iOS Media Playback
- Using Mobile Sync
- iOS Logs
- Do I need a Plex account to stream locally?
- What are the features and limitations without unlocking the app?
- Can I use the in-app purchase with Family Sharing?
- Can I AirPlay if I require secure connections and have DNS Rebinding protection?
- Will Plex work on my older iOS devices?
- iOS App System Permissions
-
- NAS Compatibility List
- NAS Devices and Limitations
- Is Plex Media Server on a NAS Right for Me?
- Mounting Network Resources
- Installing Plex Media Server on FreeNAS
- Install Plex Media Server on a TerraMaster NAS
- Western Digital My Cloud Home
-
- Setting Up and Managing Plex Media Server on NVIDIA SHIELD
- Media Storage Options for NVIDIA SHIELD
- Accessing SHIELD Storage
- Limitations When Running Plex Media Server on NVIDIA SHIELD
- Moving server data storage location on NVIDIA SHIELD
-
- Navigating the Big Screen Apps
- Customizing the Big Screen Apps
- Settings: PlayStation
- What media formats are supported?
- Why can’t it find my local server?
- Where is Plex for PlayStation available?
- Logging for PlayStation
- Is it for the PlayStation 3 or PlayStation 4?
- Is it available for the PlayStation TV and PlayStation Vita?
- Is a PlayStation Plus subscription required?
-
- Getting Started
- Navigating the Big Screen Apps
- Customizing the Big Screen Apps
- Settings: Plex Media Player
- Controlling the App
- Audio Configuration Guide – Plex Media Player
- Create your own inputmap
- Plex Media Player Logs
- Advanced Configuration
- Uninstalling Plex Media Player
- How do I set up WiFi on an embedded Plex Media Player?
- Is Plex Media Player based on Kodi/XBMC?
- How do I create the disk image for my SD Card or USB Stick?
-
- Customizing Plex Web
- Overview
- Opening Plex Web App
- Cinema Trailers & Extras – Plex Web App
- Why are there old or duplicate Server entries in the Dashboard sidebar?
- Interface Overview
- Using the Library View
- Viewing Item Details
- Plex Web App Player
- Plex Web App Settings
- Search
- Devices
- Server Status and Dashboard
- Plex Account
- Updating Plex Web App
- Plex Web App Logs
-
- Navigating the Big Screen Apps
- Customizing the Big Screen Apps
- What models are supported for the Plex for Roku channel?
- Purchasing a Plex Pass Subscription Through the Roku App
- Settings: Plex for Roku
- Roku Logs
- Is 4K content supported on the Roku?
- Do I need a Plex account to use the Roku channel?
- Is Plex for Roku open source?
-
- Plex VR for Gear VR & Oculus Go
- Plex VR for Daydream
-
- Navigating the Big Screen Apps
- Customizing the Big Screen Apps
- Which Smart TV models are supported?
- Why can’t it find my local server?
- What media formats are supported?
- How do streaming quality selections work?
- Logging for Smart TVs & TiVo
-
- Requirements for using Plex for Sonos
- Control Sonos Playback With a Plex App
- Installing the Plex for Sonos Service
- Navigating Plex for Sonos
- Sonos Playback
-
- Introduction and Installation
- Configuration and Usage Options
- Download for Offline Access – Windows & MacOS
- Windows/Mac app logs
- Audio Configuration
-
Xbox
- Settings: Xbox
- Xbox One Logs
- Xbox One Controller Mapping
- What media formats are supported?
- Why can’t the Xbox One app find my local server?
- What information is sent to Microsoft?
- Is Xbox Live Gold required?
Installing the Plex Kodi addon
Since the Plex Kodi addon is part of the main Kodi repository, it’s pretty easy to get the addon installed as long as you know where to look. Here’s how I did it.
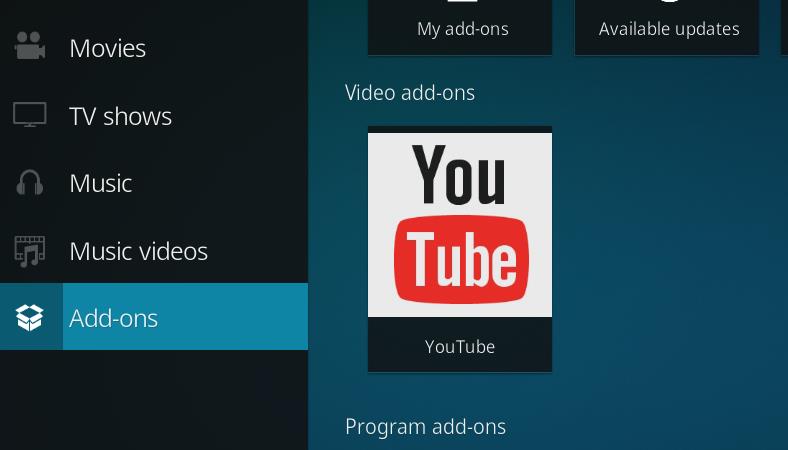
Start by opening Kodi and browsing to the Addons menu in the main screen. It will be at the bottom of the list on the left by default.
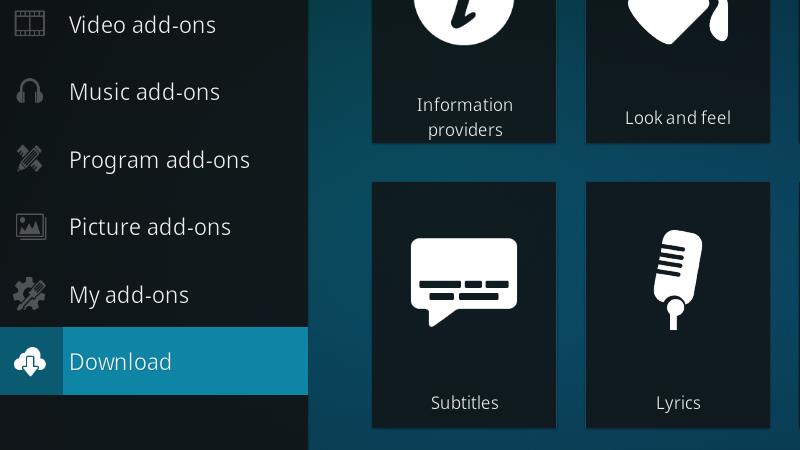
Next click the Download menu item.
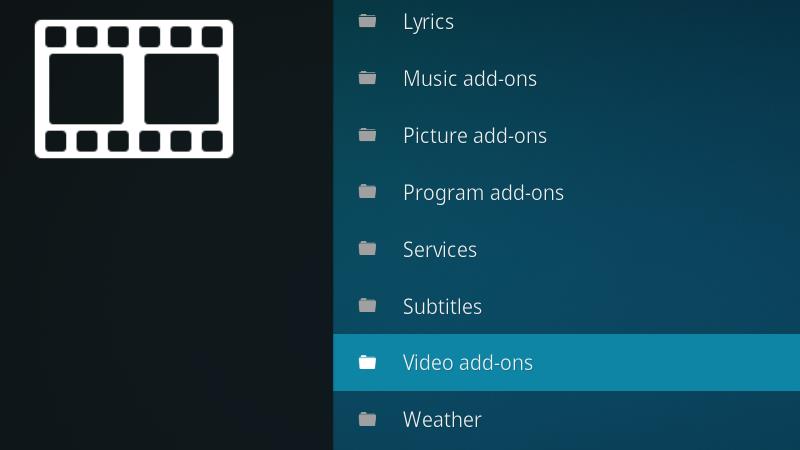
Then scroll down and click the Video addons menu item to open the addons browser.
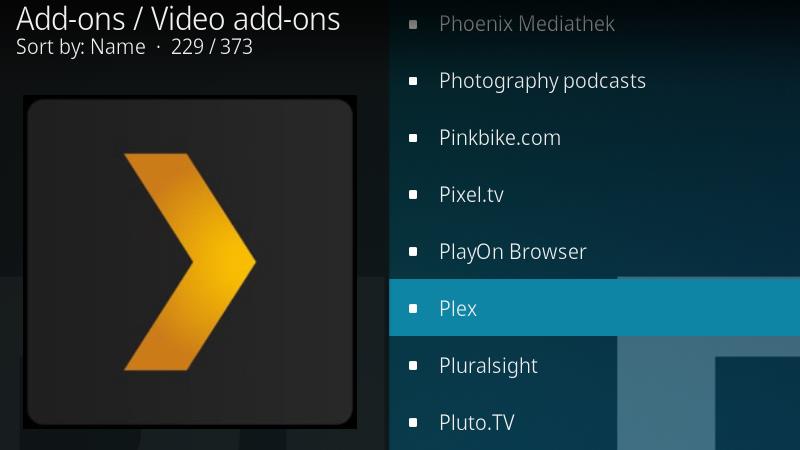
Scroll through the list of available video addons until you find the Plex menu item, and click it to open the install screen.

Next, click the Install button in the lower-right corner.
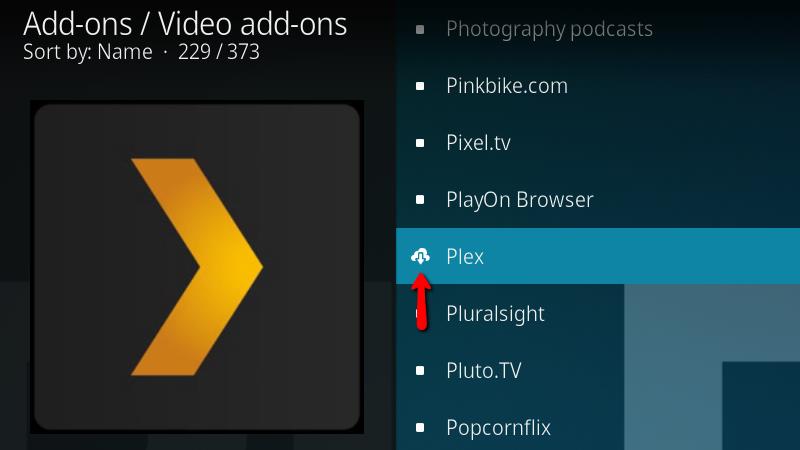
Now you’ll be taken back to the addon browser, and the Plex icon will change to show that the installation process has begun.
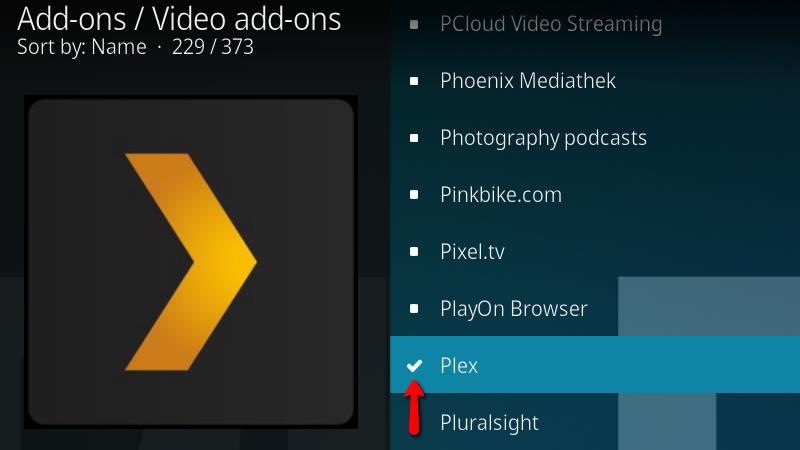
Then the Plex icon will change to a check when the installation has completed. When you’re finished, exit the addon browser and return to Kodi’s main screen in order to launch the Plex Kodi addon.

Now you can launch the Plex Kodi addon from the Addons menu.