Файлы
Содержание:
Что такое файл CSV?
Файл CSV (файл значений, разделенных запятыми) – это тип простого текстового файла, в котором для упорядочения табличных данных используется определенное структурирование. Поскольку это простой текстовый файл, он может содержать только фактические текстовые данные – другими словами, печатные символы ASCII или Unicode .
Структура CSV-файла определяется его именем. Обычно файлы CSV используют запятую для разделения каждого конкретного значения данных. Вот как выглядит эта структура:
Обратите внимание, что каждый фрагмент данных разделен запятой. Обычно первая строка идентифицирует каждый фрагмент данных, другими словами, имя столбца данных. Каждая последующая строка после этого является фактическими данными и ограничена только ограничениями размера файла. В общем, символ разделителя называется разделителем, и запятая используется не только одна. Другие популярные разделители включают символы табуляции ( ), двоеточия ( ) и точки с запятой ( ). Правильный анализ файла CSV требует, чтобы мы знали, какой разделитель используется
В общем, символ разделителя называется разделителем, и запятая используется не только одна. Другие популярные разделители включают символы табуляции ( ), двоеточия ( ) и точки с запятой ( ). Правильный анализ файла CSV требует, чтобы мы знали, какой разделитель используется.
Откуда берутся файлы CSV?
Файлы CSV обычно создаются программами, которые обрабатывают большие объемы данных. Это удобный способ экспортировать данные из электронных таблиц и баз данных, а также импортировать или использовать их в других программах. Например, вы можете экспортировать результаты программы интеллектуального анализа данных в файл CSV, а затем импортировать их в электронную таблицу для анализа данных, создания графиков для презентации или подготовки отчета для публикации.
С файлами CSV очень легко работать программно. Любой язык, который поддерживает ввод текстовых файлов и манипуляции со строками (например, Python), может работать с файлами CSV напрямую.
Как читать файл по частям
Самый простой способ для выполнения этой задачи – использовать цикл. Сначала мы научимся читать файл строку за строкой, после этого мы будем читать по килобайту за раз. В нашем первом примере мы применим цикл:
Python
handle = open(«test.txt», «r»)
for line in handle:
print(line)
handle.close()
|
1 2 3 4 5 6 |
handle=open(«test.txt»,»r») forline inhandle print(line) handle.close() |
Таким образом мы открываем файл в дескрипторе в режиме «только чтение», после чего используем цикл для его повторения
Стоит обратить внимание на то, что цикл можно применять к любым объектам Python (строки, списки, запятые, ключи в словаре, и другие). Весьма просто, не так ли? Попробуем прочесть файл по частям:
Python
handle = open(«test.txt», «r»)
while True:
data = handle.read(1024)
print(data)
if not data:
break
|
1 2 3 4 5 6 7 8 |
handle=open(«test.txt»,»r») whileTrue data=handle.read(1024) print(data) ifnotdata break |
В данном примере мы использовали Python в цикле, пока читали файл по килобайту за раз. Как известно, килобайт содержит в себе 1024 байта или символов. Теперь давайте представим, что мы хотим прочесть двоичный файл, такой как PDF.
Запись докуменов MS Word
Добавление абзацев осуществляется вызовом метода объекта . Для добавления текста в конец существующего абзаца, надо вызвать метод объекта :
import docx
doc = docx.Document()
# добавляем первый параграф
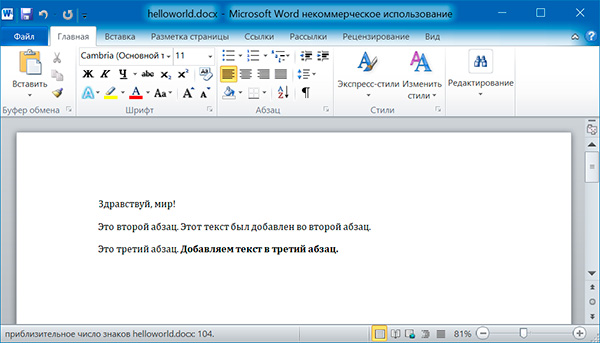
doc.add_paragraph('Здравствуй, мир!')
# добавляем еще два параграфа
par1 = doc.add_paragraph('Это второй абзац.')
par2 = doc.add_paragraph('Это третий абзац.')
# добавляем текст во второй параграф
par1.add_run(' Этот текст был добавлен во второй абзац.')
# добавляем текст в третий параграф
par2.add_run(' Добавляем текст в третий абзац.').bold = True
doc.save('helloworld.docx')
Оба метода, и принимают необязательный второй аргумент, содержащий строку стиля, например:
doc.add_paragraph('Здравствуй, мир!', 'Title')
Добавление заголовков
Вызов метода приводит к добавлению абзаца, отформатированного в соответствии с одним из возможных стилей заголовков:
doc.add_heading('Заголовок 0', )
doc.add_heading('Заголовок 1', 1)
doc.add_heading('Заголовок 2', 2)
doc.add_heading('Заголовок 3', 3)
doc.add_heading('Заголовок 4', 4)
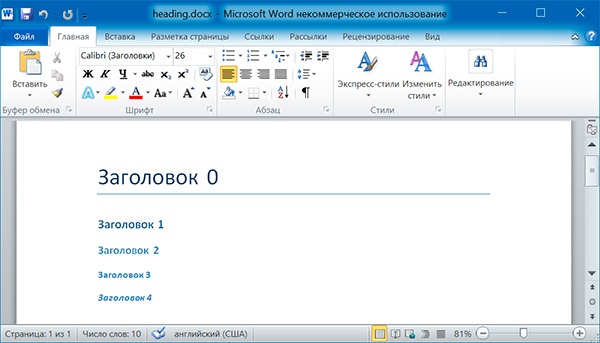
Аргументами метода являются строка текста и целое число от 0 до 4. Значению 0 соответствует стиль заголовка .
Добавление разрывов строк и страниц
Чтобы добавить разрыв строки (а не добавлять новый абзац), нужно вызвать метод объекта . Если же требуется добавить разрыв страницы, то методу надо передать значение в качестве единственного аргумента:
import docx

doc = docx.Document()

doc.add_paragraph('Это первая страница')
doc.paragraphs.runs.add_break(docx.enum.text.WD_BREAK.PAGE)
doc.add_paragraph('Это вторая страница')

doc.save('pages.docx')
Добавление изображений
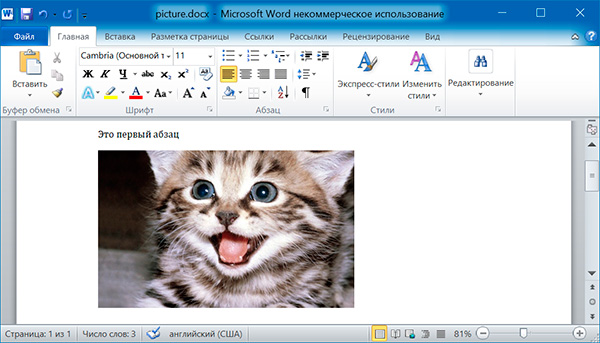
Метод объекта позволяет добавлять изображения в конце документа. Например, добавим в конец документа изображение шириной 10 сантиметров:
import docx

doc = docx.Document()

doc.add_paragraph('Это первый абзац')
doc.add_picture('kitten.jpg', width = docx.shared.Cm(10))

doc.save('picture.docx')
Именованные аргументы и задают ширину и высоту изображения. Если их опустить, то значения этих аргументов будут определяться размерами самого изображения.
Добавление таблицы
import docx

doc = docx.Document()

# добавляем таблицу 3x3
table = doc.add_table(rows = 3, cols = 3)
# применяем стиль для таблицы
table.style = 'Table Grid'

# заполняем таблицу данными
for row in range(3)
    for col in range(3)
        # получаем ячейку таблицы
        cell = table.cell(row, col)
        # записываем в ячейку данные
        cell.text = str(row + 1) + str(col + 1)

doc.save('table.docx')
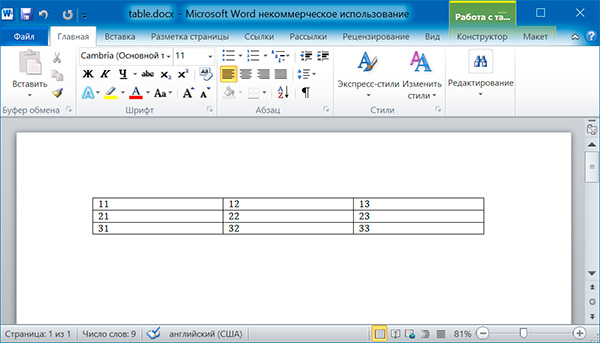
import docx

doc = docx.Document('table.docx')

# получаем первую таблицу в документе
table = doc.tables

# читаем данные из таблицы
for row in table.rows
    string = ''
    for cell in row.cells
        string = string + cell.text + ' '
    print(string)
11 12 13
21 22 23
31 32 33
Merging cells
Cells can be merged with the method and unmerged
with the method. When we merge cells, all cells
but the top-left one are removed from the worksheet.
merging_cells.py
#!/usr/bin/env python

from openpyxl import Workbook
from openpyxl.styles import Alignment

book = Workbook()
sheet = book.active

sheet.merge_cells('A1:B2')

cell = sheet.cell(row=1, column=1)
cell.value = 'Sunny day'
cell.alignment = Alignment(horizontal='center', vertical='center')

book.save('merging.xlsx')
In the example, we merge four cells: A1, B1, A2, and B2. The text in the
final cell is centered.
from openpyxl.styles import Alignment
In order to center a text in the final cell, we use the
class from the module.
sheet.merge_cells('A1:B2')
We merge four cells with the method.
cell = sheet.cell(row=1, column=1)
We get the final cell.
cell.value = 'Sunny day'
cell.alignment = Alignment(horizontal='center', vertical='center')
We set text to the merged cell and update its alignment.
Figure: Merged cells
The open Function
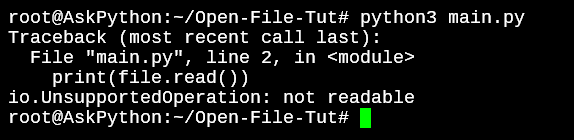
Before you can read or write a file, you have to open it using Python’s built-in open() function. This function creates a file object, which would be utilized to call other support methods associated with it.
Syntax
file object = open(file_name )
Here are parameter details −
-
file_name − The file_name argument is a string value that contains the name of the file that you want to access.
-
access_mode − The access_mode determines the mode in which the file has to be opened, i.e., read, write, append, etc. A complete list of possible values is given below in the table. This is optional parameter and the default file access mode is read (r).
-
buffering − If the buffering value is set to 0, no buffering takes place. If the buffering value is 1, line buffering is performed while accessing a file. If you specify the buffering value as an integer greater than 1, then buffering action is performed with the indicated buffer size. If negative, the buffer size is the system default(default behavior).
Here is a list of the different modes of opening a file −
| Sr.No. | Modes & Description |
|---|---|
| 1 |
r Opens a file for reading only. The file pointer is placed at the beginning of the file. This is the default mode. |
| 2 |
rb Opens a file for reading only in binary format. The file pointer is placed at the beginning of the file. This is the default mode. |
| 3 |
r+ Opens a file for both reading and writing. The file pointer placed at the beginning of the file. |
| 4 |
rb+ Opens a file for both reading and writing in binary format. The file pointer placed at the beginning of the file. |
| 5 |
w Opens a file for writing only. Overwrites the file if the file exists. If the file does not exist, creates a new file for writing. |
| 6 |
wb Opens a file for writing only in binary format. Overwrites the file if the file exists. If the file does not exist, creates a new file for writing. |
| 7 |
w+ Opens a file for both writing and reading. Overwrites the existing file if the file exists. If the file does not exist, creates a new file for reading and writing. |
| 8 |
wb+ Opens a file for both writing and reading in binary format. Overwrites the existing file if the file exists. If the file does not exist, creates a new file for reading and writing. |
| 9 |
a Opens a file for appending. The file pointer is at the end of the file if the file exists. That is, the file is in the append mode. If the file does not exist, it creates a new file for writing. |
| 10 |
ab Opens a file for appending in binary format. The file pointer is at the end of the file if the file exists. That is, the file is in the append mode. If the file does not exist, it creates a new file for writing. |
| 11 |
a+ Opens a file for both appending and reading. The file pointer is at the end of the file if the file exists. The file opens in the append mode. If the file does not exist, it creates a new file for reading and writing. |
| 12 |
ab+ Opens a file for both appending and reading in binary format. The file pointer is at the end of the file if the file exists. The file opens in the append mode. If the file does not exist, it creates a new file for reading and writing. |
The need for “open with” statement
Before going into the “with statement” we need to understand the requirement behind it. For that, we first need to know how to open a file in python.
In python to read or write a file, we need first to open it and python provides a function open(), which returns a file object. Using this file object, we can read and write in the file. But in the end, we need to close the file using this same.
Check out this example,
# open a file
file_object = open('sample.txt')

# read the file content
data = file_object.read()

# print file content
print(data)

#close the file
file_object.close()
This is a sample file.
It contains some sample string.
you are going to use it.
Thanks.
FileNotFoundError: No such file or directory: 'sample.txt'
In the above example, we opened a file sample.txt using open() function, which returned a file object. Then read file’s content as string using file object’s read() function. Then printed that and in the end closed this file using the same file object.
This will work fine in typical scenarios, but there can be problems in some situations like,
What if someone forgets to close the file in the end?
Well, it seems highly impossible now, but in big projects, people usually do big stuff after opening files, and it includes many conditions and checks. So, there can be scenarios when the return statement hit before close() function gets called, or it got skipped sue to some if condition in code.
Well, in scenarios like these, till we don’t call the close() function, the file will remain open, and its object will be consuming the memory of our process. Also, there might be chances that data will not entirely be flushed to the file. Closing a file using close() function is a graceful way of closing the file.
What if an exception comes?
Check out this code
# File is not closed in case of exception
try:
    # open a file
    file_object = open('sample.txt')
    # read file content
    data = file_object.read()
    # It will raise an exception
    x = 1 / 0
    print(data)
    file_object.close()
except:
    # Handling the exception
    print('An Error')
finally:
    if file_object.closed == False:
        print('File is not closed')
    else:
        print('File is closed')
An Error
File is not closed
# File is not closed in case of exception
try:
    # open a file
    file_object = open('sample.txt')
    # read file content
    data = file_object.read()
    # It will raise an exception
    x = 1 / 0
    print(data)
    file_object.close()
except:
    file_object.close()
    # Handling the exception
    print('An Error')
finally:
    if file_object.closed == False:
        print('File is not closed')
    else:
        print('File is closed')
Найти все страницы, где есть заданный текст
Этот скрипт довольно практичен и работает аналогично . Используя PyMuPDF, скрипт возвращает все номера страниц, которые содержат заданную строку поиска. Страницы загружаются одна за другой и с помощью метода обнаруживаются все вхождения строки поиска. В случае совпадения соответствующее сообщение печатается на :
import fitz

filename = "source/Computer-Vision-Resources.pdf"

search_term = "COMPUTER VISION"
pdf_document = fitz.open(filename)

for current_page in range(len(pdf_document)):
    page = pdf_document.loadPage(current_page)
    if page.searchFor(search_term):
        print("%s найдено на странице %i" % (search_term, current_page+1))
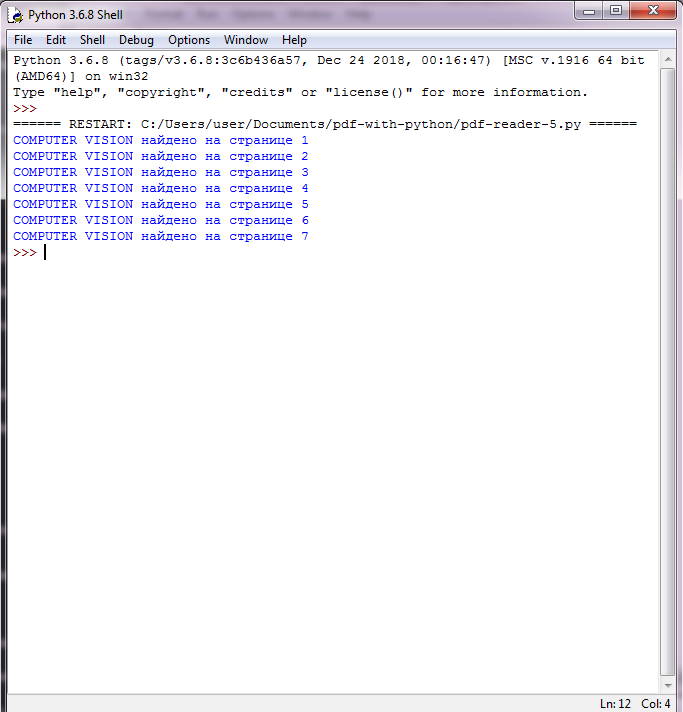 Результаты поиска COMPUTER VISION
Методы, показанные здесь, довольно мощные. Сравнительно небольшое количество строк кода позволяет легко получить результат. Другие варианты применения рассматриваются во второй части, посвященной добавлению водяного знака и картинок в PDF.
Продолжение цикла статей-конспектов на сайте
Источники вдохновения:
Open Files in Python
To open a file, all we need is the directory path that the file is located in. If it’s located in the same directory then including just the complete filename will suffice.
I’ve created a file with some sample text in it which we’ll use as a sample to learn the open file method.
 Python Open File Sample File Contents
1. Opening a file using the open() method
To open the OpenFile.txt and read the text contents of the file, let’s use the and the methods.
file = open('OpenFile.txt')
print(file.read())
file.close()
The method will read the entire contents of the file.
 Python Open File Output
By default, the method opens a file in read-only mode. To write to a file, we will need to specify that the file has to be opened in write mode.
2. Different Modes For open() Method
Let’s try to write to the file with the default mode on.
file = open('OpenFile.txt')
print(file.read())
file.write("testing write")
file.close()
We’ll keep the read operation as it is so we can see where the code stops.
 File Write Not Permitted Read-Only Mode
So what are modes, and how do we add them? Below is a list of modes when using the open() method.
- r: Read-Only mode.
- r+: Read and write mode. Will not create a new file and open will fail if the file does not exist
- rb: Read-only binary mode to read images, videos, etc.
- w: Write-only mode. Overwrites existing file content. This will create a new file if the specified filename does not exist.
- w+: Read and write mode.
- wb: Binary write-only mode for writing to media files.
- wb+: Binary read and write mode.
- a: Append mode. Does not overwrite existing content
- a+: Append and read mode. It will create a new file if the filename does not exist.
- ab: Append binary mode for images, videos, etc.
- ab+: Append and read binary mode.
3. Opening Files in Write Mode in Python
There are multiple ways you can open a file in write mode in Python. Depending on how you want the file handling methods to write to a file, you can use one of the below modes.
file = open('OpenFile.txt', 'w')
print(file.read())
file.close()
By adding the ‘w’ while opening the file in the first line, we specify that the file should be opened in write mode. But this operation would fail too because the file is write-only and won’t allow us to use the read() method.
 Write Only Mode File Not Readable
file = open('OpenFile.txt', 'w')
file.write('New content\n')
file.close()
The above code will completely clear all the contents of the text file and instead just say “New content”.
If you do not want to overwrite the file, you can use the a+ or r+ modes.
The r+ mode will write any content passed to the method.
file = open('OpenFile.txt', 'r+')
print(file.read())
file.write('r+ method, adds a line\n')
file.close()
The a or a+ mode will perform the same action as the r+ mode with one main difference.
In the case of the r+ method, a new file will not be created if the filename specified does not exist. But with a+ mode, a new file will be created if the specified file is not available.
4. Opening Files Using the with clause
When reading files with the method, you always need to make sure that the method is called to avoid memory leaks. As a developer, you could miss out on adding the method causing your program to leak file memory due to the file being open.
With smaller files, there isn’t a very noticeable effect on the system resources but it would show up when working with larger files.
with open('OpenFile.txt', 'r+') as file:
    print(file.read())
Python Open File Output
In the above example, the output would be the same as the ones we saw in the beginning, but we don’t have to close the file.
A block acquires a lock as soon as it’s executed and releases the lock once the block ends.
You can also run other methods on the data while staying within the code block. I’ve edited the OpenFile.txt, in this case, and added some more text for better understanding.
with open('OpenFile.txt', 'r+') as file:
    lines = file.readlines()

    for line in lines:
        print(line.split())
 With Command Open File Python 1
The statement does the memory handling for us as long as we continue to work within its scope. This is yet another but the better way to work with files in Python.
Запись информации в файл
Теперь давайте
посмотрим, как происходит запись информации в файл. Во-первых, нам нужно
открыть файл на запись, например, так:
file = open("out.txt", "w")
и далее вызвать
метод write:
file.write("Hello World!")
В результате у
нас будет создан файл out.txt со строкой «Hello World!». Причем, этот
файл будет располагаться в том же каталоге, что и файл с текстом программы на Python.
Далее сделаем
такую операцию: запишем метод write следующим
образом:
file.write("Hello")
И снова выполним
эту программу. Смотрите, в нашем файле out.txt прежнее
содержимое исчезло и появилось новое – строка «Hello». То есть,
когда мы открываем файл на запись в режимах
w, wt, wb,
то прежнее
содержимое файла удаляется. Вот этот момент следует всегда помнить.
Теперь
посмотрим, что будет, если вызвать метод write несколько раз
подряд:
    file.write("Hello1")
    file.write("Hello2")
    file.write("Hello3")
Смотрите, у нас
в файле появились эти строчки друг за другом. То есть, здесь как и со
считыванием: объект file записывает информацию, начиная с текущей файловой
позиции, и автоматически перемещает ее при выполнении метода write.
Если мы хотим
записать эти строчки в файл каждую с новой строки, то в конце каждой пропишем
символ переноса строки:
   file.write("Hello1\n")
   file.write("Hello2\n")
   file.write("Hello3\n")
Далее, для
дозаписи информации в файл, то есть, записи с сохранением предыдущего
содержимого, файл следует открыть в режиме ‘a’:
file = open("out.txt", "a")
Тогда, выполняя
эту программу, мы в файле увидим уже шесть строчек. И смотрите, в зависимости
от режима доступа к файлу, мы должны использовать или методы для записи, или
методы для чтения. Например, если вот здесь попытаться прочитать информацию с
помощью метода read:
file.read()
то возникнет
ошибка доступа. Если же мы хотим и записывать и считывать информацию, то можно воспользоваться
режимом a+:
file = open("out.txt", "a+")
Так как здесь
файловый указатель стоит на последней позиции, то для считывания информации,
поставим его в самое начало:
   file.seek()
   print( file.read() )
А вот запись
данных всегда осуществляется в конец файла.
Следующий
полезный метод для записи информации – это writelines:
file.writelines("Hello1\n", "Hello2\n")
Он записывает
несколько строк, указанных в коллекции. Иногда это бывает удобно, если в
процессе обработки текста мы имеем список и его требуется целиком поместить в
файл.
Создание и удаление папок через Pathlib
Классический модуль используется только для манипуляции строками пути. Чтобы что-то сделать с путем, например, создать директорию, нам нужен модуль . Модуль предоставляет набор функций для работы с файлами и каталогами, например: для создания директории, для переименования, а для получения ее размера.
Давайте напишем некоторые из этих операций с помощью модуля , а затем перепишем тот же код с помощью модуля Pathlib.
Пример кода, написанный с использованием модуля :
Python
if os.path.isdir(path):
os.rmdir(path)
|
1 2 |
ifos.path.isdir(path) os.rmdir(path) |
Если мы используем объекты модуля Pathlib для достижения той же функциональности, конечный код будет читабельнее и легче для понимания:
Python
if path.is_dir()
path.rmdir()
|
1 2 |
ifpath.is_dir() path.rmdir() |
В модуле сложновато найти утилиты, связанные с путем. Модуль Pathlib решает эту проблему, заменяя утилиты модуля методами объектов путя. Давайте попробуем разобраться в этом на примере следующего кода:
Python
outpath = os.path.join(os.getcwd(), ‘output’)
outpath_tmp = os.path.join(os.getcwd(), ‘output.tmp’)
generate_data(output_tmp)
if os.path.getsize(output_tmp):
os.rename(outpath_tmp, outpath)
else: # Ничего не происходит
os.remove(outpath_tmp)
|
1 2 3 4 5 6 7 8 |
outpath=os.path.join(os.getcwd(),’output’) outpath_tmp=os.path.join(os.getcwd(),’output.tmp’) generate_data(output_tmp) ifos.path.getsize(output_tmp) os.rename(outpath_tmp,outpath) else# Ничего не происходит os.remove(outpath_tmp) |
Здесь функция принимает путь к файлу в качестве параметра и записывает данные в другой путь. Однако, если файл, который передается в качестве параметра, не изменяется, так как в последний раз была выполнена функция , генерируется пустой файл. В этом случае пустой файл заменяется предыдущей версией файла.
Переменная сохраняет данные, соединяя текущий рабочий каталог с названием файла «output». Мы также создаем временную версию, названную . Если размер временной версии не равен нулю, что означает, что это не пустой файл, тогда временная версия переименовывается в , в противном случае временная версия удаляется, а старая версия сохраняется.
Используя модуль , манипулирование путями файловых систем в виде строковых объектов становится несколько корявым, поскольку используется несколько вызовов , и так далее. Во избежание данной проблемы модуль Pathlib предлагает набор классов, что могут использоваться для популярных операций с путами через более читабельный, простой, объектно-ориентированный способ.
Попробуем переписать вышеуказанный код с модулем Pathlib:
Python
from pathlib import Path
outpath = Path.cwd() / ‘output’
outpath_tmp = Path.cwd() / ‘output_tmp’
generate_data(output_tmp)
if outpath_tmp.stat().st_size:
outpath_tmp.rename(outpath)
else: # Ничего не производится
Path_tmp.unlink()
|
1 2 3 4 5 6 7 8 9 10 11 |
frompathlib importPath outpath=Path.cwd()’output’ outpath_tmp=Path.cwd()’output_tmp’ generate_data(output_tmp) ifoutpath_tmp.stat().st_size outpath_tmp.rename(outpath) else# Ничего не производится Path_tmp.unlink() |
При использовании Pathlib становится , а оператор нужен для объединения путей на месте . Вместе с модулем Pathlib можно значительно упростить код, задействуя операторы и вызовы метода.
Популярные методы и их предназначение:
- : Возвращает путь объекта текущей рабочей директории;
- : Возвращает путь объекта домашней директории;
- : Возвращает информацию о пути;
- : Меняет режим и уровень доступа файла;
- : Получение всех файлов которые соответствую паттерну, например (все картинки) или (все песни);
- : создает новую папку по данному пути;
- : Открывает файл, созданный в пути;
- : Переименовывает файл или директорию указанной цели;
- : Удаляет пустую директорию;
- : Удаляет файл или символическую ссылку.
Извлечение текста с помощью PyMuPDF
Перейдём к PyMuPDF.
Отображение информации о документе, печать количества страниц и извлечение текста из документа PDF выполняется аналогично PyPDF2 (см. скрипт ниже). Импортируемый модуль имеет имя , что соответствует имени PyMuPDF в ранних версиях.
import fitz

pdf_document = "./source/Computer-Vision-Resources.pdf"
doc = fitz.open(pdf_document)
print("Исходный документ: ", doc)
print("\nКоличество страниц: %i\n\n------------------\n\n" % doc.pageCount)
print(doc.metadata)

for current_page in range(len(doc)):
    page = doc.loadPage(current_page)
    page_text = page.getText("text")
    print("Стр. ", current_page+1, "\n\nСодержание;\n")
    print(page_text)
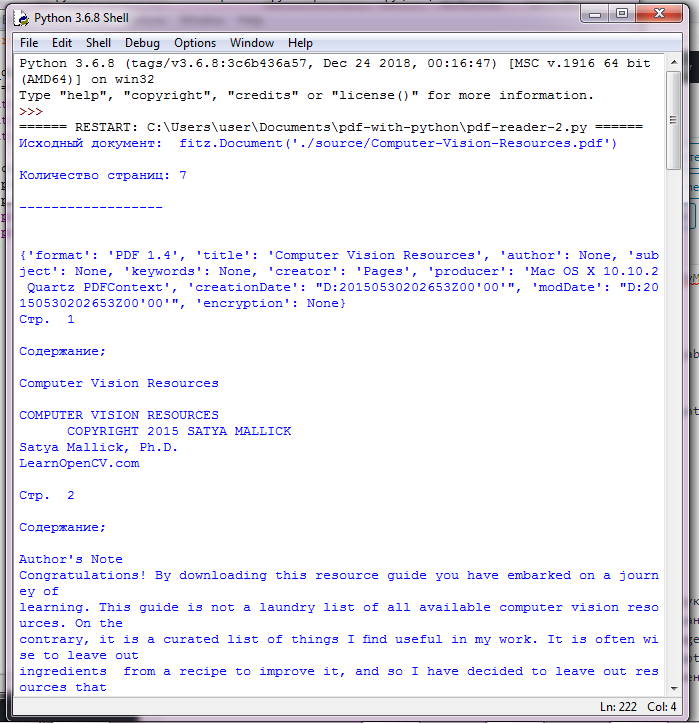 Извлечение текста с помощью PyMuPDF
Приятной особенностью PyMuPDF является то, что он сохраняет исходную структуру документа без изменений — целые абзацы с разрывами строк сохраняются такими же, как в PDF‑документе.