Способы форматирования текстовых строк в python
Содержание:
- Содержание:
- F-строки
- Using Formatters
- Форматирование строк
- #3 Интерполяция строк / f-Строки (Python 3.6+)
- The Python String .format() Method
- Python string formatting integer
- Запись файлов Excel
- Погружене в f-строки
- User-Defined Formatting
- Extra formatting options with format()
- Для аргументов ключевого слова
- 3 – Литеральная интерполяция строки (Python 3.6+)
- Python Tutorial
- #3 String Interpolation / f-Strings (Python 3.6+)
- String Methods
- Форматирование строк с помощью f-строк
- #2 “New Style” String Formatting (str.format)
- Error handling
- Python string formatting
- Встроенные средства Python
- Padding Variable Substitutions
- Method 2: Redirect sys.stdout to the file
- Ввод и вывод данных
Содержание:
Помните Дзен Python, где должен быть “один очевидный способ сделать что-то в Python”? Можете почесать голову перед тем, как понять, что зачастую есть целых 4 эффективных способа выполнить в Python.
Давайте приступим к делу, работы много! Чтобы иметь в распоряжении простой пример для эксперимента, представим, что у вас есть следующие переменные (или константы, не важно) для работы:
Python
errno = 50159747054
name = ‘Bob’
|
1 2 |
errno=50159747054 name=’Bob’ |
Основываясь на этих переменных, вы хотите создать строку вывода, содержащую простое уведомление об ошибке:
Python
‘Hey Bob, there is a 0xbadc0ffee error!’
| 1 | ‘Hey Bob, there is a 0xbadc0ffee error!’ |
Эта ошибка может немного подпортить понедельник вашему разрабу… Но мы здесь за тем, чтобы обсудить форматирование строк. Так что приступим к делу.
F-строки
Начиная с версии
Python 3.6, появился
еще один способ форматирования строк, так называемые, F-строки. И во
многих случаях он еще более удобный, чем использование метода format. Здесь мы
рассмотрим лишь основы использования этого подхода (F-строк), для
более глубокого изучения можно обратиться к стандарту PEP498 документации Python:
Итак, чтобы
указать Python на
использование механизма F-строк, перед ее литералом ставится
символ ‘f’ (именно малая
буква), а в фигурных скобках записывать непосредственно имена переменных:
f"Меня зовут {name}, мне {age} и я люблю язык Python."
Видите как это
удобно? Или, присваивая результат переменной:
msg = f"Меня зовут {name}, мне {age} и я люблю язык Python."
Можем в
дальнейшим оперировать им через переменную msg. Далее, внутри
фигурных скобок F-строк в действительности можно записывать любые
конструкции языка Python, например, арифметические операции и
операции со строками:
f"Меня зовут {name.upper()}, мне {age*2} и я люблю язык Python."
В результате,
получим:
'Меня зовут ФЕДОР, мне 36 и я люблю язык Python.'
Или даже не
прописывать переменные, а использовать обычные числовые операции или вызывать
отдельные функции:
f"Меня зовут {len(name)}, мне {14*2} и я люблю язык Python."
Соответственно,
можно использовать и свои функции в таких строках:
def f(n):
    return n%2 ==

name = "Иван"
age=18

msg = f"""Меня зовут {name}, мне {age}
и проверка возраста на четность
дает значение {f(age)}"""

print( msg )
Помимо отдельных
переменных, можно использовать любые типы данных: списки, кортежи, словари и
т.д. Например, вот так:
g = {"m": "Уважаемый", "w": "Уважаемая"}

ps = ("Иван Федорович", 18, "m"),
("Сергей Владимирович", 32, "m"),
("Дарья Ивановна", 22, "w"),
("Ксения Петровна", 25, "w")

for p in ps:
    msg = f"""{g ]}
{p}! Поздравляем Вас
с {p}-летием! Желаем
выучить язык Python"""

print( msg, end="\n\n" )
Здесь на выходе
будем получать строки с корректным обращением к тому или иному человеку и
поздравлять в соответствии с заданным шаблоном. Как видите, F-строки
предоставляют большую свободу действий и при этом просты в использовании.
Using Formatters
Formatters work by putting in one or more replacement fields or placeholders — defined by a pair of curly braces — into a string and calling the method. You’ll pass into the method the value you want to concatenate with the string. This value will be passed through in the same place that your placeholder is positioned when you run the program.
Let’s print out a string that uses a formatter:
In the example above, we constructed a string with a pair of curly braces as a placeholder:
We then added the method and passed the value of the integer to that method. This places the value of into the string where the curly braces were:
We can also assign a variable to be equal to the value of a string that has formatter placeholders:
In this second example, we concatenated the string with the larger string, replacing the curly braces in the original string.
Formatters in Python allow you to use curly braces as placeholders for values that you’ll pass through with the method.
Форматирование строк
Форматирование строк (также известно как замещение) – это замещение значений в базовой строке. Большую часть времени вы будете вставлять строки внутри строк, однако, вам также понадобиться вставлять целые числа и числа с запятыми в строки весьма часто. Существует два способа достичь этой цели. Начнем с старого способа, после чего перейдем к новому:
Python
# -*- coding: utf-8 -*-
my_string = «Я люблю %s» % «Python»
print(my_string) # Я люблю Python
var = «яблоки»
newString = «Я ем %s» % var
print(newString) # Я ем яблоки
another_string = «Я люблю %s и %s» % («Python», var)
print(another_string) # Я люблю Python и яблоки
|
1 2 3 4 5 6 7 8 9 10 11 |
# -*- coding: utf-8 -*- my_string=»Я люблю %s»%»Python» print(my_string)# Я люблю Python var=»яблоки» newString=»Я ем %s»%var print(newString)# Я ем яблоки another_string=»Я люблю %s и %s»%(«Python»,var) print(another_string)# Я люблю Python и яблоки |
Как вы могли догадаться, % — это очень важная часть вышеописанного кода. Этот символ указывает Python, что вы скоро вставите текст на его место. Если вы будете следовать за строкой со знаком процента и другой строкой или переменной, тогда Python попытается вставить ее в строку. Вы можете вставить несколько строк, добавив несколько знаков процента в свою строку. Это видно в последнем примере
Обратите внимание на то, что когда вы добавляете больше одной строки, вам нужно закрыть эти строки в круглые скобки. Теперь взглянем на то, что случится, если мы вставим недостаточное количество строк:
Python
another_string = «Я люблю %s и %s» % «Python»
Traceback (most recent call last):
File «<string>», line 1, in <fragment>
TypeError: not enough arguments for format string
|
1 2 3 4 5 |
another_string=»Я люблю %s и %s»%»Python» Traceback(most recent call last) File»<string>»,line1,in<fragment> TypeErrornotenough arguments forformatstring |
О-па. Мы не передали необходимое количество аргументов для форматирования строки. Если вы внимательно взгляните на пример, вы увидите, что у нас есть два экземпляра %, но для того, чтобы вставить строки, вам нужно передать столько же %, сколько у нас строк. Теперь вы готовы к тому, чтобы узнать больше о вставке целых чисел, и чисел с запятыми. Давайте взглянем.
Python
my_string = «%i + %i = %i» % (1,2,3)
print(my_string) # ‘1 + 2 = 3’
float_string = «%f» % (1.23)
print(float_string) # ‘1.230000’
float_string2 = «%.2f» % (1.23)
print(float_string2) # ‘1.23’
float_string3 = «%.2f» % (1.237)
print(float_string3) # ‘1.24’
|
1 2 3 4 5 6 7 8 9 10 11 |
my_string=»%i + %i = %i»%(1,2,3) print(my_string)# ‘1 + 2 = 3’ float_string=»%f»%(1.23) print(float_string)# ‘1.230000’ float_string2=»%.2f»%(1.23) print(float_string2)# ‘1.23’ float_string3=»%.2f»%(1.237) print(float_string3)# ‘1.24’ |
Первый пример достаточно простой. Мы создали строку, которая принимает три аргумента, и мы передаем их. В случае, если вы еще не поняли, Python не делает никаких дополнений в первом примере. Во втором примере, мы передаем число с запятой
Обратите внимание на то, что результат включает множество дополнительных нулей (1.230000). Нам это не нужно, так что мы указываем Python ограничить выдачу до двух десятичных значений в третьем примере (“%.2f”)
Последний пример показывает, что Python округлит числа для вас, если вы передадите ему дробь, что лучше, чем два десятичных значения. Давайте взглянем на то, что произойдет, если мы передадим неправильные данные:
Python
int_float_err = «%i + %f» % («1», «2.00»)
Traceback (most recent call last):
File «<string>», line 1, in <fragment>
TypeError: %d format: a number is required, not str
|
1 2 3 4 |
int_float_err=»%i + %f»%(«1″,»2.00») Traceback(most recent call last) File»<string>»,line1,in<fragment> TypeError%dformatanumber isrequired,notstr |
В данном примере мы передали две строки вместо целого числа и дроби. Это привело к ошибке TypeError, что говорит нам о том, что Python ждал от нас чисел. Это указывает на отсутствие передачи целого числа, так что мы исправим это, по крайней мере, попытаемся:
Python
int_float_err = «%i + %f» % (1, «2.00»)
Traceback (most recent call last):
File «<string>», line 1, in <fragment>
TypeError: float argument required, not str
|
1 2 3 4 5 |
int_float_err=»%i + %f»%(1,»2.00″) Traceback(most recent call last) File»<string>»,line1,in<fragment> TypeErrorfloatargument required,notstr |
Мы получили ту же ошибку, но под другим предлогом, в котором написано, что мы должны передать дробь. Как мы видим, Python предоставляет нам полезную информацию о том, что же пошло не так и как это исправить. Если вы исправите вложения надлежащим образом, тогда вы сможете запустить этот пример. Давайте перейдем к новому методу форматирования строк.
#3 Интерполяция строк / f-Строки (Python 3.6+)
Python 3.6 Добавил новый подход форматирования строк под названием форматированные строчные литералы, или “f-строки”. Этот новый способ форматирования строк позволяет вам использовать встроенные выражения Python внутрь строковых констант. Вот простой, наглядный пример:
Python
name = ‘Bob’
print(f’Hello, {name}!’)
# Вывод: ‘Hello, Bob!’
|
1 2 3 4 |
name=’Bob’ print(f’Hello, {name}!’) |
Как вы видите, это добавляет префикс к константе строки с буквой “f” — следовательно, названием становится “f-strings”. Этот новый синтаксис форматирования — очень мощный. Так как вы можете вставлять произвольные выражения Python, вы можете даже проводить встроенную арифметику. Посмотрим на пример:
Python
a = 5
b = 10
print(f’Five plus ten is {a + b} and not {2 * (a + b)}.’)
# Вывод: ‘Five plus ten is 15 and not 30.’
|
1 2 3 4 5 |
a=5 b=10 print(f’Five plus ten is {a + b} and not {2 * (a + b)}.’) |
Форматированные строчные литералы — это особенность парсера Python, которая конвертирует в серию строчных констант и выражений. Затем, они соединяются и составляют итоговую строку.
Представьте, что у вас есть следующая функция greet(), которая содержит :
Python
def greet(name, question):
return f»Hello, {name}! How’s it {question}?»
print(greet(‘Bob’, ‘going’))
# Вывод: «Hello, Bob! How’s it going?»
|
1 2 3 4 5 6 7 |
defgreet(name,question) returnf»Hello, {name}! How’s it {question}?» print(greet(‘Bob’,’going’)) |
Когда вы разбираете функцию, и смотрите, что происходит за кулисами, вы увидите, что f-строка в функции трансформируется в нечто, похожее на следующее:
Python
def greet(name, question):
return «Hello, » + name + «! How’s it » + question + «?»
|
1 2 |
defgreet(name,question) return»Hello, «+name+»! How’s it «+question+»?» |
Python
>>> import dis
>>> dis.dis(greet)
2 0 LOAD_CONST 1 (‘Hello, ‘)
2 LOAD_FAST 0 (name)
4 FORMAT_VALUE 0
6 LOAD_CONST 2 («! How’s it «)
8 LOAD_FAST 1 (question)
10 FORMAT_VALUE 0
12 LOAD_CONST 3 (‘?’)
14 BUILD_STRING 5
16 RETURN_VALUE
|
1 2 3 4 5 6 7 8 9 10 11 |
>>>importdis >>>dis.dis(greet) 2LOAD_CONST1(‘Hello, ‘) 2LOAD_FAST(name) 4FORMAT_VALUE 6LOAD_CONST2(«! How’s it «) 8LOAD_FAST1(question) 10FORMAT_VALUE 12LOAD_CONST3(‘?’) 14BUILD_STRING5 16RETURN_VALUE |
Строчные литералы также поддерживают существующий синтаксис формата строк метода str.format(). Это позволяет вам решать те же проблемы с форматированием, которые мы рассматривали в двух предыдущих разделах:
Python
print(f»Hey {name}, there’s a {errno:#x} error!»)
# Вывод: «Hey Bob, there’s a 0xbadc0ffee error!»
|
1 2 3 |
print(f»Hey {name}, there’s a {errno:#x} error!») |
Новые форматированные строчные литералы аналогичны шаблонным литералам (Template Literals) в JavaScript, которые были добавлены в ES2015. Я думаю это достаточно хорошее нововведение в Python, и я бы с радостью пользовался ими на каждодневной основе (в Python 3). Вы можете узнать больше о форматированных строчных литералах в интернете.
The Python String .format() Method
The Python string method was introduced in version 2.6. It’s similar in many ways to the string modulo operator, but goes well beyond in versatility. The general form of a Python call is shown below:
Note that this is a method, not an operator. You call the method on , which is a string containing replacement fields. The and to the method specify values that are inserted into in place of the replacement fields. The resulting formatted string is the method’s return value.
In the string, replacement fields are enclosed in curly braces (). Anything not contained in curly braces is literal text that’s copied directly from the template to the output. If you need to include a literal curly bracket character, like or , in the template string, then you can escape this character by doubling it:
>>>
Python string formatting integer
Now, we will see python string formatting integer.
In string formatting integer, we will use “d” which is used for integer argument. The placeholder is defined by using curly brackets “{ }”.
Example:
To get the output, I have used print(“My marks is {:d} in maths”.format(80)). You can refer to the below screenshot for the output.
Python string formatting integer
You may like the following Python tutorials:
- Python String Functions
- How to convert an integer to string in python
In this tutorial, we have learned about Python string formatting, and also we have covered these topics:
- Python string formatting
- Python string formatting multiple values
- Python string formatting padding
- Python string formatting padding with left alignment
- Python string formatting padding with right alignment
- Python string formatting padding with center alignment
- Python string formatting padding with center alignment and * padding character
- Python string formatting using f
- Python string formatting float
- Python string format methods
- Python string formatting decimal places
- Python string formatting integer
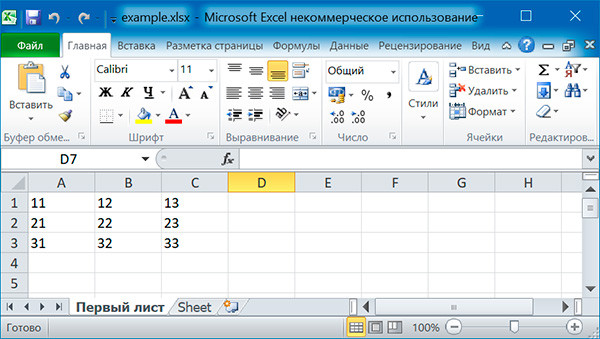
Запись файлов Excel
>>> import openpyxl
>>> wb = openpyxl.Workbook()
>>> wb.sheetnames

>>> wb.create_sheet(title = 'Первый лист', index = 0)
<Worksheet "Первый лист">
>>> wb.sheetnames

>>> wb.remove(wb)
>>> wb.sheetnames

>>> wb.save('example.xlsx')
Метод возвращает новый объект , который по умолчанию становится последним листом книги. С помощью именованных аргументов и можно задать имя и индекс нового листа.
Метод принимает в качестве аргумента не строку с именем листа, а объект . Если известно только имя листа, который надо удалить, используйте . Еще один способ удалить лист — использовать инструкцию .
Не забудьте вызвать метод , чтобы сохранить изменения после добавления или удаления листа рабочей книги.
Запись значений в ячейки напоминает запись значений в ключи словаря:
>>> import openpyxl
>>> wb = openpyxl.Workbook()
>>> wb.create_sheet(title = 'Первый лист', index = 0)
>>> sheet = wb
>>> sheet = 'Здравствуй, мир!'
>>> sheet.value
'Здравствуй, мир!'
Заполняем таблицу 3×3:
import openpyxl

# создаем новый excel-файл
wb = openpyxl.Workbook()

# добавляем новый лист
wb.create_sheet(title = 'Первый лист', index = )

# получаем лист, с которым будем работать
sheet = wb'Первый лист'

for row in range(1, 4)
    for col in range(1, 4)
        value = str(row) + str(col)
        cell = sheet.cell(row = row, column = col)
        cell.value = value

wb.save('example.xlsx')
Можно добавлять строки целиком:
sheet.append('Первый', 'Второй', 'Третий')
sheet.append('Четвертый', 'Пятый', 'Шестой')
sheet.append('Седьмой', 'Восьмой', 'Девятый')
Погружене в f-строки
f-строки делают очень простую вещь — они берут значения переменных, которые есть в текущей области видимости, и подставляют их в строку. В самой строке вам лишь нужно указать имя этой переменной в фигурных скобках.
f-строки также поддерживают расширенное форматирование чисел:
С помощью f-строк можно форматировать дату без вызова метода strftime():
Они поддерживают базовые арифметические операции. Да, прямо в строках:
Позволяют обращаться к значениям списков по индексу:
А также к элементам словаря по ключу:
Причем вы можете использовать как строковые, так и числовые ключи. Точно также как в обычном Python коде:
Вы можете вызывать в f-строках методы объектов:
А также вызывать функции:
f-строки очень гибкий и мощный инструмент для создания самых разнообразных шаблонов.
Со всеми возможностя f-строк вы можете ознакомится в PEP498.
User-Defined Formatting
There will be times when customizing the formatting of fields
on a per-type basis is not enough. An example might be a
spreadsheet application, which displays hash marks ‘#’ when a value
is too large to fit in the available space.
For more powerful and flexible formatting, access to the underlying
format engine can be obtained through the ‘Formatter’ class that
lives in the ‘string’ module. This class takes additional options
which are not accessible via the normal str.format method.
An application can subclass the Formatter class to create its own
customized formatting behavior.
The PEP does not attempt to exactly specify all methods and
properties defined by the Formatter class; instead, those will be
defined and documented in the initial implementation. However, this
PEP will specify the general requirements for the Formatter class,
which are listed below.
Extra formatting options with format()
also supports type-specific formatting options like datetime’s and complex number formatting.
internally calls for datetime, while accesses the attributes of the complex number.
You can easily override the method of any object for custom formatting.
Example 11: Type-specific formatting with format() and overriding __format__() method
Output
It's now: 2016/12/02 04:16:28
Real part: 1.0 and Imaginary part: 2.0
Adam's age is: 23
Here,
-
For datetime:
Current datetime is passed as a positional argument to the method.
And, internally using method, accesses the year, month, day, hour, minutes and seconds. -
For complex numbers:
1+2j is internally converted to a ComplexNumber object.
Then accessing its attributes and , the number is formatted. -
Overriding __format__():
Like datetime, you can override your own method for custom formatting which returns age when accessed as
You can also use object’s and functionality with shorthand notations using .
Like , you can easily override object’s and methods.
Для аргументов ключевого слова
Мы использовали тот же пример выше, чтобы показать разницу между ключевыми и позиционными аргументами.
Здесь вместо параметров мы использовали пару «ключ-значение» для параметров. А именно name = «Adam» и blc = 230.2346.
Поскольку на эти параметры ссылаются их ключи, как {name} и {blc: 9.3f}, они известны как ключевое слово или именованные аргументы.
Внутри:
- Заполнитель {имя} заменяется значением имени ‒ «Адам». Поскольку он не содержит никаких других кодов формата, помещается «Адам».
- Для аргумента blc = 230.2346 заполнитель {blc: 9.3f} заменяется значением 230.2346. Но перед его заменой, как и в предыдущем примере, он выполняет над ним операцию 9.3f. Это выводит 230.235.0. Десятичная часть обрезается после трех знаков, а оставшиеся цифры округляются. Аналогично, общая ширина назначена 9, оставляя два пробела слева.
3 – Литеральная интерполяция строки (Python 3.6+)
Python 3.6 добавляет новый метод форматирования строк под названием Форматированные строковые литералы. Это новый способ форматирования строк, позволяющий использовать встроенные выражения Python внутри строковых констант. Вот простой пример, который поможет почувствовать эту функцию:
Новый синтаксис форматирования является очень мощным, потому что может содержать произвольные Python выражения с внутренней арифметикой. Например:
Форматированные строковые литералы – это функция парсера Python, которая преобразует f-string в ряд строковых констант и выражений. Затем они соединяются для построения финальной строки.
Допустим, что есть функция greet(), которая содержит f-string:
it going?»
Если рассмотреть функцию более подробно, можно увидеть, что f-string в функции преобразуется в следующее:
Реальная реализация немного быстрее, чем при использовании кода операции BUILD_STRING в качестве оптимизации. Но функционально они одинаковы:
Строковые литералы также поддерживают существующий синтаксис формата строки метода str.format(). Это позволяет решать те же проблемы форматирования, которые обсуждались в предыдущих двух разделах:
Новое форматирование строковых литералов Python похожи на литералы шаблонов в JavaScript, добавленные в ES2015.
Python Tutorial
Python HOMEPython IntroPython Get StartedPython SyntaxPython CommentsPython Variables
Python Variables
Variable Names
Assign Multiple Values
Output Variables
Global Variables
Variable Exercises
Python Data TypesPython NumbersPython CastingPython Strings
Python Strings
Slicing Strings
Modify Strings
Concatenate Strings
Format Strings
Escape Characters
String Methods
String Exercises
Python BooleansPython OperatorsPython Lists
Python Lists
Access List Items
Change List Items
Add List Items
Remove List Items
Loop Lists
List Comprehension
Sort Lists
Copy Lists
Join Lists
List Methods
List Exercises
Python Tuples
Python Tuples
Access Tuples
Update Tuples
Unpack Tuples
Loop Tuples
Join Tuples
Tuple Methods
Tuple Exercises
Python Sets
Python Sets
Access Set Items
Add Set Items
Remove Set Items
Loop Sets
Join Sets
Set Methods
Set Exercises
Python Dictionaries
Python Dictionaries
Access Items
Change Items
Add Items
Remove Items
Loop Dictionaries
Copy Dictionaries
Nested Dictionaries
Dictionary Methods
Dictionary Exercise
Python If…ElsePython While LoopsPython For LoopsPython FunctionsPython LambdaPython ArraysPython Classes/ObjectsPython InheritancePython IteratorsPython ScopePython ModulesPython DatesPython MathPython JSONPython RegExPython PIPPython Try…ExceptPython User InputPython String Formatting
#3 String Interpolation / f-Strings (Python 3.6+)
Python 3.6 added a new string formatting approach called formatted string literals or “f-strings”. This new way of formatting strings lets you use embedded Python expressions inside string constants. Here’s a simple example to give you a feel for the feature:
>>>
As you can see, this prefixes the string constant with the letter ““—hence the name “f-strings.” This new formatting syntax is powerful. Because you can embed arbitrary Python expressions, you can even do inline arithmetic with it. Check out this example:
>>>
Formatted string literals are a Python parser feature that converts f-strings into a series of string constants and expressions. They then get joined up to build the final string.
Imagine you had the following function that contains an f-string:
>>>
When you disassemble the function and inspect what’s going on behind the scenes, you’ll see that the f-string in the function gets transformed into something similar to the following:
>>>
The real implementation is slightly faster than that because it uses the opcode as an optimization. But functionally they’re the same:
>>>
String literals also support the existing format string syntax of the method. That allows you to solve the same formatting problems we’ve discussed in the previous two sections:
>>>
String Methods
The built-in string class (and also the unicode class in 2.6) will
gain a new method, ‘format’, which takes an arbitrary number of
positional and keyword arguments:
"The story of {0}, {1}, and {c}".format(a, b, c=d)
Within a format string, each positional argument is identified
with a number, starting from zero, so in the above example, ‘a’ is
argument 0 and ‘b’ is argument 1. Each keyword argument is
identified by its keyword name, so in the above example, ‘c’ is
used to refer to the third argument.
There is also a global built-in function, ‘format’ which formats
a single value:
print(format(10.0, "7.3g"))
Форматирование строк с помощью f-строк
В Python 3.6 добавился новый вариант форматирования строк — f-строки или
интерполяция строк. F-строки позволяют не только подставлять какие-то
значения в шаблон, но и позволяют выполнять вызовы функций, методов и
т.п.
Во многих ситуациях f-строки удобней и проще использовать, чем format,
кроме того, f-строки работают быстрее, чем format и другие методы
форматирования строк.
Синтаксис
F-строки — это литерал строки с буквой перед ним. Внутри f-строки
в паре фигурных скобок указываются имена переменных, которые надо
подставить:
In : ip = '10.1.1.1'

In : mask = 24

In : f"IP: {ip}, mask: {mask}"
Out: 'IP: 10.1.1.1, mask: 24'

Аналогичный результат с format можно получить так:
``"IP: {ip}, mask: {mask}".format(ip=ip, mask=mask)``.
Очень важное отличие f-строк от format: f-строки — это выражение, которое
выполняется, а не просто строка. То есть, в случае с ipython, как только
мы написали выражение и нажали Enter, оно выполнилось и вместо выражений
и подставились значения переменных
Поэтому, например, нельзя сначала написать шаблон, а затем определить
переменные, которые используются в шаблоне:
In 1]: f"IP: {ip}, mask: {mask}"
---------------------------------------------------------------------------
NameError                                 Traceback (most recent call last)
<ipython-input-1-e6f8e01ac9c4> in <module>()
----> 1 f"IP: {ip}, mask: {mask}"

NameError name 'ip' is not defined
Кроме подстановки значений переменных, в фигурных скобках можно писать
выражения:
In 5]: first_name = 'William'

In 6]: second_name = 'Shakespeare'

In 7]: f"{first_name.upper()}{second_name.upper()}"
Out7]: 'WILLIAM SHAKESPEARE'
После двоеточия в f-строках можно указывать те же значения, что и при
использовании format:
In 9]: oct1, oct2, oct3, oct4 = 10, 1, 1, 1

In 10]: print(f'''
    ...: IP address:
{oct1<8}{oct2<8}{oct3<8}{oct4<8}
{oct108b}{oct208b}{oct308b}{oct408b}''')

IP address
10       1        1        1
00001010 00000001 00000001 00000001
Предупреждение
Так как для полноценного объяснения f-строк, надо показывать
примеры с циклами и работой с объектами, которые еще не рассматривались,
это тема также есть в разделе с дополнительными примерами и пояснениями.
#2 “New Style” String Formatting (str.format)
Python 3 introduced a new way to do string formatting that was also later back-ported to Python 2.7. This “new style” string formatting gets rid of the -operator special syntax and makes the syntax for string formatting more regular. Formatting is now handled by .
You can use to do simple positional formatting, just like you could with “old style” formatting:
>>>
Or, you can refer to your variable substitutions by name and use them in any order you want. This is quite a powerful feature as it allows for re-arranging the order of display without changing the arguments passed to :
>>>
This also shows that the syntax to format an variable as a hexadecimal string has changed. Now you need to pass a format spec by adding a suffix. The format string syntax has become more powerful without complicating the simpler use cases. It pays off to read up on this .
Still, the official Python 3 documentation doesn’t exactly recommend “old style” formatting or speak too fondly of it:
This is why I’d personally try to stick with for new code moving forward. Starting with Python 3.6, there’s yet another way to format your strings. I’ll tell you all about it in the next section.
Error handling
There are two classes of exceptions which can occur during formatting:
exceptions generated by the formatter code itself, and exceptions
generated by user code (such as a field object’s ‘getattr’ function).
In general, exceptions generated by the formatter code itself are
of the «ValueError» variety — there is an error in the actual «value»
of the format string. (This is not always true; for example, the
string.format() function might be passed a non-string as its first
parameter, which would result in a TypeError.)
The text associated with these internally generated ValueError
exceptions will indicate the location of the exception inside
the format string, as well as the nature of the exception.
For exceptions generated by user code, a trace record and
dummy frame will be added to the traceback stack to help
in determining the location in the string where the exception
occurred. The inserted traceback will indicate that the
error occurred at:
File "<format_string>;", line XX, in column_YY
where XX and YY represent the line and character position
information in the string, respectively.
Python string formatting
Here, we will see python string formatting with an example.
The format() method allows the formatting of the selected parts of a string. We use format to make sure that the string will display as expected.
To control such value, add a placeholder curly bracket {} in the text and then run the values through the format() method.
Example:
To get the output, I have used print(msg.format(roll)). You can refer to the below screenshot for the output.

Python string formatting
This is how we can do string formatting in Python.
You may also like, How to concatenate strings in python? and How to add two variables in Python.
Встроенные средства Python
Основа для работы с файлами — built-in функция
Эта функция имеет два аргумента. Аргумент принимает строку, в которой содержится путь к файлу. Второй аргумент, , позволяет указать режим, в котором необходимо работать с файлом. По умолчанию этот аргумент принимает значение rt», с которым, и с некоторыми другими, можно ознакомиться в таблице ниже
Эти режимы могут быть скомбинированы. Например, «rb открывает двоичный файл для чтения. Комбинируя «r+» или «w+» можно добиться открытия файла в режиме и чтения, и записи одновременно с одним отличием — первый режим вызовет исключение, если файла не существует, а работа во втором режиме в таком случае создаст его.
Начать саму работу с файлом можно с помощью объекта класса , который возвращается функцией . У этого объекта есть несколько атрибутов, через которые можно получить информацию
- — название файла;
- — режим, в котором этот файл открыт;
- — возвращает , если файл был закрыт.
По завершении работы с файлом его необходимо закрыть при помощи метода
Однако более pythonic way стиль работы с файлом встроенными средствами заключается в использовании конструкции , которая работает как менеджер создания контекста. Написанный выше пример можно переписать с ее помощью
Главное отличие заключается в том, что python самостоятельно закрывает файл, и разработчику нет необходимости помнить об этом. И бонусом к этому не будут вызваны исключения при открытии файла (например, если файл не существует).
Padding Variable Substitutions
Because the placeholders are replacement fields, you can pad or create space around an element by increasing field size through additional parameters. This can be useful when we need to organize a lot of data visually.
We can add a number to indicate field size (in terms of characters) after the colon in the curly braces of our syntax:
In the example above, we gave the number a character field size of 4, and the string a character field size of 16 (because it is a long string).
As we see, by default strings are left-justified within the field, and numbers are right-justified. You can modify this by placing an alignment code just following the colon. will left-align the text in a field, will center the text in the field, and will right-align it.
Let’s left-align the number and center the string:
Now we see that is left-aligned, providing space in the field before , and is centered in its field with space to the left and right of it.
By default, when we make a field larger with formatters, Python will fill the field with whitespace characters. We can modify that to be a different character by specifying the character we want it to be directly following the colon:
We are accepting the string being passed to in the index position of 0 since we did not specify otherwise, including the colon, and specifying that we will use instead of space to fill up the field. We’re centering the string with , specifying that the field is 20 characters in size, and also indicating that we are working with a string conversion type by including .
We can combine these parameters with other parameters we’ve used before:
In the parameters within the curly braces, we specified the index field number of the float and included the colon, indicated the size of the field number and included the full stop, wrote in the number of places after the decimal place, and then specified the conversion type of .
Method 2: Redirect sys.stdout to the file
Usually, when we use the print function, the output gets displayed to the console.
But, since the standard output stream is also a handler to a file object, we can route the standard output to point to the destination file instead.
The below code is taken from our previous article on stdin, stdout and stderr. This redirects the to the file.
import sys

# Save the current stdout so that we can revert sys.stdou after we complete
# our redirection
stdout_fileno = sys.stdout

sample_input =

# Redirect sys.stdout to the file
sys.stdout = open('output.txt', 'w')

for ip in sample_input:
    # Prints to the redirected stdout (Output.txt)
    sys.stdout.write(ip + '\n')
    # Prints to the actual saved stdout handler
    stdout_fileno.write(ip + '\n')

# Close the file
sys.stdout.close()
# Restore sys.stdout to our old saved file handler
sys.stdout = stdout_fileno
Output (Assume that is a newly created file)
vijay@AskPython:~# python output_redirection.py
Hi
Hello from AskPython
exit
root@ubuntu:~# cat output.txt
Hi
Hello from AskPython
exit
Ввод и вывод данных
- Вывод данных осуществляется при помощи оператора print:
1 2 3 4 5 |
a = 1
b = 2
print(a)
print(a + b)
print('сумма = ', a + b)
|
Существует возможность записи инструкций в одну строку, разделяя их через . Однако не следует часто использовать такой способ, это снижает удобочитаемость:
1 2 3 |
a = 1; b = 2; print(a)
print(a + b)
print('сумма = ', a + b)
|
Для функции print может задаваться так называемый сепаратор — разделитель между элементами вывода:
1 2 3 |
x=2 y=5 print ( x, "+", y, "=", x+y, sep = " " ) |
Результат отобразится с пробелами между элементами: 2 + 5 = 7
Для форматированного вывода используется format:
1 2 |
x = 11
print ( "{:4d}".format(x) )
|
В результате выведется число 11, а перед ним два пробела, так как указано использовать для вывода четыре знакоместа.
Или с несколькими аргументами:
1 2 |
x = 2
print ( "{:4d}{:4d}{:4d}".format (x, x+x, x*x) )
|
В итоге каждое из значений выводится из расчета 4 знакоместа.
Ввод данных осуществляется при помощи оператора :
1 2 |
a = input() print(a) |
В скобках функции можно указать сообщение-комментарий к вводимым данным:
a = input ("Введите количество: ")
|
Функция input воспринимает входные данные, как поток символов. Поэтому, чтобы принять целочисленное значение, следует воспользоваться функцией int():
a = int (input()) |
Задание Python 1_1:
Используя операторы input и print, выведите значения целых переменных x=5 и y=3 в следующих форматах:
3+5=?
3 | 5 | 8
Z(5)=F(3)
x=5; y=3;
Ответ: (5;3)