Идеальные настройки роутера: устанавливаем альтернативную прошивку dd-wrt
Содержание:
- [edit] Basic Tutorials
- 3) NETGEAR R7800-100NAS Nighthawk X4S AC2600 WIFI Router
- [edit] Prepare to Go Offline
- [edit] How To Use DHCP to Set the WAP’s IP Address
- [edit] Options
- Настройка прошивки DD-WRT на роутере: руководство для юзера
- [edit] Review
- [edit] Method 1: Flashing with Web GUI
- [edit] Method 1: Flashing with Web GUI
- [edit] Client Mode Setup
- [edit] Going Offline/Before Implementation
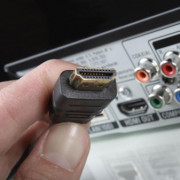
- Flashing Your Router with DD-WRT Firmware
- [edit] Где скачать прошивку?
- [edit] Карта меню
[edit] Basic Tutorials
|
|
3) NETGEAR R7800-100NAS Nighthawk X4S AC2600 WIFI Router
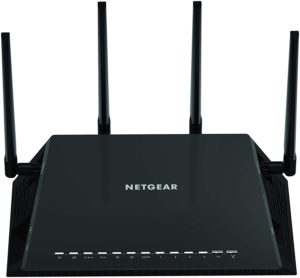 The NETGEAR R7800-100NAS Nighthawk X4S AC2600 is yet another phenomenal wireless router from NETGEAR. Typical of NETGEAR routers, it features a high-top speed and a wide coverage area. Adding the DD-WRT firmware to this router would make it arguably the best router you’ve ever had.
Features
- The dual-band router has top speeds of up to 2600Mbps (800+1800)
- The router features the multi-user MIMO technology
- The router has a 1.7GHz dual-core processor
- The router is equipped with superfast twin USB 3.0
Pros
- The dual-core processor enhances performance
- The USB access allows easy firmware upgrade and data download
- The router has impressive speeds
- The four high-powered antennas ensure maximum coverage
Cons
Guest networks are wide open at L2. They are not isolated. That’s a security loophole
Opinion
The NETGEAR R7800-100NAS Nighthawk X4S AC2600 has a price tag of under $200. Comparing that price and the features on this router, it seems like the ultimate bargain. Upgrading this router with the DD-WRT firmware would be the best thing you gave yourself all year.
[edit] Prepare to Go Offline
- You will not have internet access through the router during the process of replacing the firmware. You are going to do almost everything offline with a LAN connection to your router (how to ). Given the many types of problems you can encounter that can prohibit you from getting help, the process of reactivating and deactivating your security settings if you actually can get back online, and the likelihood for browser crashes if you try to just keep the pages up, you will need to download everything you need before you start. This will allow you to review the information offline in the event that something goes wrong.
- Windows Vista users may need to .
- Note or screenshot the current settings for future reference, especially if you have static IP addresses.
- It can be essential to record your current WAN MAC address. Some ISPs do not allow an immediate change of the routing hardware without a phone call. Check the GUI and router label for the WAN MAC.
- Have a secondary router or internet connection available while experimenting with your router’s firmware, to expedite any trouble shooting and remove the risk of becoming stranded.
- If you have a cable modem which connects to your router with ethernet, you can plug your PC straight into the modem should you have any problems. Your PC will be assigned your external IP with DHCP, and you will be on the net. Remember to use a software firewall.
- Recommended: PDF or save the following for offline reference e.g. File->Save As to html (NOT a bookmark)
- The installation page for your specific router as found though the Hardware-specific page.
- This Installation wiki.
- Recover from a Bad Flash.
- In addition, you will probably also need:
- First («killer») flash file, if applicable.
- Second (DD-WRT) flash file. (In some cases, this may be the only file you need.)
[edit] How To Use DHCP to Set the WAP’s IP Address
Note: This step is optional. Having the WAP’s IP address set by a DHCP server is not required. It can be made static, as shown above.
Note also that the steps below assume a DHCP server is running outside this DD-WRT WAP box on the LAN (e.g., in the FAI DSL box/gateway), so, keep this internal DD-WRT WAP DHCP server disabled as stated above, as well as all other settings.
It is not possible to set the LAN interface to get its IP address via DHCP using the web configuration interface. You can, however, set your startup script to obtain an IP address.
Simply set your IP address to (starting DHCP client):
[ ! -e /tmp/udhcpc ] && ln -s /sbin/rc /tmp/udhcpc
udhcpc -i br0 -p /var/run/udhcpc.pid -s /tmp/udhcpc -H test-wrt-wireless
hostname `nslookup \`ifconfig br0 | grep 'inet addr' |cut -f 2 -d ':'\` | grep 'Name:' | awk '{print $2;}' | cut -f 1 -d '.'`
if test `hostname` != `nvram get wan_hostname`; then
     nvram set wan_hostname=`hostname`;
     nvram set router_name=`hostname`;
     nvram commit;
fi
Only the two first lines are required if you don’t want your WAP to set its name based on the IP address it gets. However, if you want to save a configuration file which will apply to several WAPs, that can be a handy feature.
EDIT 2013/09/19:
If you leave the «Local DNS» GUI field to 0.0.0.0, then the WAP will use the DNS supplied by DHCP. To be functional, this requires the «Gateway» is set too. So, you also wish the gateway to be assigned by DHCP too. You do it appending
route add default gw `nvram get wan_gateway`
after the udhcpc command in the script. You will leave the unused Basic/Network Setup/»Gateway» GUI field to 0.0.0.0, or, to get a GUI feedback of the currently assigned wan_gateway nvram value, have this field filled by the value of the nvram lan_gateway value by setting this last the same way as the one below for wds_watchdog_ips.
Then you may want the optional WDS/Connection Watchdog to ping the gateway it just got from DHCP: just enable the watchdog in the GUI, set the wanted delay to have the WAP monitor the connection to the gateway, leave the IP’s field blank, append the following 4 lines after the route add … command above, so that they will fill it in for you and the watchdog will help your WAP to follow any change of the gateway IP address (as long as the previous gateway IP is no longer used. You can work around the case when the previous IP is reused for another purpose with a reboot on URL ping failure custom script plus the cron job that triggers it in the GUI Management tab, but if the gateway loses its WAN connection, the WAP’s wireless clients may lose their wireless connection at the same rhythm the WAP reboots. To prevent this, think to ping both external(s) URL(s) and internal IP(s) and make the custom script to reboot the WAP when all pings fail — this will preserve internal connections in the case the Internet is lost at the gateway WAN side).
The if tests below are just here to preserve the nvram service life with no rewrite when not needed on boot. Even the WAP’s ip will survive over reboots thanks to a static lease — this applies to other scripts.
GW=`route -n|grep UG|awk '{print $2;}'`
if ; then
nvram set wds_watchdog_ips="$GW"
nvram commit
fi
Once you have manually set the router & hostname name fields, you should set the DHCP startup script this way:
[ ! -e /tmp/udhcpc ] && ln -s /sbin/rc /tmp/udhcpc
udhcpc -i br0 -p /var/run/udhcpc.pid -s /tmp/udhcpc -H `nvram get wan_hostname`
route add default gw `nvram get wan_gateway`
GW=`route -n|grep UG|awk '{print $2;}'`
IP_LAN=`ifconfig br0 | grep inet | cut -d: -f2 | cut -d' ' -f1`
MSK=`ifconfig br0 | grep inet | cut -d: -f4`
if ; then nvram set lan_ipaddr="$IP_LAN"; NC=1; fi
if ; then nvram set lan_netmask="$MSK"; NC=1; fi
if ; then nvram set lan_gateway="$GW"; NC=1; fi
if ; then nvram set wds_watchdog_ips="$GW"; NC=1; fi
# enable the following if you need watchdog
# if ; then nvram set wds_watchdog_enable=1; NC=1; fi
if ; then nvram commit; reboot; fi
The whole ip/mask/gateway will show correctly in the Settings web GUI page.
—Bib
[edit] Options
-d <dest_name> or       Install, upgrade, or remove package from <dest_name>
-dest <dest_name>       where <dest_name> is '''either''' a folder path '''or''' a pre-defined
                        path in /etc/ipkg.conf
                        by default, ipkg on DD-WRT supports these pre-defined names:
                        root /jffs
                        ram /tmp

-o <offline_root>       Use <offline_root> as the root for offline installation.
-offline <offline_root> where <offline_root> is a path

-force-depends          Make dependency checks warnings instead of errors

-force-defaults         Use default options for questions asked by ipkg.
                        (no prompts). Note that this will not prevent
                        package installation scripts from prompting.
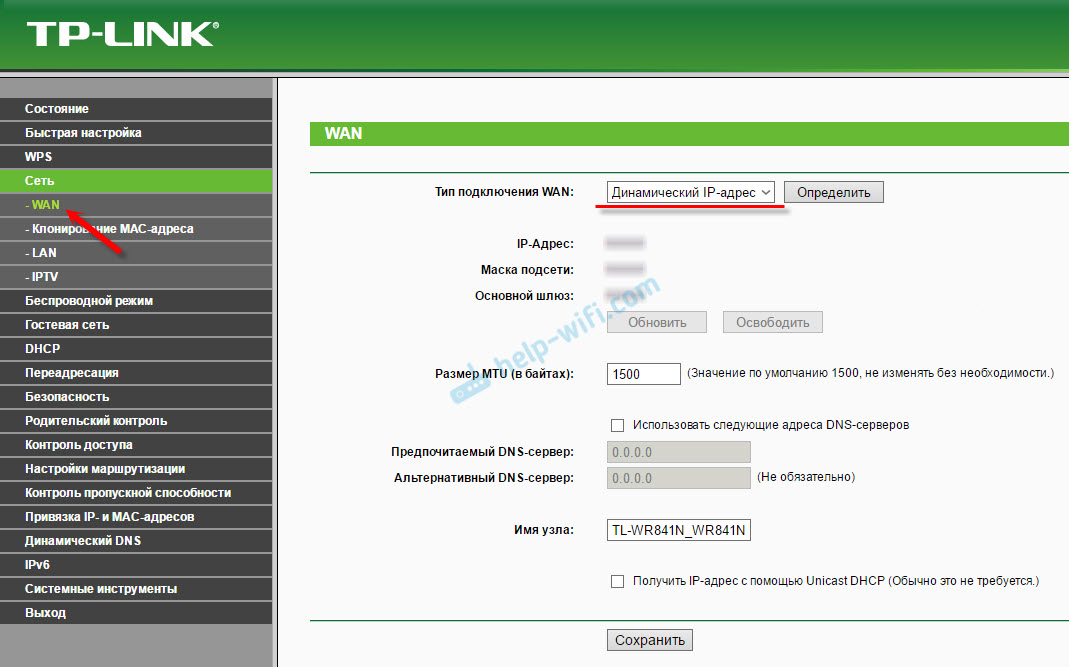
Настройка прошивки DD-WRT на роутере: руководство для юзера
DD WRT — это прошивка для маршрутизаторов, созданная на основе Unix. Она используется для моделей, работающих на процессорах BroadCom, Atheros, Xscale и PowerPC, и расширяет их стандартный функционал.
Опытному пользователю, которому нужно создать и настроить локальную сеть, почти всегда не хватает обычных настроек роутера для реализации всех задач, потому эта прошивка отлично подойдёт тем, кому нужная тонкая настройка функций и параметров домашней сети.
Установка прошивки позволяет расширить возможности маршрутизатора
Возможности прошивки
Помимо обычных настроек, предлагаемых официальным программным обеспечением роутера, DD WRT обеспечивает следующий функционал:
- доступ по Telnet и SSH;
- настройка планировщика задач Cron;
- удалённый запуск (Wake-on-Lan);
- настройка Samba;
- виртуальные точки Wi-Fi;
- PPTP, VPN — сервер и клиент;
- другие варианты гибкой настройки роутера.
Порядок настройки маршрутизатора с DD-WRT
Для открытия страницы настроек маршрутизатора, прошитого DD WRT, нужно настроить автоматическое назначение IP и других значений на сетевом адаптере ПК, с которого будете настраивать.
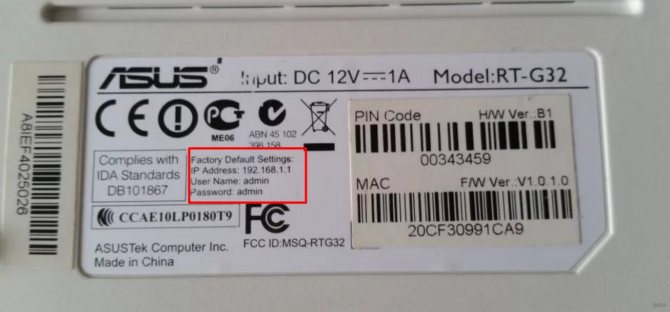
Затем нужно зайти в настройку роутера по IP, изначально указанному в инструкции. Здесь система предложит вам поменять админские логин и пароль на более надёжные.
Придумайте новые данные для входа, введите и запомните их — они ещё не раз пригодятся при работе с другими функциями роутера.
https://youtube.com/watch?v=h3WXX6uMpg0
При желании можно поменять язык пользовательского интерфейса. Дальнейшие инструкции мы приводим на примере русского. На странице «Administration» — «Management» нужно найти пункт «Enable Info Site» и поставить метку Disabled. Здесь же в пункте Language Selection выбрать русский язык. Нажать Save.
После этого начинается непосредственно настройка.
Статический IP
- На вкладке «Установка» — «Основные установки» выбрать «Тип соединения» — «Статический IP».
- Внести IP и другие данные, предоставленные поставщиком услуг.
- Снять отметки в пунктах «Использование DNSMasq для DHCP» и «… для DNS». Сохранить параметры.
- Перейти на вкладку «Службы», отключить «DNSMasq». Сохранить параметры.
Маршрутизация
Далее — настройка маршрутизации:
- Перейти на страницу «Установка» — «Маршруты».
- Назначить название и номер маршрута (своё для каждой из созданных подсетей).
- «Сеть назначения» — 172.17.0.0 (или ваш диапазон подсети).
- «Маска подсети» — 255.255.0.0
- «Шлюз» — IP-шлюза, выданный провайдером.
- «Интерфейс» — WAN.
- Сохранить введённые значения, повторить действия для создания следующего маршрута.
Подключение по VPN (PPTP)
- Открыть вкладку «Службы» — «PPTP».
- Включить «Опции клиента PPTP».
- «IP или имя DNS-сервера» — ввести цифровой или буквенный адрес.
- «MPPE-шифрование» — пустое.
- Пользовательское имя и пароль — из договора.
- Сохранить.
Подключение PPPoE
В DD WRT есть некоторые сложности с реализацией протокола PPPoE, поэтому понадобится прописать некоторые параметры вручную:
- На вкладке «Службы» — «PPTP» отключить «Опции клиента PPTP».
- На вкладке «Установка» — «Основные установки» выбрать тип подключения «PPPoE».
- Логин-пароль взять из договора.
- «Имя службы» —
- «Статический DNS1» — 172.17.0.2.
- Снять отметки напротив «DNSMasq для DHCP» и «DNSMasq для DNS».
- Сохранить.
Чтобы внешняя и локальная сети роутера под DD WRT корректно работали одновременно, необходимо настроить PPPoE Dual Access. Это делается в виде текстовых команд:
- Зайти на страницу «Тех. обслуживание» — «Команды».
- В текстовое поле ввести (vlan2 — имя интерфейса, выделенного для локалки):
ifconfig vlan2 netmask uproute add -net 172.17.0.0 netmask 255.255.0.0 gw
Повторить для 172.18.0.0 и 172.24.0.0
Нажать «Сохранить параметры запуска».
- В текстовое поле «Команды» ввести:
iptables -t nat -A POSTROUTING -o vlan2 -j MASQUERADE
iptables -t nat -A POSTROUTING -o vlan2 -j SNAT —t WAN_IP
Далее — «Сохранить брандмауэр».
- После перезагрузки устройство соединится по PPPoE.
Сеть Wi-Fi
Последний штрих — настройка вай-фай-сети:
- Вкладка «Wi-Fi» — «Основные настройки».
- Тип беспроводной сети — Точка доступа.
Режим беспроводной сети — Смешанный.
Ширина канала — 20 Мгц.
SSID передаётся в эфир — Включить.
Конфигурация сети — В мосте.
- Чтобы назначить пароль на Wi-Fi-сеть, нужно перейти на вкладку «Безопасность», выбрать Режим безопасности — WPA Personal и ввести новый ключ в «Общий ключ WPA».
- Сохранить параметры и перезагрузить роутер.
[edit] Review
There were three basic configuration changes you made to set up your router as a wireless access point.
Turn Off DHCP
If you did not turn off DHCP, when you plug your router into the network (after configuration), your WAP may provide IP addresses to clients on the wired network, and this may be inappropriate. Tracking down problems caused by multiple DHCP servers can be time-consuming and difficult.
Because it’s so important, it is worth repeating: Turn off DHCP before you continue!
Set the IP address of the LAN Interface
Immediately after turning off DHCP, while your PC still has the IP address the WAP gave you, set the LAN interface of the WAP to the IP address you want it to use, e.g., if the host router is 192.168.1.1, give the WAP an IP of 192.168.1.2. Alternatively, you can use the instructions below to set the WAP’s IP address via DHCP.
If you cannot connect to the WAP in order to set the LAN interface’s IP address, it is probably because your computer no longer has an IP address on the same subnet. To get past this issue, simply set your computer’s IP address and subnet to 192.168.1.8 and 255.255.255.0 respectively. (This assumes you are still using the default settings. If not, change the IP address and subnet as appropriate) You should now be able to point your browser at 192.168.1.1 (again assuming default settings).
LAN Uplink
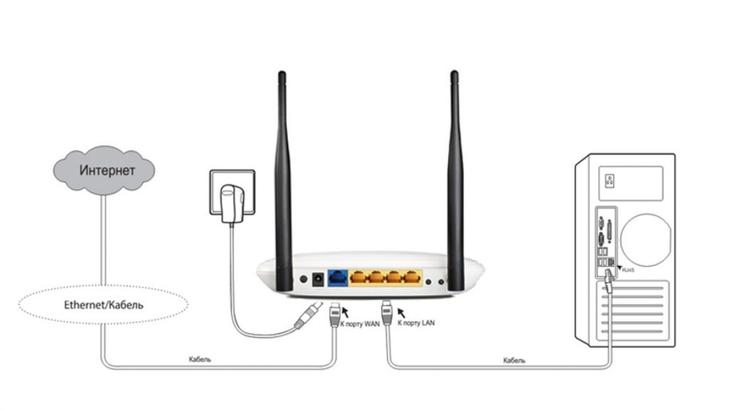
There are two ways to connect your WAP to the LAN. You can either Uplink through one of the router’s LAN ports, or use the WAN port that is normally connected to the cable/DSL modem.
LAN Uplink Through LAN Port
To complete the link between the two routers, connect a LAN port on the central router, to a LAN port on Linksys router (to be used as your WAP). You may need a crossover cable to do this, although many modern routers have automatic polarity sensing. To test this, connect a standard Ethernet cable between the two routers. If the LAN light comes on, the router has automatically switched the polarity and a crossover cable is not required.
LAN Uplink Through WAN Port
If you use your DD-WRT router as a WAP only, you may use your DD-WRT router’s WAN port to connect it to your existing LAN. To do this, you need to disable the Internet Connection and «Assign WAN Port to Switch».
Normally, the router does Layer 3 IP routing. but by «Assigning WAN Port to Switch,» your DD-WRT router will bypass that functionality and just pass on the Layer 2 ethernet packets from your wired network to the wireless network and vice versa.
Alternatively, if you have a router that supports assigning the WAN port to the switch:
Setup -> Basic Setup -> Internet Connection Type -> Connection Type = Disabled
Setup -> Basic Setup -> Network Setup -> WAN Port -> Assign WAN Port to Switch
you can connect the WAN port as your uplink to your main router. All this really buys you is an extra port (4 available instead of 3), but why not?
[edit] Method 1: Flashing with Web GUI
-
Reset your router
- This is probably not needed, but if the memory or nvram is almost full, a firmware update can brick it. Thus it is recommended at least until are familiar with the particular device.
- See Reset And Reboot and note the default IP address. If not listed on the router label see
- Perform a GUI reset (Administration->Factory Defaults in DD-WRT) or use an alternate method:
- Hard reset. WARNING: some devices should not use 30/30/30, including all ARM devices.
- Reset button: with the router running normally, hold the reset button until the lights flash (or up to 30 sec). Be careful when using this method! Research the functionality of your current firmware to be safe.)
-
Log in to the Web GUI
- Javascript is required for the Web interface. Try a different browser if having issues.
- Access the GUI via the router IP address. The default for DD-WRT and many devices is , or see . If the IP address is unknown, see Obtaining Router IP. If still having issues, .
- You will be prompted for username and password. (If your router already has a DD-WRT versions starting with 2006-Feb-28, the default username is root. Prior versions have a blank username by default. For Linksys firmware, the default username can be left blank or set to anything. For both DD-WRT and Linksys firmware, the default password is admin. Search online for other defaults on other routers).
-
Upload the Firmware
- NOTE: Multiple flashes may be needed if flashing from OEM firmware. See the .
- WARNING:DO NOT interrupt the setup while the router is being flashed and rebooted. Do not turn off the computer, close the web browser, or turn off the router during this process!
- This section is written for the DD-WRT GUI. An OEM firmware interface will be different. See .
- Click the «Administration»->»Firmware Upgrade» tab.
- Optional: select the option to Reset to Defaults after flashing (NOTE: this can cause flashing issues)
- Click the «Browse» button and select the DD-WRT .bin file you downloaded and confirmed.
- Click the «Upgrade» button and wait for a redirect page confirming successful upload.
- Now wait at least 5 minutes before clicking «Continue». This varies with the hardware.
- If flashed successfully you will now be able to access the DD-WRT web interface at .
-
Reset Again
- Do this only after you have confirmed that the firmware upgrade is working.
- This is required if flashing from OEM firmware! See the above section again.
- For DD-WRT upgrades, this should only be needed if making large build jumps, changing kernel version (e.g. 2.4 to 2.6 or 2.6 to 3.10), or if having issues. For the latter, reset, retest, and then search the forum before making a new post.
-
Possible Errors with Uploading Firmware
- If the DD-WRT web interface is not accessible after 10 minutes, try clearing the browser cache, renewing the IP address («ipconfig -renew» in a Windows command prompt window), another reset, or power cycle.
- Ping the router: a TTL=64 response indicates normal operation, while TTL=100 usually indicates a TFTP server awaiting firmware upload. TFTP usually only is available in the first couple seconds at power-up, and may time out if the file upload is larger than OEM versions. See Tftp_flash, and note only OEM firmware may work for TFTP, possible trailed builds.
- The firmware upload process may respond with «Upload Failed» if using the wrong file type, kernel, or size of DD-WRT (or may just brick). E.g. This may occur through the web GUI if you use a *wrt54g.bin version when you should have selected the generic version. It may also be that your router requires the mini version to be flashed before the full version. Ensure you have the right version, as described in the first section.
- See Recover from a Bad Flash or try a different internet browser to upload the firmware.
- If logging in fails with the default username/password, reset again.
[edit] Client Mode Setup
Ensure the secondary client router is on a different subnet than the primary host router. Thus, if the primary router IP address is 192.168.A.x, you need to set the client router to an IP of 192.168.B.x. For example, if the host router uses 192.168.1.1, configure your client router to e.g. 192.168.2.x.
Broadcom routers: read the Peacock thread
- Recommended: reset the router
- Connect a cable from your computer to the LAN port on your router.
- Set your computer to a static IP address (e.g. 192.168.1.7 subnet 255.255.255.0)
- Open a web browser and connect to 192.168.1.1 to view the DD-WRT GUI.
- Set a username and password, if not asked for this, do a proper reset
- Go to Wireless->Wireless Security and enter the Security Mode and other information same as Primary
- Hit SAVE (not apply)
- Go to the Wireless->Basic Settings and change the Wireless Mode to «Client»
- Set the Wireless Network Name (SSID) to exactly match the primary router. Check spelling and case!
- If multiple routers broadcast the same SSID, to connect to a specific one (i.e. the primary router, instead of a repeater), enable MAC Filtering on the Wireless Tab, and add the specific device’s MAC Address.
- MAC Address can be found on the «Site Survey» page, linked from the Wireless tab in Status
- (Optional) If available, in Wireless tab (or under Advanced), set (or disable) the Ack Timing in meters
- Hit SAVE (not apply)
- Go to Setup->Basic Setup and change Connection Type to Static IP or «Automatic Configuration — DHCP»
- Static IP allows easier access remote GUI, SSH, or telnet access is enabled under Administration
- If the client router is externally managed (e.g. in a college dorm), go to Setup->Basic Setup, set the WAN port protocol as needed for the AP (usually Static, DHCP, or PPPoE), and enter info provided by your ISP. This is the setting that is bonded to the wireless interface.
- This is what a computer (wired or wireless) connected to the ROUTER would use to gain access to the network, not to be confused with the settings required to gain access to the WAN by the ROUTER.
- The device should be in GATEWAY mode (not ROUTER), otherwise Masquerade/NAT does not happen.
- In Network Setup set the Local IP Address to a different subnet from the Primary (e.g. 192.168.2.1)
- (Optional) Set your gateway to the IP address of your client router (same as the previous step)
- (Optional) Set Static DNS servers in the Network Address Server Settings section if your WAN type does not provide them or you want to use different ones than the AP provides.
- (Recommended) Change your Time Zone and DST to match where you are.
- (Optional) Set a «Server IP/Name» in Time Setting section for NTP (blank uses a hidden default server)
- Hit SAVE (not Apply)
- (Optional) In Security->Firewall, disable SPI Firewall if security between AP & Client is not needed
- Hit Apply, then set the computer back to auto IP and DNS if needed (replug the LAN cable if not working)
- The Client router should connect to the AP within a minute, otherwise unplug the router for 30 sec
- Once connected and working, configure as needed (e.g. Virtual Interface for wireless connection)
[edit] Going Offline/Before Implementation
- Do NOT use a wireless connection to GUI upload firmware. Use a wired (LAN) connection.
- Disable any wireless adapters (see the ) on your system to ensure that none are used for the transfer.
- Recommended: AFTER you are offline, disable your anti-virus software, as as a false positive detection could interrupt the upload. Disable all firewalls and security (see Disable Security. Restore security measures before going back online.
Flashing Your Router with DD-WRT Firmware
Three methods of flashing are covered below: using the router’s online interface (Method 1), via TFTP (), and with the Command Line Interface ( — use this if wirelessly connected). The router model and/or location may dictate what you use.
[edit] Где скачать прошивку?
НЕ ИСПОЛЬЗУЙТЕ БАЗУ ДАННЫХ ROUTER DATABASE: если это не указано в вики конкретного устройства.
Она НЕ содержит рекомендуемых сборок, и даты сборки прошивок не верны.
См. различия в функциональности различных сборок DD-WRT в статье (устарело).
- Маршрутизаторы Atheros и Ralink используют пользовательские сборки с различными наборами функций: не запрашивайте другую сборку.
- Примечание. Маршрутизаторы Atheros и Ralink с флэш-памятью 4 МБ не будут иметь таких функций, как Hotspot или VPN (необходимо >= 8 МБ).
Сборки DD-WRT могут быть бета-версиями с частичным или без тестирования на реальных маршрутизаторах
Используйте их с осторожностью!. Основные (BrainSlayer) места хранения прошивок:
Основные (BrainSlayer) места хранения прошивок:
* НАЧИНАЯ С ИЮЛЯ 2019 Г. KONG ПРЕКРАТИЛ РАЗРАБОТКУ DD-WRT.*
Приведенные ниже ссылки в основном не работают.
Шаг 2. Выберите правильную папку сборки:
- Сборки Atheros, Ralink и Marvel находятся в папках с именами моделей маршрутизаторов. Убедитесь, что выбрали правильную версию!
- Маршрутизаторы Broadcom на базе ARM (и MIPS с флеш-памятью NAND, например: Netgear WNDR4500) также имеют папки с именами моделей.
- Маршрутизаторы Broadcom на базе MIPS с флэш-памятью NOR используют одну или несколько папок broadcom*.
- broadcom
Сборки со строкой special в имени папки могут проходить проверку подлинности с помощью 802.11x в режиме клиента (PEAP, TLS и т.д.).
— сборки с ядром 2.4 для очень старых маршрутизаторов (например: Linksys WRT54Gv5).
- broadcom_K26
Некоторые маршрутизаторы могут использовать k2.4 или k2.6, другие могут использовать k2.6 или k3.x, но многие могут превратиться в кирпич в остальных версиях.
— сборки с ядром 2.6 для старых маршрутизаторов, но многие маршрутизаторы, работающие на K26, также могут работать на K3X (например, Linksys E2500) с лучшей поддержкой USB, а k3.10+ поддерживают ускоренный SFE NAT с 33006.
- broadcom_K3X
Сборки K3X расширяют NVRAM по умолчанию.
— сборки с ядром 3.x для новых моделей Broadcom с MIPS и флэш-памятью NOR (например, Asus RT-N66U).
- broadcom
- x86 и x64 (x86_64): см. X86.
Шаг 3. Загрузите нужный файл в папку.
Broadcom: всегда читайте вики-страницу конкретной модели для подробной информации. Для начальной инициализации используйте сборку trailed build (с названием модели в имени файла), за исключением особых случаев, таких как различия между nv60k и nv64k, или сборок Micro маршрутизаторов, особенно тех, на которых запущена заводская прошивка VXworks и имеют специальную процедуру замены CFE (загрузчика). Для обновления используйте сборку generic (nv64k, nv60k или ни то, ни другое). Примечание: некоторые модели требуют обновления по TFTP.
Другие: файл factory-to-ddwrt предназначен для перепрошивки маршрутизатора с заводской прошивки на DD-WRT. Файл webflash предназначен для обновления со старой на новую версию DD-WRT
Обратите внимание, что некоторые модели будут иметь только файл factory-to-ddwrt и сборку trailed build (с названием модели в имени файла). В этом случае используйте сборку trailed build для обновления
Примечание: TP-Link и модели других производителей могут иметь версии прошивки для конкретных регионов, US (США), IL (Израиль), RU (Россия), TW (Тайвань) и WW (или не указано для всего мира (англ. World-Wide)). Если вы не уверены, какой файл прошивать, то лучше поискать на форумах, чем рисковать маршрутизатором.
Шаг 4. См. Supported_Devices, инструкцию по установке, страницу вики конкретной модели маршрутизатора и форум для инструкций по конкретному маршрутизатору о том, как прошить маршрутизатор, особенно для первоначальной перепрошивки.
[edit] Карта меню
Выберите один из пунктов меню ниже для получения информации о настройках на этой странице меню.
(Структура меню по состоянию на июнь 2012 г. из прошивки svn19342 Mega).
- Setup
- Basic Setup
- DDNS
- MAC Address Clone
- Advanced Routing
- VLANs
- Networking
- EoIP Tunnel
- Wireless
- Basic Settings
- Radius
- Wireless Security
- MAC Filter
- Advanced Settings
- WDS
- Services
- Services
- VPN
- USB
- NAS
- Hotspot
- SIP Proxy
- My Ad Network
- Security
- Firewall
- VPN Passthrough
- Access Restrictions
- NAT/QoS
- Port Forwarding
- Port Range Forwarding
- Port Triggering
- UPnP
- DMZ
- Quality of Service — QoS
- Administration
- Management
- Keep Alive
- Commands
- WOL
- Factory Defaults
- Firmware Upgrade
- Backup
- Status
- Router
- WAN
- LAN
- Wireless
- Bandwith
- Sys-Info
- My Page